How to Replace a Vacuum Belt: A Complete Guide to Restoring Suction and Indoor Air Quality

If you have ever noticed your vacuum leaving behind pet hair, crumbs, or dust on your carpets, you are likely dealing with a broken or stretched vacuum belt. A malfunctioning vacuum doesn’t just leave your floors looking dirty; it directly impacts the air you breathe. When your vacuum fails to pull allergens out of the carpet fibers, everyday foot traffic kicks those particles right back into your indoor air.
Understanding exactly how to replace a vacuum belt is an essential maintenance skill for any homeowner. It ensures your machine runs efficiently, protecting both your investment and your family’s respiratory health. In this comprehensive guide, we will walk you through the process step-by-step so you can get your vacuum cleaning effectively again.
By following a few simple steps, you can swap out that old, worn belt for a fresh one in just a few minutes. Let’s dive into the easiest way to repair your vacuum and keep your home’s air clean, fresh, and free of allergens.
Quick Answer
To quickly learn how to replace a vacuum belt, start by unplugging the machine for safety. Unscrew and remove the bottom base plate to expose the brush roll. Lift the brush roll out and slide the broken belt off the motor shaft. Loop your new belt around the metal motor shaft first, then stretch it over the brush roll. Reinsert the brush roll, reattach the base plate, and test your vacuum cleaner.
Why a Working Vacuum Belt Matters for Indoor Air Quality
It is easy to think of a vacuum cleaner as just a tool for keeping floors tidy. However, for homeowners with allergies, asthma, or pets, it is a primary defense against indoor air pollution.
Your vacuum’s brush roll, powered by the vacuum belt, agitates the carpet fibers. This physical brushing action loosens embedded dust mites, pet dander, and pollen so the vacuum’s suction can pull them into the HEPA filter.
When the belt stretches or snaps, the brush roll stops spinning. You might still have suction, but you are only cleaning the very surface of the rug. The heavy particulate matter remains trapped deep in the fibers. According to the Asthma and Allergy Foundation of America’s recommendations for controlling indoor allergens, regular and effective vacuuming is critical to removing asthma triggers from your living spaces.
If your vacuum is not operating at peak performance, those trapped particles are eventually disturbed by walking or playing children, sending them airborne. Keeping your vacuum belt in top condition ensures your home’s filtration system starts at the floor level.
Signs You Need to Replace Your Vacuum Belt
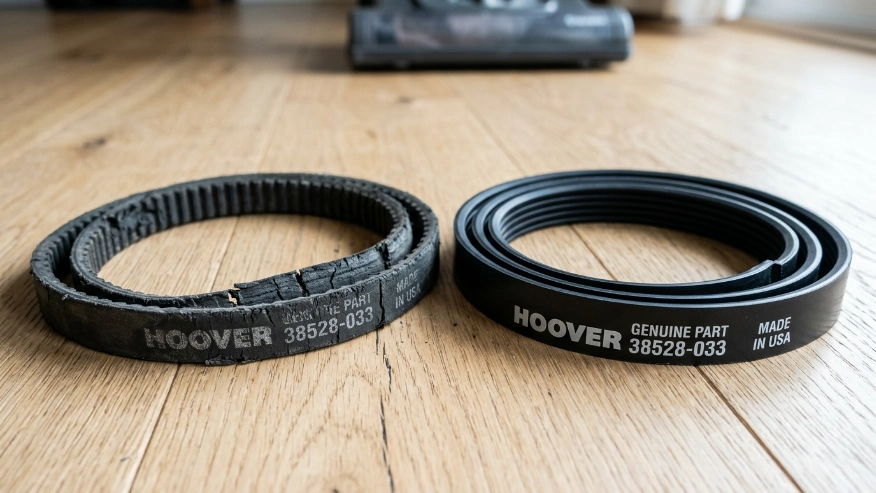
You don’t always have to wait for the belt to snap in half to know it is time for a replacement. Belts degrade over time due to heat, friction, and normal wear and tear.
Look out for these common warning signs:
- A strong burning rubber smell: This happens when a jammed brush roll stops spinning, but the metal motor shaft keeps turning, creating friction against the stationary rubber belt.
- Noticeable loss of cleaning power: If your vacuum is leaving lint, string, or pet hair behind on carpets, the brush roll is likely moving too slowly because of a stretched belt.
- The brush roll easily stops: Turn the vacuum on and carefully watch the brush roll. If it stops spinning the moment it touches the carpet, the belt lacks the tension needed to do its job.
- Visible damage: If you flip the vacuum over and see cracks, fraying, or a loose, sagging belt, it is time for an immediate replacement.
Step-by-Step: How to Replace a Vacuum Belt Safely
Replacing a vacuum belt is a DIY-friendly task that requires no specialized training. In most cases, all you need is a Phillips-head screwdriver and a clean workspace.
Step 1: Unplug the Vacuum Cleaner
Safety first. Never attempt to perform maintenance on a vacuum cleaner while it is plugged into a wall outlet. Even if the power switch is off, an accidental bump could engage the motor, putting your fingers at serious risk. Unplug the cord and wrap it up so it is out of your way.
Step 2: Access the Brush Roll
Lay the vacuum cleaner flat on its back so the bottom of the cleaning head is facing you. Most upright vacuums have a bottom base plate secured by anywhere from two to six screws.
- Use your screwdriver to remove these screws.
- Set the screws aside in a small bowl so they do not get lost in your carpet.
- Gently pull the base plate off to expose the roller brush and the belt assembly.
Step 3: Remove the Roller and the Old Belt
If the belt is broken, it will simply fall out. If it is stretched but still intact, you will need to lift the roller brush out first.
- Grasp the roller brush on both ends and pull straight up.
- Slide the old belt off the motor shaft (a small metal peg usually located toward the back of the cleaning head) and off the roller brush.
- Discard the old belt immediately so you don’t confuse it with the new one.
Step 4: Clean the Roller Brush (Crucial Step)
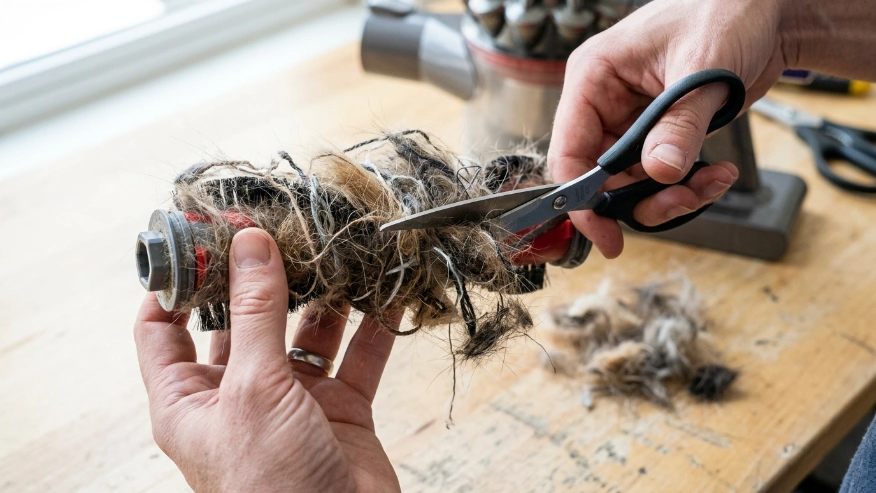
Before installing the new belt, you must clean the brush roll. Over time, hair, string, and carpet fibers wrap tightly around the roller and its end bearings.
- Use scissors to carefully snip away tangled hair.
- Pull all debris away from the end caps so the roller can spin freely.
- If the roller is jammed with hair, the new belt will overheat and snap almost immediately.
Step 5: Install the New Vacuum Belt
Now it is time to put everything back together.
- Slide the new belt over the metal motor shaft first.
- Next, thread the other end of the belt through the designated smooth channel on your clean roller brush.
- Important: You will have to pull firmly to stretch the belt over the roller. It is supposed to be very tight!
Step 6: Reinsert the Brush Roll and Test
Push the ends of the roller brush back into their slots on the sides of the vacuum head. You may need to spin the roller slightly by hand to make sure the belt is seated correctly and is not twisted.
- Snap the bottom base plate back into place.
- Reinsert and tighten all the screws.
- Plug the vacuum in, turn it on, and listen. It should sound smooth, and the brush roll should spin vigorously.
Choosing the Right Replacement Belt
Not all vacuum belts are created equal. Buying the wrong size can lead to poor performance or immediate belt failure.
Always check your vacuum cleaner’s model number, which is usually found on a silver or white sticker on the back or bottom of the machine. Use this number to order the exact original equipment manufacturer (OEM) part.
While generic aftermarket belts might be cheaper, they are often made of inferior rubber compounds that stretch out rapidly. For the best suction and allergen removal, stick to the brand-name replacements designed specifically for your model.
Expert Tip: Buy vacuum belts in packs of two or three. Since they are inexpensive, keeping a spare in your utility closet means you won’t have to delay your weekend cleaning routine or suffer through poor indoor air quality while waiting for a part to arrive in the mail.
Helpful Table: Vacuum Troubleshooting Guide
Use this quick reference table to determine if your vacuum belt is the true culprit behind your cleaning and air quality issues.
| Symptom / Warning Sign | Likely Cause | Homeowner Solution |
|---|---|---|
| Smell of burning rubber | Jammed brush roll rubbing against a spinning belt. | Turn off immediately. Clean roller brush; replace damaged belt. |
| Brush roll won’t spin | Belt is snapped, severely stretched, or disconnected. | Open base plate and replace the vacuum belt. |
| Poor suction on carpets | Belt is loose; brush roll lacks tension to agitate fibers. | Install a new belt for proper tension. |
| Loud rattling noise | Debris caught in the roller, or bearings are failing. | Clear debris. If noise persists, the entire roller may need replacing. |
| Vacuum spits dirt back out | Clogged hose, full bin, or heavily soiled HEPA filter. | Empty bin, clear hose blockages, and replace air filters. |
Common Mistakes Homeowners Should Avoid
When learning how to replace a vacuum belt, homeowners frequently make a few simple errors that can ruin their brand-new part.
Keep these practical warnings in mind to ensure a successful repair:
- Failing to clean the bearings: If you replace the belt but leave massive clumps of dog hair wrapped around the roller bearings, the new belt will overheat and break on its first use.
- Twisting the belt: When stretching the belt over the motor shaft and brush roll, make sure it sits completely flat. A twisted belt will track incorrectly and quickly wear out.
- Buying the wrong size: Forcing a belt that is slightly too small puts excessive strain on the vacuum motor. Using one that is too large will result in slipping and zero cleaning power.
- Ignoring the HEPA filter: Replacing the belt fixes floor agitation, but if you don’t also clean or replace your vacuum’s HEPA filter, those agitated allergens will just blow right out the exhaust and back into your room.
Proper maintenance across the entire machine is required. As detailed in the EPA’s guide to indoor air quality, controlling pollutants at their source—like removing pet dander from carpets before it becomes airborne—is a cornerstone of a healthy home environment.
When to Consult a Professional Repair Service or Air Quality Expert
While changing a vacuum belt is easy, not every vacuum issue can be solved with a screwdriver and a $5 rubber ring.
You should consult a professional vacuum repair shop if:
- The motor makes a high-pitched screaming noise: This often indicates failing motor bearings, which requires specialized repair or a total machine replacement.
- The vacuum repeatedly snaps new belts: If you have installed the belt correctly, cleaned the brush, and the belt still breaks instantly, the motor shaft or roller itself may be warped or damaged.
- Electrical issues: If the vacuum sparks, smokes (not just a rubber smell), or the power cord is frayed, stop using it immediately. Do not attempt DIY electrical repairs.
Furthermore, if your family is suffering from severe indoor allergies despite regular vacuuming and changing the belt, your vacuum alone may not be enough.
In these cases, consider consulting an HVAC professional to assess your home’s central ventilation. You may need to invest in a dedicated, high-CADR (Clean Air Delivery Rate) room air purifier to properly scrub the air of the particulates your vacuum cannot catch.
FAQs
How often should you replace a vacuum belt?
Under normal household use, you should inspect your vacuum belt every 6 to 12 months. If you vacuum multiple times a week or have several shedding pets, you may need to replace the belt every 3 to 6 months to maintain peak performance.
Are vacuum belts universal?
No, vacuum belts are not universal. They come in specific lengths, widths, and thicknesses designed for specific motor speeds and brush roll sizes. Always buy the exact belt recommended for your specific vacuum cleaner model.
Why does my new vacuum belt smell like burning rubber?
A brief, faint rubber smell can be normal for the first few minutes as a new, tight belt breaks in. However, if the smell is strong or produces smoke, turn off the vacuum immediately. The brush roll is likely jammed, or the belt is incorrectly installed and rubbing against the housing.
Can you run a vacuum cleaner without a belt?
You can run the vacuum, and it will still have suction through the hose, but the floor brush will not spin. Without a spinning brush roll, you cannot effectively clean carpets or remove embedded allergens. It should only be used on hard floors without a belt.
Will a broken vacuum belt affect my home’s air quality?
Yes. A broken belt stops the brush roll from agitating the carpet. This leaves deeply embedded dust, pollen, and pet dander trapped in your rugs. When people walk on the carpet, those allergens are released into the air, lowering your indoor air quality.
Do all vacuums have belts?
Most traditional upright vacuums and powered canister vacuum heads use belts. However, some modern, high-end stick vacuums and robotic vacuums use direct-drive motors inside the brush roll, which do not rely on traditional rubber belts.
Conclusion
Understanding how to replace a vacuum belt is a quick, inexpensive, and highly effective way to extend the life of your appliance. More importantly, it is a crucial step in maintaining excellent indoor air quality. By keeping the brush roll spinning vigorously, you ensure that deeply embedded dust mites, pet dander, and other allergens are safely trapped in your vacuum’s filter rather than floating in the air your family breathes.
Remember to always prioritize safety by unplugging the machine, take the extra time to clean hair and debris from the roller bearings, and ensure you purchase the correct OEM belt for your specific model.
Don’t let a stretched-out $5 rubber belt compromise your home’s cleanliness or your respiratory health. Take a few minutes to check your vacuum belt today, and if it’s showing signs of wear, swap it out for a fresh one so you can breathe easier tomorrow.