How to Clean a Cordless Vacuum to Protect Your Indoor Air Quality

Have you ever noticed a dusty, stale smell filling your living room right after you finish vacuuming? That unpleasant odor is a major warning sign. When you don’t know how to clean a cordless vacuum properly, your trusty cleaning tool can actually become a source of indoor air pollution.
Over time, dust, pet dander, and microscopic allergens clog your vacuum’s filtration system. Instead of trapping these irritants, a dirty vacuum motor will exhaust fine particles right back into the air you breathe. This completely defeats the purpose of cleaning, especially for families dealing with allergies or asthma.
In this guide, we will walk you through exactly how to deep-clean your cordless vacuum. You will learn how to safely wash the components, maintain your HEPA filters, and ensure your vacuum leaves your floors—and your home’s air—fresher than before.
Quick Answer
To clean a cordless vacuum, first remove the battery to ensure safety. Empty the dustbin into a trash bag, then wipe it clean with a damp microfiber cloth. Remove the filters; tap away loose dust and wash any washable filters with cold water. Use scissors to cut away tangled hair from the motorized brush roll. Check the wand for blockages, wipe down the exterior, and let all washed parts air-dry completely for 24 hours before reassembling.
Why a Clean Vacuum is Crucial for Home Air Quality
Cordless vacuums are incredibly convenient, but their compact size means they hold less dirt and their filters clog much faster than traditional upright models.
When a vacuum filter is saturated with dirt, the machine loses suction power. More importantly, the internal air pressure forces microscopic pollutants past the clogged filter and out through the exhaust vents. According to the EPA’s guide to indoor particulate matter, fine particles (known as PM2.5) can remain airborne for hours and easily travel deep into your lungs.
By maintaining your vacuum, you are actively protecting your respiratory health. A clean, unblocked vacuum ensures that the dust you suck up out of your carpets actually stays trapped inside the machine.
Essential Tools for Cleaning Your Vacuum
Before you start taking your vacuum apart, gather a few simple household supplies. Having the right tools on hand will make the process fast and hygienic.
- A large plastic trash bag: To empty the dustbin and tap out filters without creating a dust cloud.
- Microfiber cloths: For wiping down plastic parts without leaving lint behind.
- A pair of scissors or a seam ripper: To safely slice through hair tangled around the brush roll.
- An old toothbrush or soft cleaning brush: For gently scrubbing crevices and mesh screens.
- Mild dish soap: For washing non-motorized plastic components.
Step-by-Step: How to Clean a Cordless Vacuum
Follow these steps once a month to keep your vacuum operating at peak efficiency and to prevent allergens from recirculating in your home.
Step 1: Prep the Machine and Disconnect Power
Always remove the power source first. Cordless vacuums have sensitive electronics and powerful lithium-ion batteries.
Detach the battery pack from the main unit and set it safely aside. If your vacuum has a built-in battery, make sure it is unplugged from the wall charger and the power switch is firmly in the “off” position.
Next, detach all the components. Separate the motorized floor head, the long wand, the dustbin, and the main motor housing. Working with individual pieces makes deep cleaning much easier.
Step 2: Empty and Wash the Dustbin
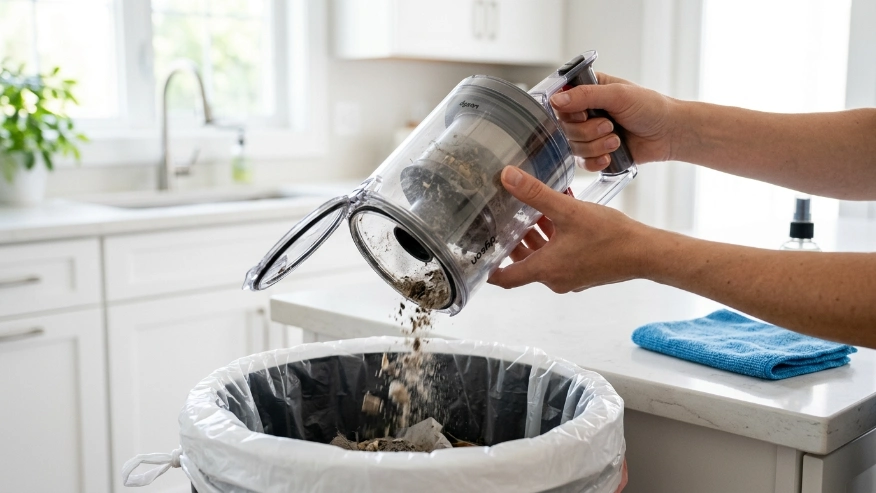
Take the dustbin outside or hold it deep inside a large trash bag before opening it. This prevents a cloud of fine dust from blowing back into your face.
Empty the loose debris, then use your soft brush to gently sweep away dust clinging to the internal metal or plastic mesh shrouds.
If your dustbin is completely removable and contains no electrical contacts, you can wash it in the sink with warm water and a drop of mild dish soap. Never submerge a dustbin that has metal electrical pins attached to it. If you cannot wash it, simply wipe the inside thoroughly with a slightly damp microfiber cloth.
Step 3: Clean and Maintain the Filtration System
This is the most important step for maintaining your indoor air quality. Most modern cordless vacuums feature at least two filters: a pre-motor filter (often a foam or felt pad) and a post-motor HEPA filter.
Check your manufacturer’s manual to see if your filters are washable. If they are, rinse them under cold, running water until the water runs completely clear. Do not use soap, and do not scrub HEPA filters with a brush, as this will destroy the delicate micro-fibers that trap allergens.
If your filters are not washable, gently tap them against the inside of your trash can to knock loose the heavy dust. Because high-efficiency filters degrade over time, the Asthma and Allergy Foundation of America recommends replacing HEPA filters regularly to effectively control indoor allergens.
Step 4: Untangle the Motorized Brush Roll
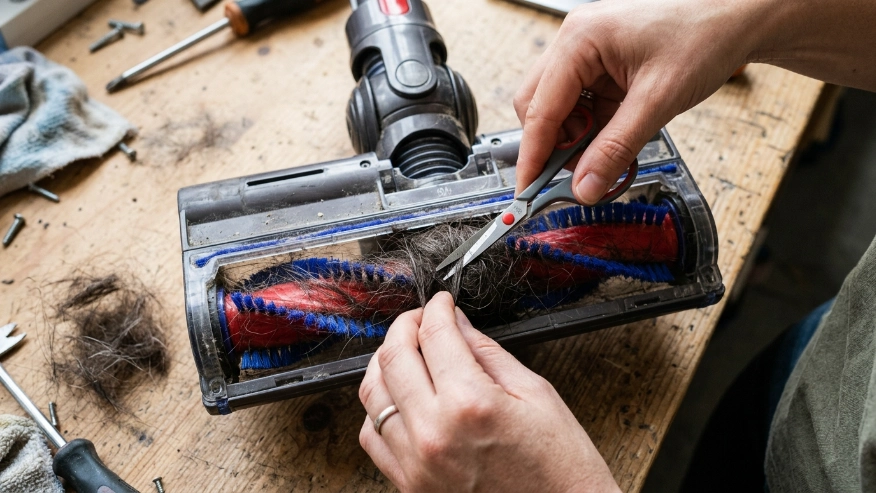
Flip the floor head over so you can see the rotating brush. Over time, hair, string, and carpet fibers wrap tightly around this roller.
When the brush roll is choked with hair, it strains the vacuum motor and stops agitating the carpet fibers. This leaves heavy dust and pet dander trapped deep in your rugs.
Take your scissors or a seam ripper and carefully slide the blade under the wrapped hair. Cut in a straight line down the length of the roller. Once the hair is severed, you can easily pull it away with your fingers. Wipe down the plastic housing around the brush roll to remove built-up grime.
Step 5: Clear the Wand and Attachments
The long tube connecting the floor head to the motor is a prime location for hidden blockages. A partial clog here reduces suction and creates a breeding ground for odor-causing bacteria.
Look through the wand toward a bright light. If you cannot see completely through to the other side, there is a blockage.
Use a long, flexible cleaning brush or a broom handle to gently push the debris out. Never use a sharp object like a wire coat hanger, as this can scratch the plastic or puncture the flexible hosing. Finally, wipe down your crevice tools and upholstery brushes with a damp cloth.
Step 6: The Crucial Drying Phase
This step requires patience, but it is vital for your safety and the longevity of your machine. Every washed component must be 100% dry before reassembly.
If you put a slightly damp filter back into a dark, airtight vacuum, mold and mildew will begin growing within days. The next time you turn the vacuum on, it will blast those mold spores directly into your breathing air.
Leave all washed parts in a warm, well-ventilated area for a minimum of 24 to 48 hours.
Expert Tip: Never use a hairdryer or place vacuum filters on a radiator to speed up the drying process. The high heat can warp the plastic framing and melt the delicate filtration fibers, permanently ruining the filter’s ability to trap fine dust.
Vacuum Maintenance Schedule for Optimal Air Quality
To keep your home smelling fresh and your vacuum running smoothly, follow this simple routine maintenance schedule.
| Vacuum Part | Action Required | Recommended Frequency |
|---|---|---|
| Dustbin | Empty debris and wipe down | After every use |
| Brush Roll | Cut away tangled hair and string | Once a month |
| Pre-Motor Filter | Rinse with cold water (if washable) | Once a month |
| HEPA Filter | Tap out loose dust / Wash if permitted | Every 1-2 months |
| All Filters | Complete replacement | Every 6-12 months |
Common Mistakes Homeowners Should Avoid
Even with the best intentions, it is easy to accidentally damage your cordless vacuum or compromise your home’s air quality. Avoid these frequent pitfalls:
- Vacuuming wet spills: Standard cordless vacuums are strictly for dry debris. Vacuuming wet messes will ruin the motor, destroy the paper HEPA filter, and cause severe mold growth inside the machine.
- Ignoring the rubber seals: The small rubber gaskets around the dustbin and filter housing keep dust inside. If you notice these seals are cracked or missing, the vacuum will leak contaminated air.
- Using harsh chemicals: Never clean the inside of your vacuum with bleach or heavy chemical sprays. The motor will heat up these chemical residues and vaporize them into your indoor air.
- Skipping filter replacements: Washing a filter does not make it last forever. Even washable filters eventually become permanently clogged with microscopic particles and must be replaced.
When to Consult an Air Quality or HVAC Professional
Cleaning your cordless vacuum is a fantastic step toward a healthier home, but a vacuum can only clean the surfaces you reach. It cannot actively clean the air circulating throughout your rooms.
If you consistently notice excessive dust building up on your furniture just days after cleaning, or if your family is suffering from persistent indoor allergies, your home may have a broader ventilation issue.
You should consult a certified HVAC technician or indoor air quality specialist if:
- Your home constantly smells stale or dusty, regardless of how often you clean.
- You notice excessive dust accumulating around your HVAC supply vents.
- You are considering a whole-home HEPA filtration system or UV-C purification upgrade.
A professional can assess your ductwork for leaks, test your indoor humidity levels, and recommend appropriate, sized-to-fit air purifiers. Organizations like the American College of Allergy, Asthma, & Immunology frequently highlight that while vacuuming is essential, true symptom relief often requires a combination of source control, ventilation, and dedicated air filtration.
FAQs
Can I wash a HEPA filter in my cordless vacuum?
It depends entirely on the manufacturer. Some cordless vacuums use washable HEPA filters that can be rinsed with cold water. However, many use paper-based HEPA filters that will be instantly destroyed by water. Always check your user manual before getting a filter wet.
Why does my cordless vacuum smell like a wet dog?
That odor usually means your vacuum has vacuumed up moisture or organic matter (like pet hair or food crumbs), which is now decaying inside the dustbin or the filters. A thorough cleaning of the bin and replacing the filters will eliminate this smell.
How often should I clean my cordless vacuum?
For the best indoor air quality, empty the dustbin after every single use. You should perform a deep clean—washing the bin, clearing the brush roll, and cleaning the filters—at least once a month.
Does a dirty vacuum cause allergies?
Yes. When a vacuum filter is clogged, the machine loses its ability to trap microscopic particles. The force of the motor will then blow fine dust, pet dander, and dust mites directly out of the exhaust and into the air, triggering allergy and asthma symptoms.
How long does a cordless vacuum battery last before it needs replacing?
With regular use, most lithium-ion batteries in cordless vacuums last between two to four years. If you notice your vacuum is dying after only a few minutes of use, or if the suction power drops dramatically even when the machine is clean, it is likely time to purchase a replacement battery.
Can I use essential oils on my vacuum filter to make my house smell good?
No, you should avoid this. Putting liquid essential oils on a vacuum filter can degrade the filter material and cause dirt to clump up. Additionally, dispersing aerosolized essential oils can introduce Volatile Organic Compounds (VOCs) into your air, which may irritate sensitive lungs.
Conclusion
Knowing how to clean a cordless vacuum is about much more than just appliance maintenance; it is a vital part of managing your home’s indoor air quality. A clean vacuum effectively traps dust, pet dander, and irritants, while a neglected vacuum simply blasts those same pollutants back into your breathing zone.
By taking just 15 minutes a month to empty the bin, wash the washable parts, untangle the brush roll, and maintain your HEPA filters, you will drastically extend the life of your machine. More importantly, you will ensure that your home remains a safe, breathable sanctuary for you and your family.
Make it a habit to check your vacuum’s filters this weekend. If they are dark gray, caked in dust, or smell stale, it is time for a deep clean or a fresh filter replacement!