How to Replace a Cordless Vacuum Battery (and Protect Your Home’s Air Quality)

You are halfway through vacuuming the living room, trying to capture all that fresh pet hair and settled dust, and suddenly—your cordless vacuum dies. A failing battery doesn’t just leave your carpets looking messy; it directly impacts the air you breathe.
Learning how to replace a cordless vacuum battery is one of the easiest and most cost-effective ways to bring your favorite cleaning tool back to life. A high-quality stick vacuum, especially one equipped with a HEPA filter, acts as a mobile air purifier. It pulls dust mites, pollen, and pet dander out of your home’s surfaces before they can become airborne.
When your battery weakens, the motor’s suction power drops, which means you are simply pushing dirt around rather than trapping it. In this guide, we will walk you through exactly how to swap your vacuum’s battery safely, why it matters for your indoor air quality, and how to maintain your new battery for years to come.
Quick Answer
Wondering how to replace a cordless vacuum battery? First, purchase a compatible replacement battery directly from the manufacturer. Disconnect the vacuum from its charger. Depending on your model, either press the quick-release button or remove the retaining screws on the handle. Slide the old battery out, snap the new one in, secure it, and charge fully before use.
Why Your Vacuum Battery Health Matters for Indoor Air
Most homeowners think of their vacuum purely as a floor-cleaning tool. In reality, it is a critical component of your home’s respiratory defense system.
When your cordless vacuum battery starts to degrade, the motor cannot achieve the high RPMs necessary for deep suction. Instead of pulling allergens safely into the dustbin, a weak vacuum agitates settled particles, launching them into your breathing zone. According to the Asthma and Allergy Foundation of America’s recommendations on allergen reduction, using a vacuum equipped with a HEPA filter weekly is vital to controlling indoor dust mites and pet dander.
If your battery is only lasting five minutes on a full charge, your vacuum isn’t cleaning your floors or your air. Restoring full power ensures your HEPA filtration system works exactly as designed.
Signs It Is Time to Replace Your Cordless Vacuum Battery
Before you spend money on a new battery, you need to ensure the battery is actually the culprit. Sometimes, what looks like a battery failure is actually an airflow blockage.
Look for these clear warning signs that your battery is at the end of its lifespan:
- Drastically reduced runtime: The vacuum dies after 3 to 5 minutes, even after charging overnight.
- Failure to hold a charge: The battery indicator lights drop from full to empty the moment you pull the trigger.
- Red flashing warning lights: Many modern vacuums (like Dyson or Shark) use a flashing red LED to indicate a dead battery cell.
- Loss of suction power on high settings: If the vacuum shuts off immediately when you engage “Max” or “Boost” mode, the battery can no longer output high-drain energy.
Step-by-Step: How to Replace a Cordless Vacuum Battery
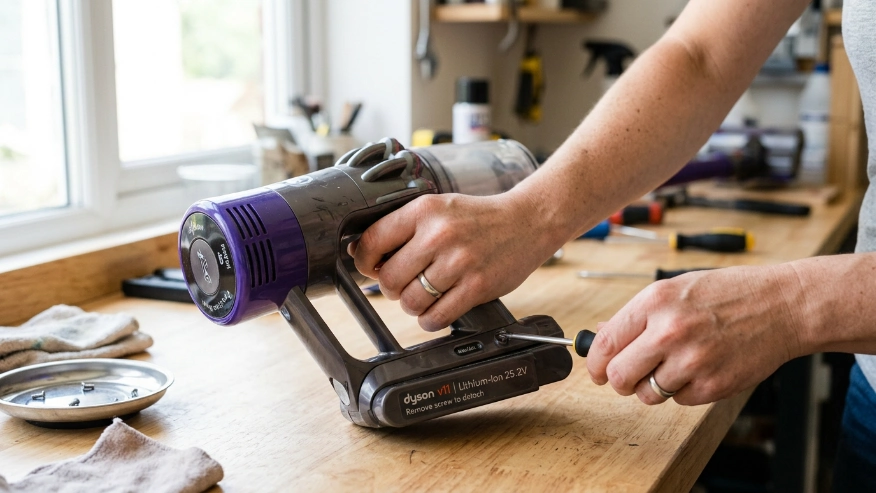
Replacing a battery is completely safe and usually only takes about five minutes. Just ensure you are working in a well-lit area on a flat surface, like a kitchen table.
Step 1: Unplug and Disconnect
Never attempt to replace a battery while the vacuum is plugged in or resting on its wall-mounted charging dock. Remove the main vacuum body (the motor and handle) from the wand and floor attachment to make it easier to handle.
Step 2: Identify Your Battery Type
Cordless vacuums generally use one of two battery attachment methods:
- Click-in batteries: These have a large release button (often red or grey). You simply press the button and slide the battery off the handle track.
- Screw-in batteries: These require a small Phillips-head screwdriver. You will typically find one screw on the back of the handle and two on the bottom of the battery pack.
Step 3: Remove the Old Battery
If you have a click-in battery, press the release latch firmly and pull downward.
If you have a screw-in model, carefully remove the two or three retaining screws. Keep these screws in a small bowl so they do not roll off the table. Once the screws are out, gently pull the battery away from the main motor housing.
Step 4: Install the New Battery
Take your new battery and align it with the tracks on the vacuum handle.
- For click-in models, slide it up until you hear a firm “click.”
- For screw-in models, slide the battery into place and gently hand-tighten the screws. Do not overtighten, as you can easily crack the plastic housing.
Step 5: Charge Fully Before First Use
Lithium-ion batteries are often shipped with a partial charge (around 30%) for safety during transit. Before you start vacuuming, place the unit on its charger and let it reach 100%. This helps calibrate the battery management system.
Choosing the Right Replacement Battery
When buying a replacement, you will see heavily discounted third-party batteries on sites like Amazon. While tempting, we strongly recommend buying Original Equipment Manufacturer (OEM) batteries directly from the brand (e.g., Dyson, Shark, Hoover).
Third-party batteries often lack proper thermal management systems. This can lead to overheating, poor performance, and in extreme cases, a fire hazard in your home. Protecting your home’s air quality is important, but preventing a fire hazard is paramount.
Expert Tip: To extend the life of your new cordless vacuum battery, avoid using “Max” or “Boost” mode for everyday cleaning. These high-drain settings generate excessive heat, which degrades lithium-ion cells much faster. Reserve the maximum setting only for stubborn messes or high-pile rugs.
Helpful Table: Battery Failure vs. Filter Clogs
Sometimes, a vacuum shutting off abruptly is not a battery issue at all. Modern vacuums have thermal sensors that shut the motor off if a clogged filter causes it to overheat. Use this table to diagnose your issue accurately.
| Symptom | Likely Cause | Recommended Solution |
|---|---|---|
| Dies after 2-5 minutes of use | Degraded Battery | Replace the battery pack. |
| Shuts off, feels hot to the touch | Clogged HEPA Filter | Wash or replace the HEPA/pre-motor filters. |
| Red flashing LED lights | Dead Battery Cell | Replace the battery pack immediately. |
| Blue lights on, but motor pulses on/off | Airway Blockage | Check the wand and cleaner head for trapped debris. |
| Won’t charge on the wall dock | Faulty Charger or Dock | Test the charging cable directly plugged into the battery. |
Safe Disposal of Lithium-Ion Batteries
You cannot throw your old lithium-ion vacuum battery into your regular household trash or recycling bin. If crushed in a garbage truck, these batteries can spark and cause massive fires.
Instead, you must recycle them at a designated e-waste facility or drop-off location. We highly recommend checking Call2Recycle’s battery disposal guidelines to find a free, safe drop-off location at a local hardware store or electronics retailer near you.
Common Mistakes Homeowners Should Avoid
Replacing the battery is simple, but how you treat your vacuum afterward dictates how long the new battery will survive. Avoid these common missteps:
- Leaving it in a hot garage or car: Heat is the ultimate enemy of lithium-ion batteries. Always store your vacuum inside your climate-controlled home.
- Vacuuming wet spills: Unless your vacuum is specifically rated as a wet/dry vac, sucking up moisture can easily short out the battery terminals and ruin the motor.
- Ignoring the HEPA filter: If your filter is clogged with dust, the motor has to work twice as hard to pull air. This drains the battery faster and drastically reduces its overall lifespan.
- Constantly draining it to zero: You do not need to fully drain modern lithium-ion batteries. In fact, putting it back on the charger when it reaches 20% is much healthier for the battery cells.
When to Consult an Air Quality or HVAC Professional
Your vacuum is a great tool for “source control”—removing allergens before they become a problem. As the EPA’s guide to indoor air quality notes, source control is always the most effective first step in improving the air you breathe.
However, if you have replaced your vacuum battery, clean your floors regularly, and still suffer from persistent indoor allergies, sneezing, or stale odors, a vacuum alone won’t solve the problem.
It may be time to consult an HVAC or air quality professional if:
- You notice excessive dust settling on your furniture within 48 hours of vacuuming.
- Your home’s ductwork hasn’t been inspected or cleaned in over five years.
- You are relying on room-sized air purifiers but still waking up with congestion.
A professional can help you explore whole-home air filtration systems, heavy-duty MERV 13 furnace filters, or mechanical ventilation solutions that work alongside your regular cleaning routine.
FAQs
Can I leave my cordless vacuum on the charger all the time?
Yes, most modern cordless vacuums have built-in battery management systems. Once the battery reaches 100%, the system stops drawing power, preventing overcharging. It is generally safe to leave it docked.
How long should a cordless vacuum battery last?
With regular use, a high-quality lithium-ion vacuum battery will typically last between 3 to 5 years. If you frequently use the “Max” suction mode, this lifespan may drop to 2 years due to heat degradation.
Is it cheaper to replace the battery or buy a new vacuum?
Replacing the battery is almost always more cost-effective. An OEM replacement battery generally costs between $80 and $150, whereas a brand-new HEPA cordless vacuum can easily cost $400 to $800.
Does a weak battery affect my vacuum’s suction power?
Yes. While some advanced vacuums maintain consistent suction until the battery dies entirely, many models will experience a drop in motor speed (and therefore suction) as the battery voltage drops. This leaves dirt and allergens in your carpets.
Will a third-party battery void my vacuum’s warranty?
In most cases, yes. Using unauthorized parts, especially electrical components like batteries, will usually void the manufacturer’s warranty. It is always safest to purchase OEM replacements.
Why does my vacuum pulse on and off when I pull the trigger?
Pulsing is usually a sign of an airflow blockage, not a battery issue. The vacuum is intentionally cutting power to prevent the motor from overheating. Check the wand, the floor head, and the dustbin for stuck debris or severe clogs.
Conclusion
Knowing how to replace a cordless vacuum battery is an essential skill for any homeowner looking to maintain a clean, allergen-free environment. When your vacuum operates at peak performance, its HEPA filtration system can effectively trap dust mites, pet dander, and pollen, keeping those irritants out of your indoor air.
By choosing an OEM replacement, avoiding constant use of the “Max” power setting, and keeping your vacuum’s filters clean, you can easily double the lifespan of your new battery. Take a few minutes to swap out that dying battery today, and get back to enjoying a cleaner home and fresher, healthier air.