
Monthly Vacuum Maintenance Checklist: A Complete 2026 Guide

Quick Answer
A monthly vacuum maintenance checklist should cover the dust bin or bag, filters, brush roll, hose, airflow path, attachments, seals, wheels, and visible electrical or battery components. Clean only the parts your manufacturer allows, and use vacuum maintenance guidance alongside your model’s manual when you’re unsure about a filter or removable part.
Your monthly vacuum checklist
- Empty the dirt: Empty the bin or check whether a vacuum bag needs replacement.
- Inspect filters: Remove loose dust and clean or replace filters only as your manual directs.
- Clear the brush: Remove hair, string, and fibers that restrict brush-roll movement.
- Check airflow: Inspect the floorhead, hose, wand, inlet, and connections for blockages.
- Inspect wear: Check seals, wheels, belts, cords, batteries, and charging contacts for visible trouble.
- Dry completely: Never reinstall a washable filter or wet component until it is fully dry.
Most important rule
- Your vacuum’s owner manual should override any generic maintenance schedule.
Monthly vacuum cleaner maintenance is one of the simplest home hygiene habits to build. It helps you catch restricted airflow, tangled hair, dirty filters, worn parts, and small problems before they turn into frustrating cleaning issues.
I like using one monthly inspection instead of waiting for obvious suction loss. The routine is quick once you know where dust and hair usually collect.
In This Guide
- What Should You Do During Monthly Vacuum Maintenance?
- How Do You Clean the Dust Bin or Check the Vacuum Bag?
- How Should You Check Vacuum Filters Without Damaging Them?
- How Do You Clean the Brush Roll, Hose, and Airflow Path?
- How Does Monthly Maintenance Change by Vacuum Type?
- What Warning Signs Mean Your Vacuum Needs Service?
- Monthly Vacuum Maintenance FAQ
What Should You Do During Monthly Vacuum Maintenance?
A monthly vacuum maintenance routine is a structured inspection of the parts that collect dirt, move air, contact your floors, or support the vacuum’s operation. It complements the smaller jobs you may already do after each cleaning session.
Definition: A monthly vacuum maintenance checklist is a recurring inspection and cleaning routine for a vacuum’s dirt collection system, filters, brush roll, airflow path, attachments, seals, wheels, and other accessible components.
Start by disconnecting the vacuum from power. Unplug corded models, and switch off cordless or robot vacuums before removing accessible components.
Then work through the machine in a consistent order. This makes it harder to overlook a clog or dirty connection.
- Empty and inspect the dust bin, or check the disposable bag.
- Inspect every user-accessible filter.
- Remove hair and fibers from the brush roll.
- Check the floorhead, wand, hose, and intake openings.
- Clean non-powered attachments if needed.
- Inspect seals, wheels, hinges, and connection points.
- Check the cord, plug, battery, or charging contacts visually.
- Reassemble only after washable components are fully dry.
Your monthly check does not replace everyday care. A full dust bin, packed vacuum bag, or badly tangled brush should be handled when you notice it.
Households with shedding pets, long hair, thick carpets, or frequent cleaning may need these inspections more often. Monthly is a useful reminder, not a universal manufacturer interval.
For homes where dust and allergens are a concern, the EPA’s indoor air quality guidance also emphasizes regular cleaning and appropriate high-efficiency filtration.
How Do You Clean the Dust Bin or Check the Vacuum Bag?
Start with the vacuum’s dirt collection system because an overfilled bin or bag can interfere with airflow. Bagless and bagged vacuums need slightly different monthly checks.
For a bagless vacuum
Empty the bin and look closely around the inlet, cyclone area, lid, and seals. Fine dust often settles in corners that are easy to miss during routine emptying.
- Check the fill line: Don’t routinely operate beyond the manufacturer’s maximum level.
- Inspect the inlet: Remove compacted hair or debris around the opening.
- Look at the seals: Check rubber edges for dirt, distortion, or obvious damage.
- Clean approved parts: Wash the bin only if your manufacturer’s instructions allow it.
- Dry before assembly: Moisture should not enter the powered section of the vacuum.
For a bagged vacuum
Check how full the bag feels and whether the vacuum has a bag-change indicator. Replace the bag when your manufacturer’s instructions or indicator says it is time.
Also inspect the bag collar and compartment. A poorly seated bag can allow debris to collect where it should not.
- Make sure the bag fits securely around its inlet connection.
- Remove loose dust from the compartment without pushing debris into the motor area.
- Check the compartment door and gasket for a secure fit.
- Use the correct replacement bag specified for your model.
A useful habit is to inspect the bin or bag before checking anything else. It gives you an immediate clue about how much debris the vacuum has handled since your last maintenance session.
How Should You Check Vacuum Filters Without Damaging Them?
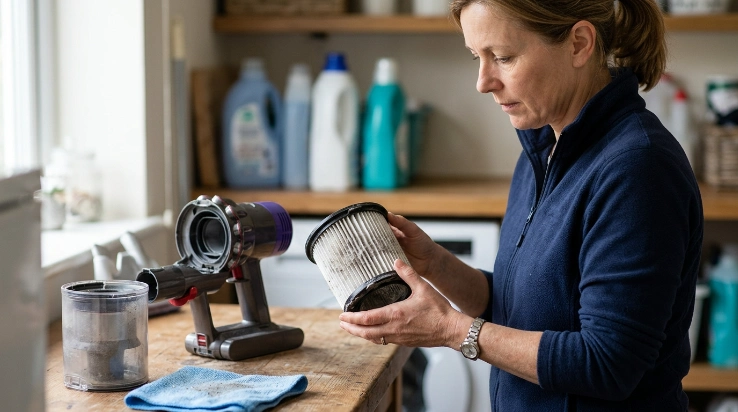
Inspect filters monthly, but don’t assume every filter should be washed. Filter materials and maintenance schedules vary widely between vacuum models.
The safest rule is simple: wash a filter only when the manufacturer specifically identifies it as washable. Otherwise, follow the recommended cleaning or replacement method.
What should you look for?
- Visible dust: Look for a heavy layer of dirt across the filter surface.
- Blocked pleats: Check whether fine debris has filled spaces in pleated filters.
- Physical damage: Replace filters that are torn, distorted, or damaged when required.
- Poor seating: Confirm the filter sits correctly inside its housing.
- Maintenance alerts: Follow filter notifications provided by your machine.
HEPA means high-efficiency particulate air. A vacuum advertised with HEPA filtration may still have model-specific requirements for cleaning, replacement, and sealing.
Don’t assume that a HEPA filter is washable simply because another vacuum’s filter can be rinsed. Filter construction differs.
The Asthma and Allergy Foundation of America notes that vacuum quality matters when controlling household allergens because some machines can return dust to the room.
That makes correct filter installation important. A clean filter that is installed incorrectly may not perform as its vacuum was designed to perform.
What if your filter is washable?
Follow the manufacturer’s washing directions exactly. Use only the recommended water temperature and cleaning method.
Allow the filter to dry completely before reinstalling it. Never place a damp filter back into a powered vacuum because moisture can reach areas that should remain dry.
I find it useful to schedule filter washing for a time when I won’t need the vacuum immediately. That removes the temptation to reinstall a filter before it has fully dried.
How Do You Clean the Brush Roll, Hose, and Airflow Path?
The brush roll and airflow path are common places for hidden restrictions. Hair, thread, lint, paper, and small objects can build up gradually.
Clean the brush roll first
Turn the floorhead over after disconnecting power. Look for hair and fibers wrapped around the roller, especially near its ends.
- Remove loose hair by hand when possible.
- Use the vacuum’s approved cleaning tool if one is supplied.
- Avoid cutting near electrical wires, flexible seals, or delicate bristles.
- Check that the roller can move as intended after cleaning.
If your vacuum uses a replaceable belt, inspect only what the manufacturer makes user-accessible. Cracks, obvious stretching, or repeated slipping can signal that the belt needs attention.
Follow the airflow path
Next, inspect every accessible section through which dirt travels. A partial blockage may reduce airflow without completely stopping suction.
- Floorhead: Check the intake opening and narrow neck behind the roller.
- Wand: Look through removable straight sections for trapped debris.
- Hose: Check both ends and feel for unusual hard spots.
- Bin inlet: Remove packed hair or dust around narrow openings.
- Attachments: Clear pet hair and lint from upholstery and crevice tools.
Don’t force sharp objects through a flexible vacuum hose. You can puncture the hose or damage internal wiring on powered systems.
For households managing dust mites or similar indoor allergens, the National Institute of Environmental Health Sciences recommends high-efficiency vacuum filtration as one part of a broader dust-control routine.
How Does Monthly Maintenance Change by Vacuum Type?
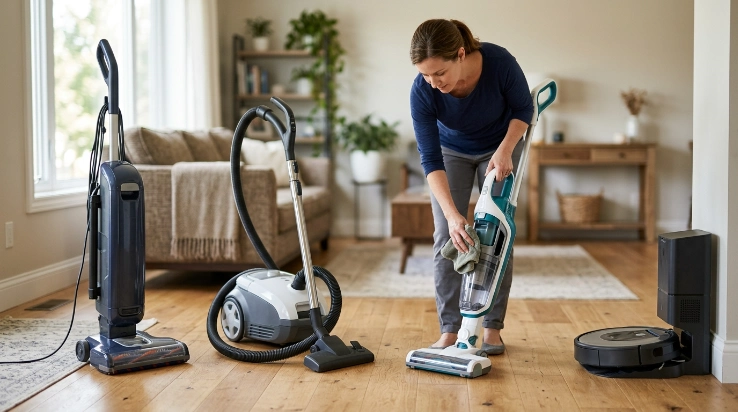
The basic checklist stays similar, but different vacuum designs have different problem areas. Focus your monthly inspection on the components your model relies on most.
| Vacuum type | Dust collection | Brush and airflow focus | Special monthly check |
|---|---|---|---|
| Upright | Bin or disposable bag | Floorhead, brush roll, hose, intake | Belt area, wheels, height-adjustment parts |
| Canister | Bin or disposable bag | Long hose, wand, powered floorhead | Hose connections, caster wheels, cord reel |
| Cordless stick | Usually removable dust bin | Brush roll, narrow air passages, filters | Battery housing and charging contacts |
| Robot | Onboard bin or auto-empty system | Main brush, side brushes, intake | Sensors, drive wheels, charging contacts |
Cordless vacuum monthly checks
Inspect battery and charging areas without opening sealed electrical components. Charging contacts should be clean, dry, and free of packed debris.
Stop using a battery that appears swollen, cracked, leaking, or unusually hot. Battery repair is not a routine DIY maintenance task.
Robot vacuum monthly checks
Robot vacuums need extra attention around sensors, wheels, side brushes, and charging contacts. Hair often winds around small wheel axles and brush ends.
- Wipe accessible sensors using the method specified by the manufacturer.
- Remove hair from the main and side brushes.
- Check drive and caster wheels for wrapped fibers.
- Empty and inspect the onboard bin.
- Clean auto-empty dock areas when your model includes one.
The NIH’s healthier-home guidance includes HEPA-filter vacuuming among practical ways to manage indoor dust. Proper maintenance helps ensure your vacuum remains assembled and used as its manufacturer intended.
What Warning Signs Mean Your Vacuum Needs Service?
Routine maintenance can solve many simple airflow problems, but some symptoms mean you should stop troubleshooting. Electrical problems, severe overheating, smoke, or damaged batteries deserve professional attention.
Check these warning signs during your monthly inspection
- Persistent suction loss: Suction remains weak after emptying the vacuum and clearing accessible blockages.
- Burning smell: A hot or electrical smell appears while the machine runs.
- Repeated shutdowns: The vacuum switches off despite normal airflow and a clean collection system.
- Unusual noise: Grinding, scraping, rattling, or high-pitched sounds continue after debris is removed.
- Damaged power cord: Cuts, exposed conductors, damaged plugs, or heat marks are visible.
- Battery damage: A cordless battery appears swollen, cracked, leaking, or abnormally hot.
- Broken housing: Cracks prevent covers, filters, bags, or seals from fitting correctly.
Expert Alert: Stop using a vacuum with electrical damage, smoke, repeated overheating, or a damaged lithium-ion battery. Have the machine inspected by a qualified appliance repair professional rather than opening powered components yourself.
A loss of suction does not automatically mean the motor has failed. Start with the bin or bag, filters, brush roll, hose, and accessible airflow passages.
If the problem remains after basic maintenance, professional diagnosis makes more sense than replacing random parts. That is especially true when the machine is still under warranty.
What should you never vacuum with a standard household machine?
Avoid liquids unless the machine is explicitly designed for wet pickup. You should also avoid hot ash, burning material, and hazardous renovation dust that requires specialized collection equipment.
If you’re dealing with extensive mold contamination or contaminated building materials, ordinary vacuum maintenance is not a substitute for proper remediation. The problem should be assessed using appropriate professional guidance.
Monthly Vacuum Maintenance FAQ
Should I clean my vacuum every month?
A monthly inspection is a useful starting point for many household vacuums, but some tasks need attention more often. Empty bins, full bags, tangled brush rolls, and obvious clogs should be handled whenever they appear.
Do vacuum filters need to be washed every month?
Not necessarily. Some manufacturers recommend regular washing for specific filters, while others use non-washable or replaceable filters. Check your vacuum’s manual before using water because washing the wrong filter can damage it.
How often should I remove hair from a vacuum brush roll?
Remove hair whenever it begins wrapping around the roller. Homes with pets or people with long hair may need brush-roll cleaning weekly, while lower-use households may find a monthly check sufficient.
Can a dirty vacuum filter reduce suction?
A heavily loaded filter can restrict airflow in many vacuum designs. Before assuming the motor is failing, check the filter, bin or bag, hose, wand, floorhead, and other accessible airflow passages.
Should I replace my vacuum bag before it is completely full?
Follow your vacuum’s bag indicator and manufacturer instructions rather than waiting until the bag is packed solid. Reduced airflow or a noticeably full bag are practical reasons to check whether replacement is due.
Can I wash the vacuum hose and attachments?
Only wash parts that your manufacturer identifies as water-safe. Powered floorheads, motorized tools, electrical connectors, and some flexible hoses should not be submerged unless the instructions specifically permit it.
What is the easiest way to remember monthly vacuum maintenance?
Attach it to an existing monthly routine. I like scheduling the inspection for the first weekend of each month, then checking the bin, filter, brush, hose, attachments, seals, and power system in the same order.
Keep the Routine Simple and Consistent
You don’t need to disassemble your vacuum every month. The goal is to keep the accessible dirt, filtration, brush, and airflow systems clean while spotting wear before it becomes a larger problem.
- Empty or inspect the dirt collection system.
- Check filters according to the manual.
- Remove hair from brushes and wheels.
- Clear accessible airflow passages.
- Inspect attachments, seals, cords, and batteries.
- Let every washable component dry completely.
Keep this monthly vacuum maintenance checklist with your cleaning supplies or phone reminders. A few consistent checks are easier than troubleshooting a vacuum after airflow, brushes, or filters have been neglected.
