
How Do You Inspect a Vacuum Belt?

Quick Answer
To inspect a vacuum belt, disconnect the vacuum from power, open the cleaner head only as your model allows, and examine the belt for cracks, fraying, glazing, stretching, melted areas, or excessive looseness. Then check that the brush roll turns freely and that the belt sits correctly on its pulleys. Because vacuum designs vary widely, it also helps to identify your vacuum type using a reliable resource such as Consumer Reports’ vacuum cleaner overview.
Quick inspection steps
- Disconnect power: Unplug a corded vacuum or remove the battery when the design allows it.
- Expose the belt: Remove the base plate or belt cover according to the owner’s manual.
- Check the surface: Look for cracks, fraying, shiny glazing, cuts, melted spots, or missing teeth.
- Check the fit: Make sure the belt hasn’t slipped off the motor shaft or brush-roll pulley.
- Test the roller: Turn the brush roll by hand and feel for binding, wobbling, or seized end bearings.
- Replace if damaged: Use the exact belt type specified for your vacuum model.
A vacuum belt is easy to overlook because it’s usually hidden inside the floor head. Yet this small drive part can determine whether your brush roll agitates carpet properly or simply slides across it.
I inspect the belt whenever a vacuum starts leaving debris behind, develops a hot-rubber smell, or produces an unusual brush noise. Here’s how to check it safely without mistaking a tangled brush roll for a failed belt.
In This Guide
What Is a Vacuum Belt, and Why Should You Inspect It?
A vacuum belt is a flexible drive component that transfers motion from a motor or drive shaft to the rotating brush roll. Many upright vacuums use one, although some modern cleaner heads use different drive systems.
When the belt loses its grip, the vacuum motor may still sound normal. The brush roll, however, may slow down or stop completely.
- Normal belt: Fits securely, has an even surface, and drives the roller without obvious slipping.
- Stretched belt: May look intact but sits too loosely to transfer power effectively.
- Cracked belt: Shows splits or deterioration along the rubber surface.
- Glazed belt: Develops a smooth, shiny surface that may indicate heat and slipping.
- Broken belt: No longer connects the motor drive to the brush roll.
The belt matters most on carpet because the rotating brush helps loosen debris from fibers. A brush that isn’t turning correctly can make a vacuum feel weak even when hose suction remains normal.
Good mechanical maintenance also supports consistent household cleaning. The EPA’s indoor particulate matter guidance identifies regular vacuuming as one way to reduce indoor dust buildup.
How Do You Inspect a Vacuum Belt Step by Step?
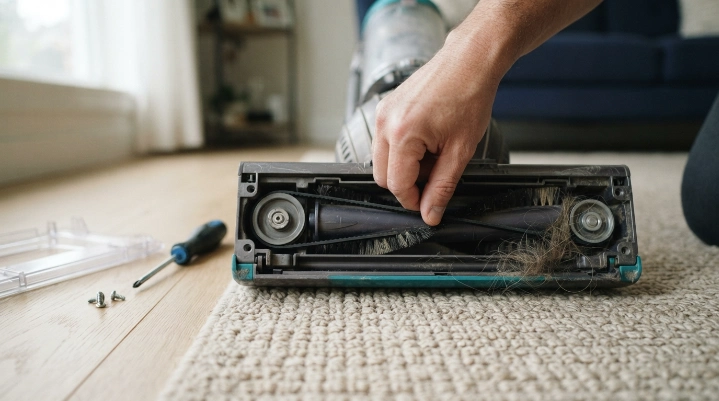
The safest method is to inspect the belt with the vacuum fully disconnected from power. Never reach into a cleaner head while the machine can start unexpectedly.
1. Disconnect the vacuum from power
Unplug a corded vacuum before turning it over. For a cordless model, switch it off and remove the battery if the manufacturer designed it to be removable.
Do not rely only on the vacuum’s power switch. Your hands will be close to the brush roll and drive system.
2. Check your model’s belt-access method
Turn the vacuum over on a stable surface and locate the base plate, soleplate, or belt cover. Some models use screws, while others use clips or quarter-turn fasteners.
- Keep removed screws together.
- Note the plate’s original position.
- Do not pry against hidden plastic tabs.
- Stop if the manual describes the cleaner head as non-serviceable.
I like to take a quick phone photo before removing the belt or roller. That simple reference makes the original belt routing much easier to confirm during reassembly.
3. Look closely at the entire belt surface
Inspect every visible side of the belt under good light. Rotate the brush roll slowly if that helps expose another section.
Watch for these warning signs:
- Cracks: Small splits can grow until the belt breaks.
- Frayed edges: Uneven wear may mean the belt is rubbing against another part.
- Glazing: A smooth or shiny surface can develop when a belt slips and heats up.
- Missing teeth: Toothed belts should have a complete, undamaged tooth pattern.
- Melted spots: Heat damage suggests abnormal friction or a seized component.
- Distortion: A belt that looks stretched or misshapen may no longer grip correctly.
4. Check whether the belt is seated correctly
A healthy belt can still cause trouble if it has slipped partly off its pulley. Check both the motor-drive side and the brush-roll side.
The belt should follow the intended belt path without twisting. Its exact position depends on your vacuum model.
5. Turn the brush roll by hand
Rotate the brush roll manually while the vacuum remains disconnected. Some resistance from a belt-driven system can be normal, but the roller shouldn’t feel seized or abruptly jammed.
- Remove wound hair and thread.
- Check both brush-roll ends.
- Look for debris around bearings or end caps.
- Check for wobbling or obvious misalignment.
A common mistake is replacing the belt without checking the brush roll. If the roller is jammed, the new belt can face the same excessive load.
6. Check belt tension without overstretching it
You can look for obvious slack, but don’t pull hard on the belt to “test” it. Stretch belts are designed around specific dimensions and materials.
There is no universal finger-pressure test that works for every vacuum. Compare the belt with the manufacturer’s service instructions or an identical correct replacement.
7. Reassemble and test carefully
Make sure the brush roll is seated in its slots and the belt follows its proper track. Replace the base plate before reconnecting power.
During the first test, listen for scraping, squealing, knocking, or belt slippage. Stop immediately if you smell hot rubber or see the brush behaving abnormally.
Section Takeaway: Inspect the belt’s condition, routing, fit, and relationship with the brush roll. A belt that repeatedly fails may be the symptom of a jammed or misaligned drive system, not the root problem.
Expert Alert: Stop DIY troubleshooting if you find melted wiring, scorched connectors, damaged motor components, or another electrical fault. Have electrical repairs handled by a qualified appliance technician.
What Are the Signs of a Worn or Damaged Vacuum Belt?
A broken belt is easy to identify, but a worn belt can be less obvious. The vacuum may still run while carpet-cleaning performance slowly drops.
What symptoms should you notice before opening the vacuum?
- Brush roll won’t spin: The belt may be broken, displaced, or badly stretched.
- Brush spins slowly: Belt slippage or brush-roll resistance may be reducing drive speed.
- Hot-rubber smell: A slipping belt can generate friction and heat.
- Squealing noise: Slippage or a binding roller may produce a high-pitched sound.
- Poor carpet pickup: Suction may remain normal while the brush loses agitation.
- Visible belt debris: Black rubber particles inside the cleaner head suggest wear.
Don’t assume every brush problem means the belt has failed. Hair packed tightly around the roller ends can create enough resistance to imitate a bad belt.
Likewise, a loose or damaged brush-roll bearing can put abnormal stress on a perfectly good replacement belt.
Can a belt look fine but still be bad?
Yes. Some stretch belts lose useful tension without developing dramatic cracks or breaks.
If the belt is noticeably looser than the correct replacement, slips during operation, or repeatedly falls out of position, replacement may be appropriate. Always match the part to the exact model.
Is the Belt Bad, or Is the Brush Roll Causing the Problem?
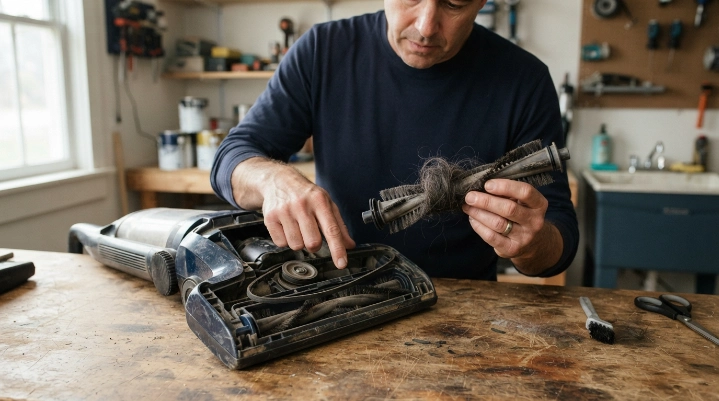
The belt and brush roll work as one system. Checking them together prevents unnecessary part replacement.
| What You Find | More Likely Cause | Next Check |
|---|---|---|
| Belt is snapped | Failed belt | Check brush roll for binding before replacement |
| Belt looks shiny and smells hot | Belt slippage or excessive friction | Inspect belt fit, roller ends, and drive alignment |
| Belt looks normal but roller won’t turn by hand | Jammed brush roll or bearing | Remove hair and inspect both end caps |
| Brush turns by hand but not when powered | Belt, drive system, or powered-head fault | Confirm belt engagement and model-specific drive design |
| Hair is tightly packed at roller ends | Brush-roll restriction | Clean the roller before judging belt performance |
| Belt keeps coming off | Wrong belt, worn pulley, or misalignment | Verify exact part number and component alignment |
One of my first checks is whether the brush roll can move freely after hair and thread are removed. A belt shouldn’t have to overcome a mechanically jammed roller.
This is also a good time to clear accumulated floor-head debris. For households managing allergens, the National Institute of Environmental Health Sciences includes vacuuming among its dust-mite reduction strategies.
Should you replace the belt and brush roll together?
Not automatically. Replace only the parts that are worn or damaged unless your manufacturer specifies a combined maintenance procedure.
If the roller is warped, seized, or badly worn, however, installing only a new belt may not solve the underlying problem.
Do All Vacuums Use the Same Belt System?
No. As of 2026, household vacuums use several brush-drive designs, so a generic belt inspection rule doesn’t fit every machine.
Always identify the system before ordering a replacement part.
- Stretch or flat belts: Common on many traditional uprights and designed to fit under tension.
- Toothed belts: Use molded teeth that engage matching drive surfaces.
- Multi-rib belts: Have several narrow ribs that run in corresponding pulley grooves.
- Powered cleaner heads: May use internal motors, gears, belts, or combinations that aren’t intended for routine user service.
- Direct-drive systems: May not have a conventional user-replaceable vacuum belt at all.
Why does the exact replacement belt matter?
Belt dimensions affect fit and drive performance. A belt that looks close enough can still have the wrong length, width, tooth pattern, or material.
Use the vacuum’s model number when identifying parts. Don’t select a belt only because the old one appears similar.
How often should you inspect the belt?
There isn’t one inspection interval that applies to every vacuum. Your model’s maintenance instructions should take priority.
I also inspect sooner when performance changes. Brush-roll stoppage, repeated tangles, squealing, hot-rubber odor, or noticeably poorer carpet pickup are good reasons to check.
Vacuum Belt Inspection FAQ
Can you inspect a vacuum belt without removing it?
You can inspect the visible portion, but a complete check usually requires enough access to see the belt’s full condition and routing. Follow your model’s instructions before removing a soleplate, brush roll, or belt cover.
How do I know whether my vacuum belt is stretched?
A stretched belt may sit unusually loose, slip during operation, or fail to drive the brush effectively despite having no obvious break. Compare it with the correct replacement specification rather than relying on a universal tension test.
Should a vacuum belt be tight?
Many belt-driven vacuums use tension to transfer power, but the required tension varies by design. Don’t assume tighter is always better because an incorrect belt can overload bearings or fail to fit properly.
Why does my new vacuum belt keep breaking?
Repeated belt failure can point to a seized brush roll, tangled hair, incorrect belt routing, misaligned components, a wrong replacement part, or excessive friction. Inspect the complete brush-drive system before installing another belt.
Can hair damage a vacuum belt?
Hair usually causes trouble by wrapping around the brush roll and its end caps. That added resistance can increase the load on the belt, so cleaning the roller is an important part of belt inspection.
Can I run a vacuum with a damaged belt?
It’s better to stop using the powered brush system until the problem is corrected. A slipping, frayed, or broken belt may produce heat, debris, poor brush performance, or further damage inside the cleaner head.
What if my vacuum has no visible belt?
Your vacuum may use a direct-drive or enclosed powered-head design. Check the model manual before opening additional housings, especially when electrical wiring or a separate brush motor is involved.
Final takeaway: A proper vacuum belt inspection takes only a few checks: disconnect power, expose the drive area safely, inspect the belt, clean the brush roll, verify alignment, and replace damaged parts with the exact model-compatible component.
If your brush roll has slowed down or stopped, inspect the belt before assuming the entire vacuum is failing. Catching a cracked, stretched, or slipping belt early can make the repair simpler and help keep your vacuum cleaning consistently.
