How to Vacuum Your Car: A Complete Step-by-Step Guide

Quick Answer
To vacuum your car, remove loose items and floor mats first, then work from the seats downward so falling dust gets collected later. Use a crevice tool around seat rails and tight gaps, vacuum carpets slowly in overlapping passes, and clean the mats outside the car. If dust or allergies are a concern, the EPA’s guidance on indoor particulate matter explains why controlling settled dust matters.
Quick car-vacuuming steps
- 1. Empty the cabin: Remove trash, personal items, child-seat accessories, and anything that can block the vacuum.
- 2. Remove the mats: Shake them outside before vacuuming them separately.
- 3. Start high: Vacuum seats, seat seams, consoles, and upper carpeted surfaces before the floor.
- 4. Clean the floor: Move the front seats when safe and vacuum carpet from several directions.
- 5. Detail the gaps: Use a crevice tool around seat rails, pedals, door pockets, and console edges.
- 6. Finish the mats: Vacuum both sides before returning completely dry mats to the car.
For a cleaner result
- Use slow passes instead of racing the vacuum nozzle across the carpet, especially around embedded sand and pet hair.
A car interior collects much more than visible crumbs. Dust, pollen, pet hair, road grit, food particles, and other debris settle into the seats, carpets, mats, and narrow gaps surprisingly fast.
I prefer treating car vacuuming like a small home-hygiene job rather than randomly chasing dirt with a nozzle. The right order makes the work quicker and helps prevent freshly cleaned areas from getting dirty again.
In This Guide
- What do you need to vacuum your car properly?
- What is the best order to vacuum a car?
- How do you vacuum seats, carpets, mats, and tight gaps?
- Which vacuum type works best for car interiors?
- How do you remove pet hair, sand, crumbs, and allergens?
- What mistakes should you avoid when vacuuming your car?
- Frequently asked questions about vacuuming a car
Definition: Car vacuuming is the mechanical removal of loose and embedded dry debris from vehicle upholstery, carpets, mats, storage areas, and interior gaps using vacuum suction and suitable attachments.
What Do You Need to Vacuum Your Car Properly?
You don’t need a professional detailing setup. A vacuum with good reach, a crevice tool, a brush attachment, and enough suction for carpet debris can handle most family cars.
The attachments matter almost as much as the vacuum itself. Car cabins contain narrow tracks, curved upholstery, textured carpet, and delicate plastic surfaces.
Basic tools to gather first
- Vacuum cleaner: A handheld, stick, canister, or wet/dry vacuum can work if it has suitable attachments.
- Crevice tool: Use it beside seats, around seat rails, between cushions, and near the center console.
- Soft brush attachment: Useful on fabric seats and textured surfaces that hold fine debris.
- Stiff detailing brush: Helps loosen grit from carpet before you vacuum it.
- Microfiber cloth: Use it for dust that the vacuum cannot safely reach.
- Trash bag: Remove wrappers, receipts, coins, and larger debris before starting.
Does your car vacuum need a HEPA filter?
A HEPA-equipped vacuum can be useful when fine dust and allergens are priorities. EPA guidance notes that a HEPA filter can help keep some collected dust from escaping a vacuum back into the air.
Check the actual vacuum specifications, though. Don’t assume that a product described as an “allergy vacuum” has a HEPA filter or a well-sealed filtration path.
CADR, or Clean Air Delivery Rate, isn’t a useful specification for choosing a car vacuum. CADR is associated with room air-cleaning equipment rather than debris pickup from upholstery or carpet.
Section Takeaway: Gather the right attachments before you start. A flexible hose and crevice tool usually improve car-cleaning results more than extra accessories you never use.
What Is the Best Order to Vacuum a Car?
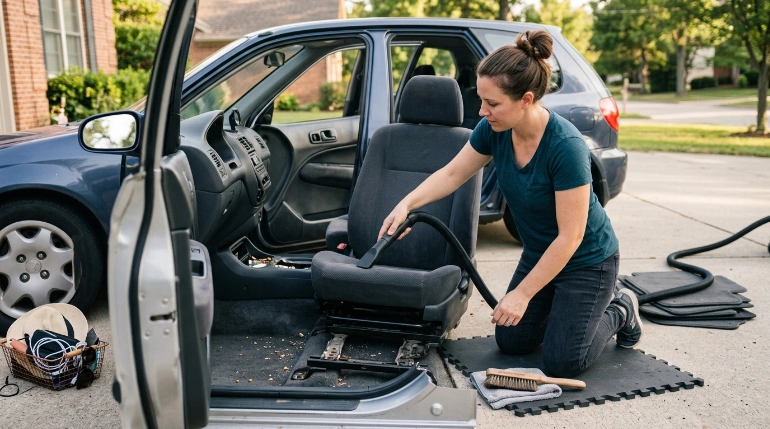
The most efficient order is to empty the vehicle, remove the mats, loosen debris, vacuum the seats, clean the floor, detail the gaps, and finish with the mats and cargo area. Working from higher surfaces toward lower ones keeps you from repeating work.
Step 1: Empty the interior
Take out bottles, papers, bags, charging cables, toys, and anything stored in door pockets. Pick up coins and other hard objects instead of intentionally vacuuming them.
Check beneath the seats before pushing a vacuum nozzle underneath. Small toys, jewelry, screws, and other objects can hide there.
Step 2: Remove every floor mat
Take the mats outside and shake loose dirt away from the vehicle. This exposes the carpet underneath and prevents mat debris from falling onto a floor you already cleaned.
Step 3: Loosen trapped debris
Brush carpet lightly where sand, dried mud, or hair is embedded. Agitation frees material that suction alone may leave behind.
- Brush toward an open area where the vacuum nozzle can reach.
- Use a softer brush on upholstery than on durable floor carpet.
- Avoid aggressive brushing on leather, screens, piano-black trim, or delicate plastics.
Step 4: Vacuum the seats before the floor
Start with seat surfaces and work into the seams. Any dirt knocked onto the carpet will be collected during the next stage.
Recline or reposition seats where appropriate so you can reach the joint between the seat base and backrest. Don’t force powered seats against objects or wiring.
Step 5: Vacuum the floor slowly
Move the nozzle in overlapping passes instead of making one fast sweep. Changing direction can expose grit caught between carpet fibers.
Slide adjustable seats forward and backward to expose the carpet beneath them. Keep the nozzle clear of exposed connectors and wiring under the seats.
Step 6: Detail the overlooked areas
- Between the seat and center console
- Around seat tracks
- Under pedals without disturbing pedal operation
- Door pockets and cup holders
- Under removable cargo-floor panels
- Around child-seat areas after following the child-seat manufacturer’s instructions
Section Takeaway: Work from the top toward the floor and save the tight gaps for detailed passes. That order prevents loose dirt from repeatedly falling onto finished areas.
How Do You Vacuum Seats, Carpets, Mats, and Tight Gaps?

Different parts of your car need different techniques. The wide nozzle that works on a floor mat usually performs poorly beside a seat rail or deep inside an upholstery seam.
Fabric seats
Use a clean upholstery or brush attachment and vacuum the broad seat surfaces first. Follow with the crevice tool along stitching, seams, seat-belt openings, and the gap between the seat base and backrest.
Don’t grind a hard plastic nozzle into the fabric. Let suction and repeated passes do most of the work.
Leather or synthetic leather seats
Loose grit can scratch finished surfaces when dragged across them. Use a soft brush attachment and keep hard nozzle edges away from the upholstery.
Vacuum crumbs from seams before wiping the seats. This prevents the cloth from pushing abrasive particles around.
Carpet
Car carpet tends to hold sand and hair more stubbornly than smooth household flooring. Slow vacuum passes combined with light brushing usually work better than suction alone.
| Area | Best Tool | Technique | Main Risk to Avoid |
|---|---|---|---|
| Fabric seats | Upholstery tool | Broad passes, then seams | Grinding hard nozzle edges into fabric |
| Leather seats | Soft brush attachment | Light contact and seam cleaning | Dragging grit across the finish |
| Floor carpet | Wide nozzle plus brush | Slow overlapping passes in multiple directions | Leaving embedded sand behind |
| Seat gaps | Crevice tool | Follow the gap without forcing the nozzle | Contact with wiring or connectors |
| Floor mats | Wide nozzle or brush attachment | Shake first, then vacuum both sides | Returning damp mats to the car |
Floor mats
Vacuum carpet mats outside the vehicle so you can attack them from several angles. Vacuum the underside too, because trapped grit can fall back onto the cabin floor.
Rubber or all-weather mats usually need debris removal followed by cleaning suitable for their material. Let wet-cleaned mats dry before reinstalling them.
Seat rails and tight gaps
A narrow crevice attachment is my first choice here. Approach loose debris from several angles rather than forcing the attachment underneath wiring or moving mechanisms.
Expert Alert: If you find damaged wiring, soaked carpet around electrical components, or a powered seat mechanism that isn’t operating normally, stop and have the vehicle inspected by a qualified automotive technician.
Section Takeaway: Match the attachment to the surface. Gentle tools protect upholstery, while narrow tools give you the reach needed around rails and consoles.
Which Vacuum Type Works Best for Car Interiors?
There isn’t one best vacuum type for every vehicle. The best choice depends on your parking location, available power, storage space, debris level, and whether you need wet pickup.
| Vacuum Type | Power Source | Best Car Use | Main Limitation |
|---|---|---|---|
| Cordless handheld | Rechargeable battery | Quick crumbs, seats, consoles, small cars | Runtime and bin capacity vary by model |
| Cordless stick with attachments | Rechargeable battery | Routine car and household cleaning | Bulky main body on some designs |
| Canister vacuum | Usually corded | Seats, floors, detailed hose work | Needs nearby electrical power |
| Wet/dry shop vacuum | Usually corded | Heavy dry debris and compatible wet pickup | Larger equipment and louder operation |
| Upright household vacuum | Corded or battery | Usable when it includes a flexible hose | Main floor head usually doesn’t fit inside a car |
If you already own a Dyson, Shark, or another stick vacuum with useful attachments, try that setup before buying a dedicated car vacuum. Hose reach and attachment shape can matter more than the label on the machine.
A wet/dry vacuum is useful only when the manufacturer specifically allows the material you’re collecting. Never use a dry-only household vacuum to collect liquid.
What should allergy-sensitive households look for?
Prioritize good filtration, a secure dust bin or bag, and easy-to-clean attachments. The EPA’s biological contaminant guidance identifies dust mites, pollen, pet allergens, and mold among biological contaminants found in indoor environments.
A car cabin isn’t the same environment as a house, so don’t treat home-air guidance as a vehicle performance guarantee. The practical lesson is simply to limit dust buildup and avoid blowing collected material back around the cabin.
As of 2026, I would still choose a car-cleaning vacuum by usable attachments, filtration, reach, and debris handling rather than marketing terms alone.
Section Takeaway: Choose a vacuum that fits your car and cleaning routine. A machine you can maneuver into the footwells and seat gaps is more useful than one that’s powerful but awkward.
How Do You Remove Pet Hair, Sand, Crumbs, and Allergens?
Stubborn debris often needs to be loosened before it can be vacuumed effectively. Pet hair, fine sand, dried mud, and crumbs each behave differently in car upholstery.
Pet hair
Vacuum loose hair first, then agitate hair trapped in carpet or fabric. A suitable upholstery brush or pet-hair attachment can gather the fibers into easier-to-vacuum clumps.
- Work one small area at a time.
- Brush in more than one direction.
- Empty the vacuum before airflow drops significantly.
- Check the attachment frequently for wrapped hair.
Sand and fine grit
Sand settles deep in dense automotive carpet. Brush lightly while vacuuming, then change the direction of your passes.
Don’t keep rubbing hard when the carpet looks clean. Excessive scrubbing adds wear without necessarily improving debris removal.
Food crumbs
Check seams, cup holders, child-seat areas, and the gaps beside the center console. Remove large or sticky pieces by hand rather than pulling everything through the vacuum.
Fine dust and allergens
Open the doors when conditions allow and avoid aggressively beating dusty carpet inside the closed cabin. EPA guidance notes that vacuuming itself can stir some settled dust into the air.
If someone in your household is sensitive to dust, consider a vacuum with appropriate HEPA filtration and empty it outside when practical. Follow the vacuum manufacturer’s instructions when cleaning or replacing its filters.
Do you need to disinfect the car after vacuuming?
Routine dirt removal and disinfection are different jobs. The CDC’s cleaning and disinfecting guidance distinguishes ordinary cleaning from sanitizing and disinfecting and recommends cleaning surfaces before applying disinfectants when disinfection is needed.
Don’t spray disinfectant indiscriminately across vehicle screens, leather, switches, or other interior finishes. Check the vehicle and product instructions for material compatibility first.
What if the carpet smells musty or looks moldy?
Vacuuming doesn’t fix a water leak or ongoing moisture problem. A musty smell that keeps returning deserves investigation rather than repeated fragrance or vacuuming.
Expert Alert: If carpet or padding remains wet, visible mold covers more than a small surface area, or water keeps entering the vehicle, have the moisture source and affected materials assessed by a qualified professional.
Section Takeaway: Loosen stubborn debris before demanding more suction from the vacuum. Persistent moisture or mold is a source problem, not simply a vacuuming problem.
What Mistakes Should You Avoid When Vacuuming Your Car?
Most poor results come from rushing, using the wrong attachment, or skipping preparation. A few simple changes make the job cleaner and safer.
Vacuuming before removing trash
Don’t make your vacuum swallow objects you could pick up by hand. Coins, screws, sharp fragments, and larger pieces can damage attachments or become lodged in the airflow path.
Starting with the floor
Cleaning the carpet first feels natural, but dirt from the seats and console can fall onto it later. Work high to low whenever practical.
Moving the nozzle too quickly
Fast passes may collect visible crumbs while leaving fine grit behind. Slow down over heavily soiled carpet and approach the fibers from different directions.
Ignoring the vacuum filter and bin
A packed bin, blocked attachment, or neglected filter can hurt airflow. Maintain the machine according to its manufacturer’s instructions rather than waiting until performance becomes poor.
Using wet pickup without checking the vacuum
A standard dry vacuum isn’t a substitute for a wet/dry machine. Keep liquid away from equipment that isn’t specifically designed to collect it.
Spraying strong cleaners inside a closed car
Vacuuming usually doesn’t require chemical cleaners at all. If you use sprays during later detailing, ventilate the cabin and follow every product label.
The EPA’s guidance on volatile organic compounds notes that cleansers, disinfectants, aerosol sprays, air fresheners, and automotive products can be sources of VOCs and recommends ventilation when using products that emit them.
Forgetting the trunk or cargo area
The cargo area often holds soil, leaf fragments, pet hair, and debris from groceries or outdoor equipment. Remove movable items and clean beneath the cargo mat where accessible.
Section Takeaway: Preparation and technique matter more than speed. Remove large debris first, work from high to low, maintain your vacuum, and never use equipment outside its intended purpose.
Frequently Asked Questions About Vacuuming a Car
How often should you vacuum your car?
Vacuum whenever dirt becomes noticeable rather than following one rigid schedule. Cars carrying children, pets, outdoor equipment, or frequent passengers may need cleaning more often than lightly used vehicles.
Should you vacuum or wipe the car interior first?
Remove loose dust and debris first, especially from seats and carpet. Wipe hard surfaces afterward so you’re not pushing crumbs and grit around with your microfiber cloth.
Can I use my regular house vacuum in my car?
Yes, if it has a hose and attachments that can reach the interior safely. Canister and stick vacuums often work well, while a large upright without a flexible hose can be difficult to maneuver.
Can I vacuum underneath car seats?
Yes, but inspect the area first and reposition adjustable seats safely. Don’t push the nozzle against electrical connectors, wiring, airbag-related components, or powered seat mechanisms.
What is the easiest way to get sand out of car carpet?
Shake removable mats outside, then loosen remaining sand with a suitable carpet brush. Vacuum slowly in several directions, repeating the brush-and-vacuum process where grit remains embedded.
Is a HEPA vacuum better for cleaning a car?
HEPA filtration can be useful when controlling fine dust is important, but it doesn’t automatically make one vacuum better at collecting car debris. Also consider attachment design, suction, airflow, filtration sealing, reach, and how easily you can empty the machine.
Should I vacuum wet car carpet?
Only use a vacuum specifically designed for wet pickup and follow its instructions. If the carpet stays wet or keeps becoming damp, identify the water source because vacuuming alone won’t correct a leak or moisture problem.
Section Takeaway: Good car vacuuming is mostly about consistency, access, and the right tools. You don’t need professional equipment to keep an ordinary car interior under control.
Closing takeaway: The easiest way to vacuum your car is to follow the same order every time: empty it, remove the mats, clean the seats, vacuum the carpet, detail the gaps, and finish the cargo area and mats.
Don’t chase perfection on every cleaning. A thorough routine performed regularly prevents crumbs, sand, pet hair, and dust from becoming a much harder detailing job later.