
How to Vacuum Every Room Efficiently

Quick Answer
To vacuum every room efficiently, prepare the whole house first, work from cleaner rooms toward dirtier areas, vacuum high surfaces before floors, and match the attachment and brush setting to each surface. Slow, overlapping passes usually collect more debris than racing across the floor, while regular cleaning helps prevent indoor dust from building up; the EPA’s indoor particulate matter guidance recommends routine vacuuming of carpets and furniture.
Fast whole-home vacuuming order
- Prepare first: Pick up toys, cords, clothes, and objects before turning on the vacuum.
- Dust high areas: Clean shelves, furniture tops, and other elevated surfaces before vacuuming floors.
- Start cleaner: Begin with bedrooms or low-traffic rooms and finish with entrances and heavily used areas.
- Clean the edges: Use a crevice tool around baseboards, furniture legs, corners, and room boundaries.
- Slow your passes: Move steadily and overlap each path instead of making many fast passes.
- Empty when needed: Don’t keep vacuuming with an overfilled bin, bag, or clogged filter.
One important rule
- Never vacuum wet floors or liquid spills with a standard dry vacuum unless its manufacturer specifically rates it for wet pickup.
I used to lose time by treating every room as a separate cleaning job. The biggest improvement came when I turned vacuuming into one repeatable whole-home system.
This guide explains that system room by room. You’ll learn the best order, which attachments to use, where dirt hides, and how to adjust the routine for pets, carpets, allergies, and mixed flooring.
In This Guide
- What Is the Most Efficient Way to Vacuum a Whole House?
- How Do You Vacuum Each Room Efficiently?
- Which Vacuum Attachment and Setting Should You Use?
- How Should You Vacuum With Pets or Allergies?
- What Vacuuming Mistakes Waste the Most Time?
- Frequently Asked Questions
- Build a Vacuuming Routine You Can Repeat
What Is the Most Efficient Way to Vacuum a Whole House?
The most efficient method is to treat the house as one cleaning route. Prepare everything first, work from higher surfaces downward, and finish floors only after loose dust has fallen.
An efficient whole-home vacuuming routine is a planned cleaning sequence that minimizes repeated setup, attachment changes, backtracking, and unnecessary passes.
Prepare every room before you start
Starting the vacuum before the rooms are ready is one of the easiest ways to waste time. You’ll stop constantly to move cords, toys, shoes, baskets, and small furniture.
I prefer doing one fast preparation lap through the house first. I carry a basket for anything that belongs somewhere else.
- Pick up floor clutter: Remove clothing, toys, cables, shoes, and small objects.
- Move lightweight obstacles: Shift wastebaskets, floor lamps, pet bowls, and small stools when practical.
- Check for problem debris: Remove coins, screws, string, large paper pieces, and anything that could damage the vacuum.
- Secure curtains and cords: Keep hanging fabric and charging cables away from the floorhead.
- Check the vacuum: Inspect the bin or bag, floorhead, brush roll, and filter before starting.
Clean from high to low
Dust doesn’t stay exactly where you disturb it. Cleaning upper surfaces after vacuuming can put debris back onto freshly cleaned floors.
If I’m doing a full clean, I dust shelves, tables, window areas, and furniture before the final floor pass. When suitable, I use the vacuum’s dusting attachment on those surfaces.
The CDC distinguishes routine cleaning from sanitizing and disinfecting. Its home cleaning guidance also notes that routine cleaning is generally the starting point for household surfaces.
Create one continuous route
There isn’t one mandatory room order for every floor plan. The goal is to reduce backtracking and prevent dirty areas from contaminating cleaner ones.
A practical whole-home route looks like this:
- Upstairs or furthest bedrooms
- Home office or guest room
- Living and family rooms
- Hallways
- Stairs
- Kitchen and dining area
- Dry bathroom floors
- Mudroom or main entryway
Finish with the room that collects the most tracked-in grit. For many homes, that’s the main entrance or mudroom.
Use slow, overlapping floor passes
Fast movement feels efficient but can create extra work. A steady pass gives the floorhead more opportunity to collect hair, crumbs, grit, and embedded dust.
Overlap the previous path slightly so narrow strips aren’t missed. Concentrate extra passes on visibly dirty or high-traffic sections instead of repeatedly covering the entire room.
On carpet, change direction when a high-traffic area still looks flattened or dirty. On hard flooring, pay particular attention to edges and the spaces beneath furniture where fine debris gathers.
Section Takeaway: Prepare the whole house before starting, work in one continuous route, and clean high surfaces before floors. Fewer interruptions usually save more time than simply moving the vacuum faster.
How Do You Vacuum Each Room Efficiently?
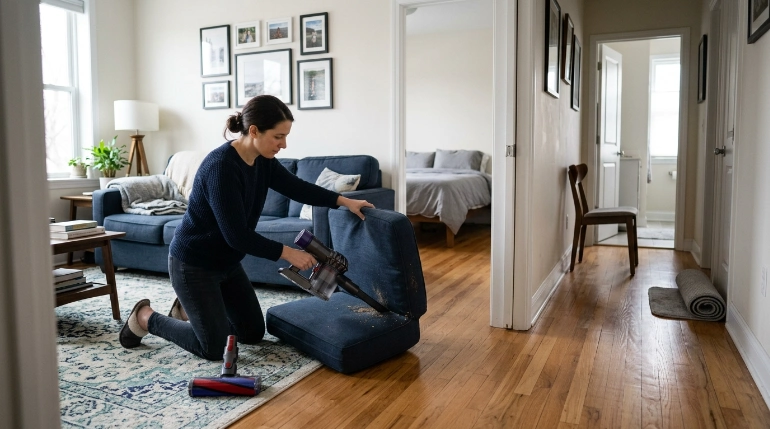
Every room collects a different mixture of debris. Efficient vacuuming means spending extra effort where dirt accumulates instead of giving every square foot identical treatment.
Bedrooms
Bedrooms often contain hair, skin flakes, textile fibers, and dust around beds and nightstands. Start around the perimeter before cleaning the open floor.
- Use the crevice tool beside nightstands and along baseboards.
- Vacuum underneath the bed when clearance allows.
- Clean accessible upholstered headboards with an upholstery attachment.
- Pay extra attention beside the bed, where feet transfer debris to flooring.
- Vacuum rugs separately and check whether their edges lift under strong suction.
If the room contains wall-to-wall carpet, I usually finish with long passes toward the doorway. That prevents me from walking repeatedly over the cleaned area.
Living rooms and family rooms
Living rooms need more attachment work because dust and debris collect around furniture. Sofa seams are especially easy to miss during a quick floor-only clean.
I treat the sofa and floor as one cleaning zone. That keeps me from putting the upholstery tool away and needing it again five minutes later.
- Remove loose sofa cushions where practical.
- Vacuum crumbs and hair from cushion seams.
- Use the crevice nozzle where the seat meets the back and arms.
- Clean beneath lightweight furniture when it can be moved safely.
- Vacuum around entertainment units without pulling on electrical cords.
- Finish the open floor with overlapping passes.
Don’t force a large floorhead into narrow spaces. A crevice or compact attachment is usually quicker and less likely to scratch furniture.
Kitchens and dining areas
Kitchens collect crumbs, dry food particles, grit, and debris beneath cabinet edges. Pick up anything wet or sticky before using a standard dry vacuum.
Start beneath the dining table and chairs. Then work around cabinet toe kicks and appliance edges before cleaning the open floor.
- Move dining chairs together or out of the cleaning path.
- Use a crevice tool around cabinet toe kicks.
- Check beneath removable floor mats.
- Vacuum dry crumbs around the refrigerator and other accessible appliance edges.
- Finish near the doorway so you don’t walk across the cleaned floor repeatedly.
Vacuuming isn’t a replacement for washing sticky kitchen floors. Remove dry debris first, then mop or clean the surface using a method appropriate for the flooring.
Bathrooms
Bathrooms can contain hair, lint, dust, and powder, but moisture changes the safety rules. Only use a standard dry vacuum when the floor and debris are dry.
I usually vacuum around the vanity, baseboards, and door edges before wet-cleaning the floor. This prevents loose hair from turning into wet clumps during mopping.
- Remove bath mats and vacuum them separately if their care instructions allow it.
- Use the crevice tool along vanity edges and corners.
- Collect hair around the toilet base carefully.
- Keep the vacuum and electrical cord away from standing water.
- Finish vacuuming before mopping or other wet cleaning.
Expert Alert: If an appliance, outlet, or cord has been exposed to water or shows electrical damage, stop using it and have the problem checked by a qualified professional.
Hallways and entryways
Hallways receive repeated foot traffic, while entryways often collect outdoor grit. These areas deserve targeted passes rather than one quick run down the center.
Vacuum the edges first. Then make steady lengthwise passes, with an extra cross-pass where traffic is heaviest.
- Lift or move removable doormats.
- Vacuum beneath mat edges where grit accumulates.
- Use the crevice tool around thresholds and baseboards.
- Check corners behind doors.
- Clean the main walking path last.
Stairs
Stairs are faster and safer with a smaller attachment than a full-size floorhead. Start at the top when practical so debris doesn’t fall onto already-cleaned steps.
Keep the vacuum stable and never balance a heavy machine on a stair tread. A hose, handheld unit, or compact stair attachment is easier to control.
- Clean each tread from edge to edge.
- Use the crevice nozzle where the tread meets the riser.
- Vacuum corners where hair often collects.
- Keep the cord behind you and outside your stepping path.
- Maintain three-point balance whenever repositioning yourself or the machine.
Section Takeaway: Clean each room according to where debris actually accumulates. Edges, furniture seams, bed areas, cabinet toe kicks, entryways, and stair corners usually deserve more attention than open floor space.
Which Vacuum Attachment and Setting Should You Use?
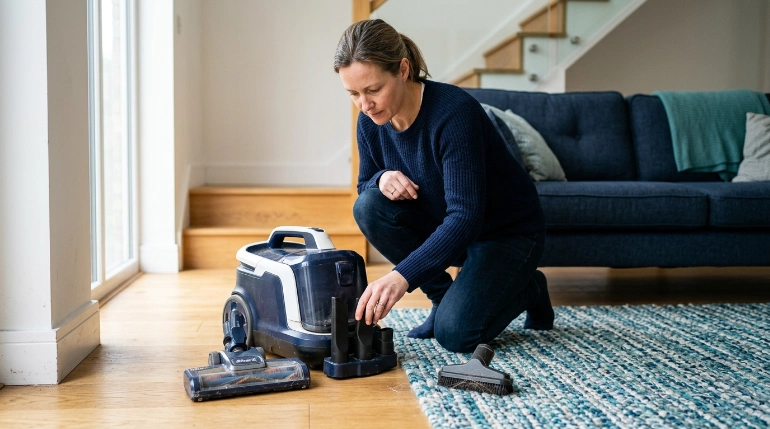
Use the attachment that brings airflow closest to the debris without damaging the surface. Floor type, rug thickness, furniture fabric, and manufacturer instructions should guide your settings.
Names vary between brands, but most household vacuums include some combination of a floorhead, crevice nozzle, dusting brush, and upholstery tool.
| Surface or Area | Typical Attachment | Brush/Suction Approach | Efficient Technique |
|---|---|---|---|
| Wall-to-wall carpet | Main carpet floorhead | Use the manufacturer-recommended carpet or brush-roll setting | Slow overlapping rows; add a cross-pass only in high-traffic areas |
| Hardwood or laminate | Hard-floor head or soft roller | Disable an aggressive rotating brush when the manufacturer recommends it | Clean edges first, then use long controlled passes |
| Tile | Hard-floor head | Use a hard-floor setting appropriate for the machine | Focus on grout edges, corners, and cabinet boundaries |
| Thin area rug | Floorhead | Reduce suction if the rug lifts or the manufacturer advises it | Hold the rug edge steady and avoid catching fringe |
| Sofa and chairs | Upholstery tool | Moderate suction suited to the fabric | Clean surfaces first, then seams and cushion gaps |
| Baseboards and corners | Crevice tool or dusting brush | Normal suction unless the surface is delicate | Make one continuous perimeter pass |
| Stairs | Stair, upholstery, or compact motorized tool | Match the setting to carpet or hard tread material | Clean tread, riser edge, and corners before moving down |
Don’t use maximum suction automatically
More suction isn’t always more efficient. A floorhead that seals itself to a lightweight rug can become harder to move and may pull at the material.
Use adjustable airflow or suction controls when your vacuum provides them. Follow the surface and vacuum manufacturer’s guidance, especially for delicate rugs and specialty flooring.
Change attachments in batches
Constantly swapping tools wastes time. I prefer doing all similar attachment work in one area before changing back to the main floorhead.
For example, use the crevice tool around the sofa, nearby baseboards, and furniture gaps during the same pass. Then attach the upholstery tool for cushions before returning to floor cleaning.
Check airflow when performance drops
A vacuum that suddenly leaves debris behind may not need more passes. The bin, bag, filter, hose, floorhead, or brush roll may need attention.
- Empty the dust bin when recommended by the manufacturer.
- Replace bags before they become excessively full.
- Remove wrapped hair from serviceable brush rolls.
- Check accessible air pathways for blockages.
- Clean or replace filters only according to the manufacturer’s instructions.
Section Takeaway: Match the tool to the surface instead of forcing one floorhead to do every job. Correct attachments and settings can reduce repeat passes while protecting rugs, furniture, and flooring.
How Should You Vacuum With Pets or Allergies?
Homes with shedding pets or household allergy concerns usually need more attention to fabric surfaces and recurring dust zones. Vacuuming can help control settled debris, but it shouldn’t be treated as a complete indoor-air solution.
The EPA notes that indoor dust can contain pollen, pet dander, mold spores, dust-mite material, and other biological particles. Cleaning can also temporarily disturb settled dust.
Give fabric surfaces extra attention
Pet hair doesn’t remain on the floor. It collects on sofas, rugs, pet beds, stairs, curtains, and other fabrics.
- Vacuum pet sleeping areas regularly.
- Clean sofa seams and cushion gaps.
- Check carpet edges near walls and furniture.
- Use a suitable pet-hair or upholstery tool where needed.
- Wash washable pet bedding according to its care label.
Hair around a brush roll can reduce its ability to work properly. Check the floorhead regularly if your pets shed heavily.
Consider filtration, but understand its role
A vacuum with effective filtration can help keep some collected fine dust from escaping through the machine. The EPA specifically suggests considering a vacuum with a HEPA filter when reducing indoor dust buildup is a concern.
HEPA means high-efficiency particulate air. Check the complete vacuum design and manufacturer specifications rather than assuming the word “HEPA” alone describes the machine’s total containment performance.
Air cleaners are a separate tool. The EPA’s air cleaner and HVAC filter guidance explains that filtration can supplement source control and ventilation but cannot remove every indoor pollutant.
Be careful when emptying collected dust
Dumping a dusty bin aggressively can release collected material again. Empty the machine using the manufacturer’s method and avoid creating a visible dust cloud.
If someone has significant dust-mite sensitivity, the National Institute of Environmental Health Sciences provides additional dust-mite reduction guidance, including damp dusting and vacuum filtration considerations.
Don’t vacuum a moisture or mold problem away
Visible mold or a persistent musty area needs its moisture source addressed. Vacuuming alone doesn’t fix leaking plumbing, water intrusion, or damp building materials.
Expert Alert: For substantial mold growth, repeated water damage, hidden moisture, or contamination beyond simple surface cleaning, contact a qualified remediation or building professional rather than relying on routine vacuuming.
Section Takeaway: In pet and allergy-sensitive homes, spend more time on upholstered surfaces, rugs, pet areas, filtration maintenance, and careful dust disposal. Remember that vacuuming supports source control; it doesn’t replace moisture control or ventilation.
What Vacuuming Mistakes Waste the Most Time?
The biggest efficiency problems usually come from poor preparation, wrong settings, and unnecessary repeated passes. Correcting those habits often matters more than buying a faster vacuum.
Vacuuming before dusting
If you clean the floor and then disturb dusty shelves or furniture, some material can settle back down. Dust higher surfaces first during a full-room clean.
Moving too quickly
Rapid passes may leave visible debris behind, especially along carpet traffic lanes. Slow down enough for the floorhead to maintain contact and airflow.
Ignoring edges until the end of the house
Walking back through every room with a crevice tool adds unnecessary steps. Clean each room’s edges while you’re already there.
Using the wrong floor setting
A carpet brush setting may not suit every hard floor, while some thick carpets need a different floorhead height or airflow setting. Check your vacuum and flooring instructions.
Vacuuming around clutter
Cleaning narrow strips around shoes and toys creates awkward movements and missed spots. A two-minute pickup pass can make the actual vacuuming much smoother.
Waiting until the vacuum barely picks up
Reduced pickup can signal a full bag or bin, dirty filter, tangled brush, or obstruction. Maintaining the airflow path prevents you from compensating with endless repeat passes.
Trying to vacuum unsuitable debris
A household dry vacuum isn’t automatically safe for liquids, wet material, hot ash, construction debris, or every type of sharp object. Use equipment specifically rated for the material you’re collecting.
Giving every room the same treatment
A rarely used guest room doesn’t need the same effort as an entryway after a muddy week. Match cleaning time to actual use and visible soil.
As of 2026, public-health guidance still emphasizes routine cleaning rather than treating every household surface as a constant disinfection project. The CDC recommends cleaning surfaces regularly or when visibly dirty, with additional sanitizing or disinfecting used when circumstances call for it.
Section Takeaway: Efficient vacuuming is selective. Prepare first, choose the right setting, concentrate on high-soil areas, and fix airflow problems instead of making repeated ineffective passes.
Frequently Asked Questions
What is the best order to vacuum a house?
Prepare and dust rooms first, then vacuum from cleaner or less-used rooms toward high-traffic areas. If your home has multiple floors, starting upstairs and working downward can reduce backtracking.
Should I dust or vacuum first?
For a full cleaning session, dust higher surfaces before vacuuming the floor. Any loose debris that falls while you dust can then be collected during the final floor pass.
How often should every room be vacuumed?
There isn’t one perfect schedule for every household. Vacuum high-traffic areas, pet zones, carpets, and visibly dirty surfaces more often, while low-use rooms can usually follow a lighter schedule.
Should you vacuum a room in two directions?
You don’t need two-direction passes everywhere. A second cross-pass can help on visibly soiled or high-traffic carpet, while one slow overlapping pass may be enough in lightly used areas.
Can I vacuum hardwood floors?
Yes, when your vacuum and flooring manufacturer permit it. Use a hard-floor-compatible head or setting, and avoid an aggressive brush configuration if it could scratch or scatter debris across the floor.
Should I vacuum before mopping?
Yes, on floors suitable for both methods. Vacuuming dry hair, crumbs, and grit first prevents that loose debris from mixing with water and spreading during mopping.
Does a HEPA vacuum remove all allergens?
No vacuum should be expected to eliminate every allergen or indoor pollutant. Effective filtration can support dust control, but moisture management, source control, ventilation, laundering, and appropriate cleaning may also matter.
Build a Vacuuming Routine You Can Repeat
The fastest whole-home vacuuming system isn’t the one with the quickest floor passes. It’s the one that prevents you from stopping, changing tools unnecessarily, backtracking, and cleaning the same area twice.
Prepare the rooms first. Work high to low, batch your attachment tasks, slow down on dirty zones, and finish with the most heavily tracked areas.
Once that sequence becomes automatic, vacuuming stops feeling like a collection of separate chores. It becomes one predictable route through the house.
Start with your normal routine this week and notice where you lose time. Fix those bottlenecks first, then adjust the route until it fits your home’s floors, furniture, pets, and traffic patterns.