How to Vacuum Drywall Dust Without Spreading It Everywhere

Quick Answer
To vacuum drywall dust, first collect large debris, then use a properly filtered HEPA vacuum with a clean filter and suitable attachment. Vacuum slowly from higher surfaces toward the floor, then finish hard surfaces with damp wiping or mopping. The EPA’s HEPA vacuum guidance explains why the vacuum’s filtration and sealed airflow matter when cleaning renovation dust.
Quick Steps for Vacuuming Drywall Dust
- Contain the room: Close doors and keep unnecessary foot traffic away from the dusty area.
- Remove chunks first: Pick up drywall scraps and other large debris before vacuuming fine powder.
- Use HEPA filtration: Choose a vacuum designed to contain fine particles rather than simply collecting visible debris.
- Work high to low: Vacuum ledges, trim, walls, and other elevated surfaces before cleaning the floor.
- Move slowly: Controlled passes capture dust better than aggressively pushing the nozzle around.
- Finish damp: Wipe hard surfaces and mop suitable floors after vacuuming to collect remaining film.
One Important Rule
- Avoid dry sweeping fine drywall dust because it can send settled particles back into the room.
Drywall dust is one of those home-hygiene problems that looks simple until you start cleaning it. Fine powder settles on floors, trim, furniture, vents, tools, and places that seemed covered during sanding.
I treat drywall cleanup as a dust-containment job, not ordinary vacuuming. The right vacuum, sequence, and final damp-cleaning pass make the biggest difference.
In This Guide
- Why Is Drywall Dust So Difficult to Vacuum?
- What Vacuum Should You Use for Drywall Dust?
- How Do You Vacuum Drywall Dust Step by Step?
- How Should You Clean Drywall Dust From Different Surfaces?
- What Drywall Dust Vacuuming Mistakes Should You Avoid?
- How Do You Stop Drywall Dust From Coming Back?
- Frequently Asked Questions
Why Is Drywall Dust So Difficult to Vacuum?
Drywall dust is a fine construction dust created when drywall, joint compound, or related finishing materials are cut or sanded. Its small particles can settle far beyond the spot where the work happened.
The dust may contain materials such as gypsum, calcite, mica, talc, and sometimes silica. NIOSH discusses these components in its drywall sanding dust guidance.
Fine dust behaves differently from normal dirt
Crumbs and pet hair usually stay where they land. Fine sanding dust can become airborne again when you walk through it, brush it, or exhaust poorly filtered vacuum air across it.
That is why a floor can appear clean and develop another pale film later. Dust may have remained on walls, ledges, fixtures, or nearby objects.
- It settles everywhere: Horizontal ledges, window trim, outlets, baseboards, and furniture can collect a thin film.
- It clogs filters: Fine powder can load a vacuum filter faster than ordinary household debris.
- It can recirculate: Poor filtration may allow collected fine particles to escape through exhaust air.
- Movement redistributes it: Dry sweeping and heavy foot traffic can put settled dust back into the air.
The EPA notes that indoor dust can be stirred into the air by cleaning and other normal activities. Damp dusting and HEPA-filtered vacuuming are among the methods it recommends for reducing indoor dust.
Section Takeaway: Drywall dust needs controlled removal. Capturing the powder without repeatedly throwing it back into the air is the real goal.
What Vacuum Should You Use for Drywall Dust?
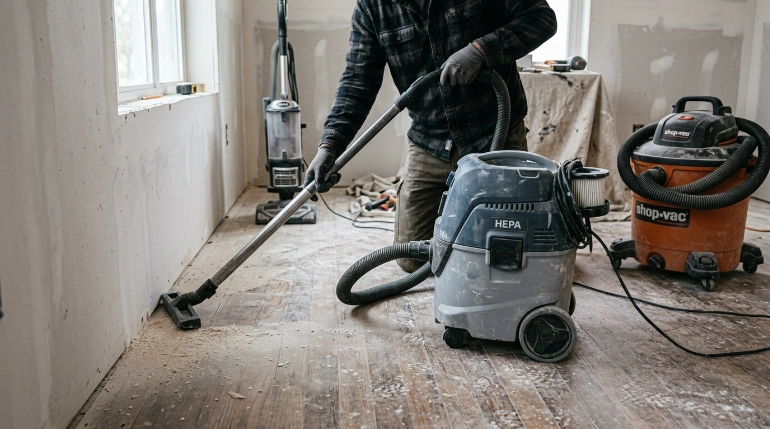
A vacuum designed with effective HEPA filtration is my preferred choice for drywall cleanup. A true HEPA vacuum should filter the air before it returns to the room.
HEPA means high-efficiency particulate air. EPA defines a HEPA filter in its renovation guidance as capable of capturing 99.97% of particles at 0.3 microns.
HEPA vacuum vs. regular vacuum vs. broom
| Cleaning Method | Fine-Dust Control | Best Use | Main Concern |
|---|---|---|---|
| Sealed HEPA vacuum | High when properly designed and maintained | Fine renovation dust and final cleanup | Filter can still clog if overloaded |
| Shop vacuum with standard filter | Depends heavily on filter and vacuum design | Larger construction debris | Fine particles may escape through exhaust |
| Household vacuum | Varies by filtration and sealing | Normal household dirt if manufacturer permits | Fine construction dust can clog filters quickly |
| Dry broom | Poor for fine settled dust | Large debris only | Can send powder back into the air |
Can you put a HEPA filter into any shop vac?
Not necessarily. A HEPA filter alone does not guarantee that every bit of exhaust air passes through it.
EPA specifically distinguishes a vacuum designed as a HEPA system from a basic shop vacuum that was simply retrofitted with a HEPA filter. Check the manufacturer’s instructions before using any machine for fine construction dust.
How Do You Vacuum Drywall Dust Step by Step?

The most reliable method is to contain the work area, remove coarse debris, vacuum from high to low, then finish hard surfaces with damp cleaning. Do not start by racing the floor nozzle through the dust.
1. Stop creating more dust
Finish sanding or cutting before beginning your final cleanup. Give airborne dust time to settle instead of vacuuming while someone is still sanding nearby.
Keep children, pets, and anyone not involved in cleanup away from the area. Close interior doors where practical so foot traffic does not spread dust into clean rooms.
2. Put on suitable protection
A dusty renovation area can expose you to much more airborne material than normal housekeeping. Avoid deliberately breathing the dust while you clean.
The CDC recommends HEPA vacuuming or wet cleaning rather than dry sweeping in dusty cleanup situations. Its respiratory cleanup guidance also discusses NIOSH-approved N95 respirators for dusty conditions.
3. Pick up large debris by hand
Remove drywall scraps, tape, paper, screws, and larger chunks before tackling the powder. Place the debris directly into a suitable waste bag.
This prevents bulky material from filling your vacuum unnecessarily. It also reduces the chance of blocking the hose.
4. Check the vacuum before starting
Inspect the filter, collection bag or bin, hose, seals, and attachments. Start with enough filter capacity for the job instead of using a filter already packed with ordinary household dirt.
- Confirm the vacuum is approved by its manufacturer for the material you plan to collect.
- Install the correct filter or collection bag.
- Check that the hose connections are secure.
- Empty or replace an overly full collection container.
- Keep replacement filters or bags ready for a larger cleanup.
5. Vacuum elevated surfaces first
Start with places above floor level. Fine dust on trim, shelves, sills, doors, and other surfaces can fall while you clean.
Use a soft brush where scratching is a concern. A crevice tool works better around edges, corners, and narrow gaps.
6. Vacuum the floor slowly
Use overlapping passes rather than quick strokes. Slow movement gives the nozzle more opportunity to collect powder before your movement disturbs it.
- Begin at the far side of the room.
- Vacuum one narrow section at a time.
- Overlap the previous pass slightly.
- Work toward the exit.
- Check edges and baseboards separately.
- Repeat the pass if visible powder remains.
7. Damp-clean suitable hard surfaces
Vacuuming is the first major stage, not always the last. A faint residue can remain on smooth floors and other washable surfaces.
The EPA recommends damp wiping and wet mopping as part of renovation-dust cleanup. Its DIY renovation guidance advises HEPA vacuuming followed by wet cleaning until surfaces are clean.
Use a damp rather than dripping-wet cloth around painted walls, wood, outlets, and moisture-sensitive materials. Follow the surface manufacturer’s cleaning instructions.
Section Takeaway: Clean in stages—debris first, HEPA vacuuming second, and damp cleanup last. Working from high surfaces toward the exit prevents you from repeatedly contaminating areas you already cleaned.
How Should You Clean Drywall Dust From Different Surfaces?
The basic method stays the same, but the final step changes with the surface. Carpet, finished wood, tile, furniture, and walls should not all be treated identically.
Hard floors
Vacuum the floor carefully before adding moisture. Turning loose drywall powder into wet slurry makes cleanup harder.
After vacuuming, damp mop the floor if its care instructions allow water. Change dirty rinse water rather than spreading a cloudy film across the next section.
Carpet and rugs
Make several slow vacuum passes from different directions. Fine powder can settle between carpet fibers instead of remaining on top.
Avoid soaking drywall dust into carpeting as your first cleaning step. If substantial construction dust remains deep in the carpet, professional cleaning may be more practical.
Walls and baseboards
Use gentle suction with a dusting brush for loose powder. Follow with a lightly damp microfiber cloth only when the wall finish can tolerate it.
Baseboard tops deserve extra attention because they act like narrow shelves. Fine dust often remains there after the center of the floor looks clean.
Furniture and fixtures
Vacuum upholstered surfaces with a suitable attachment before moving to damp cleaning. On hard furniture, capture loose dust first and then wipe according to the finish.
Do not forget door frames, window sills, light fixtures, and the tops of cabinets. These spots can release dust back into the room later.
What Drywall Dust Vacuuming Mistakes Should You Avoid?
The biggest mistake is treating fine renovation dust like everyday crumbs. Fast cleaning often redistributes the powder instead of removing it.
- Dry sweeping first: A broom can throw fine settled particles back into the air.
- Using the wrong filter: A vacuum may collect visible material while allowing smaller particles to escape.
- Ignoring exhaust: A dusty plume from the vacuum exhaust is a sign to stop and inspect the filtration setup.
- Vacuuming too quickly: Fast nozzle movement disturbs powder before it can be captured.
- Starting with the floor: Dust from walls and ledges can fall onto your freshly cleaned floor.
- Overfilling the vacuum: Restricted airflow and loaded filters can reduce cleaning performance.
- Skipping the final wipe: A thin film often remains on smooth surfaces after the first vacuum pass.
*Expert Alert: Stop routine DIY cleanup if the dust may involve asbestos, lead-based paint, extensive mold contamination, or another hazardous building material. A qualified professional may need to assess and contain the material before cleaning continues.*
Older painted surfaces deserve particular caution during renovation. Do not assume every pale powder on the floor is harmless drywall compound when other building materials were disturbed.
How Do You Stop Drywall Dust From Coming Back?
If dust seems to return after cleaning, another surface is usually still holding powder or the work area is being disturbed again. Recheck higher surfaces before repeatedly vacuuming only the floor.
The EPA explains that settled indoor particulate matter can become airborne again during ordinary movement and cleaning. Its indoor particulate matter guidance recommends frequent cleaning and damp dusting to reduce buildup.
Check these overlooked areas
- Window and door trim
- Baseboard tops
- HVAC registers and nearby surfaces
- Shelves and cabinet tops
- Light fixtures
- Furniture frames
- Tools and extension cords
- Protective sheeting being removed from the room
Remove dusty coverings carefully instead of shaking them indoors. Bag disposable materials before carrying them through clean parts of the house.
Reduce dust during the next drywall job
Prevention makes final vacuuming much easier. Contain the sanding area and capture dust as close to the source as practical.
NIOSH testing found five vacuum-assisted drywall sanding controls reduced measured dust exposures by 80% to 97% compared with conventional nonventilated sanding. Source capture can therefore reduce how much powder needs cleanup later.
As of 2026, my simple rule remains the same: capture drywall dust early, vacuum it with suitable filtration, and finish with controlled damp cleaning. That approach is slower than one rushed pass but far less frustrating.
Frequently Asked Questions
Can you vacuum drywall dust with a regular vacuum?
You can use a household vacuum only when its manufacturer permits fine construction dust and its filtration is suitable. Many ordinary vacuums are designed for household debris, not large amounts of fine sanding powder, so a properly designed HEPA vacuum is the safer cleanup choice.
Can drywall dust ruin a vacuum?
Large amounts of fine powder can clog filters and reduce airflow quickly. Whether it damages a specific vacuum depends on its design, filtration system, maintenance, and manufacturer instructions, so avoid assuming every household or shop vacuum can handle drywall dust.
Should you sweep drywall dust before vacuuming?
Avoid dry sweeping fine drywall powder because sweeping can send settled particles back into the air. Pick up large pieces separately, then vacuum the remaining fine material before damp-cleaning suitable hard surfaces.
Is a shop vac good for drywall dust?
A shop vacuum can work when it is equipped and designed for fine dust collection. A standard filter or a loosely fitted aftermarket HEPA filter does not automatically make the entire vacuum a sealed HEPA system.
Should you wet drywall dust before vacuuming?
Do not turn piles of loose powder into wet paste before removing them. Vacuum dry dust first, then use damp wiping or mopping on surfaces that safely tolerate moisture.
How many times should you vacuum after drywall sanding?
There is no fixed number of passes. Continue with slow, overlapping passes until visible powder is gone, then clean higher surfaces and finish suitable hard surfaces with a damp method before inspecting the room again.
Why does drywall dust keep appearing after I clean?
Residual powder may still be sitting on trim, walls, fixtures, furniture, vents, or protective coverings. Movement can disturb those deposits and make the floor look dusty again, so clean the entire room from high surfaces downward.
Final takeaway: Use a suitable HEPA-filtered vacuum, work from high to low, and avoid dry sweeping. Finish with damp cleaning where appropriate, then inspect the room again after the remaining airborne dust has settled.
For your next drywall project, plan the cleanup before sanding starts. Good containment and source capture can save far more effort than repeatedly cleaning dust after it has spread through the house.
“`