
How to Vacuum Car Carpet: A Complete Step-by-Step Guide

Quick Answer
To vacuum car carpet, remove the floor mats and loose items first. Loosen embedded dirt, vacuum the open carpet slowly, then use a crevice tool around seat rails, edges, pedals, and the center console. For general carpet care, the EPA recommends following manufacturer cleaning guidance rather than relying on one universal cleaning schedule.
Quick Steps
- Empty the cabin: Remove trash, personal items, and anything that blocks the carpet.
- Remove floor mats: Take them outside so dirt cannot fall back onto the carpet.
- Move the seats: Slide them fully forward and backward to expose hidden areas.
- Loosen debris: Agitate stubborn sand, hair, and soil with a suitable brush.
- Vacuum slowly: Use overlapping passes instead of racing across the carpet.
- Detail the edges: Finish with a crevice tool around rails, trim, and tight corners.
One Important Rule
- Don’t use an ordinary dry vacuum on wet carpet unless its manufacturer specifically approves wet pickup.
Car carpet can hide an impressive amount of sand, crumbs, dust, pet hair, and dried mud. A quick pass with a vacuum often cleans the surface while leaving much of that debris trapped along edges and deep in the pile.
I prefer a simple system: clear the space, loosen the dirt, vacuum slowly, then attack the tight areas separately. This guide shows exactly how to do that without turning a basic cleaning job into an all-day project.
In This Guide
What Do You Need to Vacuum Car Carpet?
You don’t need a professional detailing setup. A vacuum with useful attachments, a stiff but carpet-safe brush, and a little patience can handle most dry debris.
Car carpet vacuuming is the process of lifting dry soil and debris from automotive carpet fibers, seams, edges, and hard-to-reach cabin areas using suction and agitation.
Before starting, gather these basic tools:
- Vacuum cleaner: A shop vacuum, canister vacuum, or capable portable vacuum can work well.
- Crevice tool: Essential around seat rails, trim edges, and the center console.
- Brush attachment: Useful for surface dust and delicate carpeted areas.
- Carpet brush: Helps loosen sand, dried soil, and stubborn hair before vacuuming.
- Small detailing brush: Useful around rails and narrow seams.
- Trash bag: Keeps wrappers and larger debris out of your vacuum.
If dust or allergens are a concern, filtration matters too. The Asthma and Allergy Foundation of America discusses effective vacuuming and filtration as part of reducing indoor allergen exposure.
A HEPA-filtered machine can be useful for fine particles, but don’t choose a vacuum by its filter alone. Good suction, usable attachments, and easy access inside the car matter just as much for this job.
Prepare the car before turning on the vacuum
Park somewhere with enough space to open every door. Good lighting also helps you spot dirt along black or dark-gray carpet.
Then prepare the interior:
- Remove bottles, papers, coins, toys, and personal items.
- Pick up large pieces of trash by hand.
- Remove every removable floor mat.
- Check beneath seats for objects that could damage the vacuum.
- Unplug charging cables and move loose cords.
Coins, screws, stones, and hard plastic pieces are better picked up manually. They can make an unpleasant trip through a vacuum hose.
How Do You Vacuum Car Carpet Step by Step?
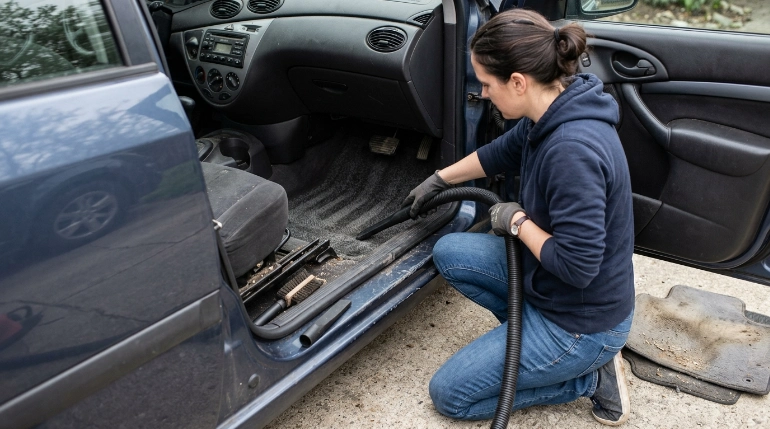
Start with the easy open areas, then work toward seams and hidden spaces. Slow overlapping passes give suction more time to pull debris from the carpet fibers.
1. Remove and clean the floor mats
Take all removable mats outside first. Otherwise, dirt from the mats can fall onto carpet you’ve already cleaned.
Shake carpet mats away from the vehicle. Vacuum each side, paying extra attention to the driver’s mat because it usually collects the most loose soil.
2. Slide the front seats all the way back
Moving the seats exposes carpet around the pedals and front seat rails. These areas collect crumbs, small stones, and grit that ordinary passes miss.
Vacuum the exposed front footwells before changing the seat position again.
3. Loosen trapped dirt before vacuuming
Dry sand and soil can settle between short automotive carpet fibers. Suction alone may leave a surprising amount behind.
Use a carpet-safe brush with short, controlled strokes. You only need enough agitation to bring debris toward the surface.
4. Vacuum the main carpet slowly
Place the vacuum nozzle flat against the carpet. Move it slowly instead of making fast sweeping motions.
Use overlapping passes in at least two directions:
- Vacuum from front to back.
- Repeat from side to side.
- Inspect the surface under bright light.
- Repeat stubborn areas as needed.
My rule is simple: if you can still hear grit entering the hose, that area isn’t finished. Change the direction of your next pass rather than simply moving faster.
5. Move the seats fully forward
Now expose the carpet behind and beneath the front seats. Check beneath the rails before inserting a rigid attachment.
A crevice tool usually reaches farther underneath a seat than a wide floor nozzle.
6. Vacuum around the seat rails
Rails create narrow channels where grit becomes trapped. Use a small brush to move debris away from rail hardware, then vacuum it.
Don’t force a hard nozzle against electrical connectors or wiring beneath powered seats.
7. Detail the carpet edges
Switch to your crevice attachment. Run it along door-sill trim, console edges, seat mounting points, and corners.
These narrow areas often make the difference between carpet that looks quickly vacuumed and carpet that looks properly detailed.
8. Do one final inspection
Look at the carpet from several angles. Direct light across the surface makes remaining hair and pale sand easier to see.
Finish these areas before reinstalling the floor mats:
- Driver’s footwell and pedal area
- Passenger footwell
- Under both front seats
- Rear footwells
- Center hump or transmission tunnel
- Door-side carpet edges
- Rear cargo carpet, if applicable
Section Takeaway: Thorough car-carpet vacuuming depends more on access, agitation, and slow passes than on repeatedly sweeping a nozzle across the visible surface.
Which Vacuum Attachment Works Best on Car Carpet?
No single attachment is best everywhere. A wider nozzle handles open carpet faster, while a crevice tool wins around rails and trim.
| Tool or Attachment | Best Use | Less Suitable For |
|---|---|---|
| Wide upholstery nozzle | Open footwells and cargo carpet | Narrow rail channels |
| Crevice tool | Edges, seat rails, console gaps | Large open areas |
| Brush attachment | Dust and light surface debris | Deeply embedded grit |
| Separate carpet brush | Loosening sand and embedded debris | Removing debris by itself |
| Wet/dry vacuum | Dry debris and approved liquid pickup | Any use outside its manufacturer’s instructions |
Don’t overlook hose size and maneuverability
A powerful full-size vacuum isn’t always convenient inside a compact vehicle. The hose needs enough flexibility to reach beneath seats without fighting you.
Portable vacuums are easier to maneuver. However, small dust bins and narrow passages may need frequent emptying when the carpet contains heavy sand.
How Do You Remove Sand, Pet Hair, and Embedded Dirt?
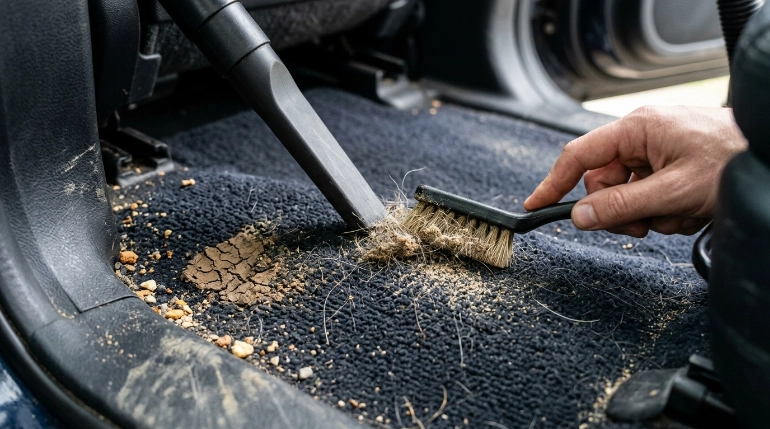
Different debris behaves differently in automotive carpet. Adjusting your technique can save more time than simply increasing suction.
Sand and fine grit
Sand settles deep and tends to bounce between fibers. Brush a small area, vacuum it, then repeat instead of brushing the whole cabin at once.
For stubborn sand:
- Agitate the carpet in short strokes.
- Vacuum immediately after brushing.
- Change the vacuuming direction.
- Repeat until little or no grit enters the nozzle.
Pet hair
Pet hair can cling to carpet through friction and become tangled around fibers. A standard nozzle may glide directly over it.
Loosen the hair before vacuuming with an appropriate pet-hair tool, rubberized hair-removal tool, or carpet-safe brush. Avoid aggressive scraping that damages the carpet pile.
Dried mud
Let ordinary mud dry before trying to remove dry soil with a vacuum. Breaking wet mud apart can spread it into a larger stain.
Once dry, gently break up the crust and vacuum loose particles. Treat any remaining stain separately using a cleaner approved for the vehicle’s carpet.
Crumbs and food debris
Start with visible pieces before working on fine particles. Check beneath seat rails and between carpet edges because food tends to migrate as passengers move their feet.
Old food debris can also contribute to unpleasant cabin odors. Removing the source should come before trying to mask the smell.
Should You Vacuum Wet or Moldy Car Carpet?
Don’t treat wet carpet like ordinary dry debris. First identify the moisture source and determine whether your equipment is designed for liquid pickup.
The EPA’s moisture guidance discusses using wet vacuums for wet carpet and emphasizes drying carpet and backing quickly after water exposure.
Use the right machine for moisture
A standard dry household vacuum isn’t automatically a wet vacuum. Never collect liquid unless the manufacturer’s instructions specifically permit it.
A suitable wet/dry vacuum or extractor may be appropriate depending on the situation. Follow its operating and electrical-safety instructions closely.
Don’t ignore why the carpet became wet
A wet floor after an overturned drink is different from recurring unexplained moisture. Persistent dampness can point to a door-seal leak, sunroof drain issue, heater problem, or other water entry.
Drying the surface while leaving the cause unfixed means the moisture can return.
Take mold or prolonged dampness seriously
The EPA explains that moisture control is central to preventing mold, and porous material can become difficult to clean once mold develops. Its mold and moisture guidance provides broader information about damp porous materials.
The CDC also advises prompt drying of wet materials and notes that soaked carpet or upholstery may need removal when it cannot be dried promptly.
Expert Alert: If vehicle carpet stays wet, has widespread visible mold, repeatedly develops a musty odor, or the padding underneath is soaked, consider a qualified automotive water-leak or remediation professional instead of treating it as a simple vacuuming job.
How Often Should You Vacuum Car Carpet?
There’s no single schedule that fits every vehicle. How quickly the carpet gets dirty depends on passengers, pets, weather, parking conditions, and how often you drive.
A useful approach is to clean based on visible buildup and your driving habits.
- Light-use vehicle: Vacuum when crumbs, dust, or grit become visible.
- Daily commuter: Inspect the footwells regularly because outside soil enters with every trip.
- Family vehicle: Check rear footwells and beneath seats more often for food debris.
- Pet vehicle: Remove loose hair before it becomes heavily embedded.
- Beach or outdoor vehicle: Deal with sand early because repeated foot traffic pushes it deeper.
- Wet-weather vehicle: Watch for damp mats and carpet instead of waiting for an odor.
Make the next vacuuming easier
Small habits reduce how much dirt reaches the permanent carpet. Empty loose trash regularly and shake out removable mats before they become heavily loaded.
Before replacing clean floor mats, make sure the underlying carpet is dry. Trapping moisture under a mat makes inspection and drying harder.
Frequently Asked Questions
What is the easiest way to vacuum car carpet?
Remove the mats, move the seats, loosen embedded debris with a carpet-safe brush, and vacuum in slow overlapping passes. Finish with a crevice tool around seat rails, trim, and console edges.
Why won’t my vacuum pick up sand from car carpet?
Sand can settle between short, dense carpet fibers. Agitate one small section with a suitable brush, vacuum immediately, then repeat from another direction instead of relying on suction alone.
Can I use a household vacuum in my car?
Yes, if the vacuum is suitable for the debris you’re collecting and you can safely reach the vehicle. A flexible hose and crevice attachment usually matter more than the vacuum’s physical size.
Can I vacuum wet car carpet?
Only use equipment specifically designed and approved for liquid pickup. Don’t use an ordinary dry vacuum on wet carpet. Identify the source of the water and dry the carpet and underlying material promptly.
How do I get pet hair out of car carpet before vacuuming?
Loosen attached hair with a carpet-safe brush or suitable pet-hair removal tool first. Gather larger clumps, then vacuum from multiple directions to collect hair lifted from the fibers.
Should I brush car carpet before vacuuming?
Brushing can help when sand, pet hair, or dried soil is embedded in the fibers. Lightly agitate the affected area, then vacuum immediately so loosened material doesn’t settle again.
Do I need a HEPA vacuum for car carpet?
A HEPA-filtered vacuum can be useful when fine dust and allergen control matter, but it isn’t mandatory for every vehicle. Effective pickup also depends on suction, attachments, filtration design, and good vacuuming technique.
The main takeaway is simple: don’t rush car carpet vacuuming. Remove obstructions, expose hidden areas, loosen embedded debris, vacuum slowly, and finish every edge with the right attachment.
Once you use the same order each time, the job becomes much faster. Start with one footwell, work systematically around the cabin, and deal with moisture separately from ordinary dry dirt.