How to Vacuum Baseboards: The Easy, Dust-Smart Method

Quick Answer
To vacuum baseboards, use your vacuum’s soft dusting brush or crevice tool and work from the top edge down toward the floor. Move slowly so the vacuum captures settled dust instead of pushing it into the room; the EPA also recommends frequent cleaning and damp dusting to control household dust.
Quick baseboard vacuuming steps
- 1. Clear the area: Move small furniture, cords, toys, and floor items away from the wall.
- 2. Choose the attachment: Use a soft dusting brush for flat trim and a crevice tool for narrow gaps.
- 3. Start at the top: Vacuum the upper lip of the baseboard before cleaning the front face.
- 4. Work slowly: Use overlapping passes instead of racing along the wall.
- 5. Clean the edges: Run the crevice tool where the baseboard meets the wall and floor.
- 6. Damp-wipe if needed: Remove remaining sticky grime with a lightly damp microfiber cloth.
One useful tip
- Vacuum baseboards before vacuuming or mopping the floor, since some loose dust may fall during the job.
Learning how to vacuum baseboards sounds simple until you notice dust packed into corners, pet hair along the floor line, and grime stuck to painted trim. I get better results when I treat the baseboard as three separate areas: the top ledge, front face, and bottom edge.
This guide covers the routine I use for home hygiene cleaning without turning a small job into a deep-cleaning project. As of 2026, the basic goal remains simple: capture settled dust with the least possible disturbance.
In This Guide
- What is the best way to vacuum baseboards?
- Which vacuum attachments work best on baseboards?
- How do you vacuum baseboards step by step?
- How do you clean corners, pet hair, and sticky grime?
- How do you vacuum baseboards without damaging paint?
- How often should you vacuum baseboards?
- Frequently asked questions
What Is the Best Way to Vacuum Baseboards?
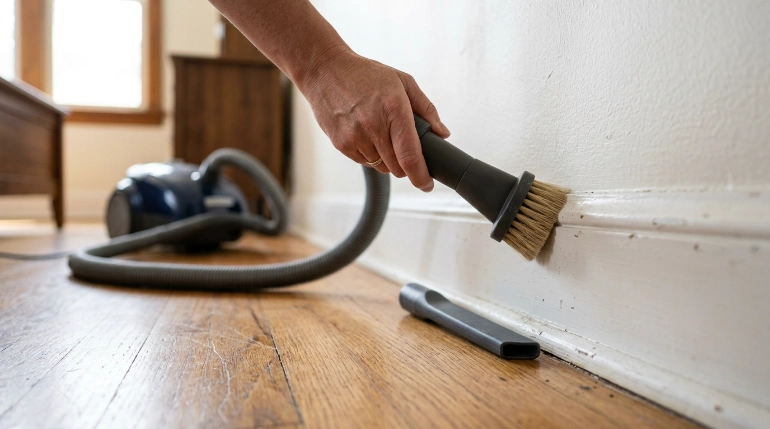
The best method is to vacuum dry dust first, then spot-clean anything the vacuum cannot remove. This keeps you from turning loose dust into muddy streaks with a wet cloth.
A baseboard is the trim fitted along the bottom of an interior wall. Its small horizontal top edge acts like a shelf, so settled dust often becomes visible there before it becomes obvious on the wall itself.
Clean from high to low
I start with the top ledge because gravity works against you during cleaning. Dust removed from that edge may land on the face of the trim or the floor.
Next, I vacuum the flat front surface. I finish where the baseboard meets the flooring.
- Top edge: Use a dusting brush with gentle contact.
- Front face: Make long, controlled horizontal passes.
- Floor seam: Switch to a crevice tool for trapped debris.
- Corners: Approach from two directions rather than forcing the nozzle into the trim.
Vacuum before wiping
Dry removal should usually come first. A wet cloth placed directly onto heavy dust can leave gray streaks across white or light-colored paint.
After vacuuming, a slightly damp microfiber cloth can pick up the fine film that remains. For routine dust, I rarely need anything stronger.
If you plan to clean the entire room, do the baseboards before your final floor pass. That lets your floor vacuum or mop collect anything that falls.
Section Takeaway: Vacuum the top edge, face, and floor seam in that order. Remove dry dust before introducing moisture.
Which Vacuum Attachments Work Best on Baseboards?
A soft dusting brush is my first choice for most painted baseboards. A crevice tool is better when debris is trapped against the wall, flooring, or inside corners.
You do not need a special baseboard vacuum. The right attachment matters more than whether you own an upright, canister, or stick vacuum.
| Tool | Best Use | Contact With Paint | My Usual Pass |
|---|---|---|---|
| Soft dusting brush | Top ledges and painted faces | Soft bristles touch the surface | 1–2 slow passes |
| Crevice tool | Floor seams and corners | Keep the hard edge slightly away | 1 controlled pass per seam |
| Flexible hose | Behind furniture and awkward angles | Depends on attachment | Short sections at a time |
| Microfiber cloth | Fine film and light marks after vacuuming | Direct, gentle contact | 1 light finishing wipe |
Upright vs. canister vs. stick vacuums
A canister vacuum can be convenient because its hose reaches trim without moving the main body constantly. Upright vacuums work well too when they include a flexible hose.
Stick vacuums are useful when they accept small dusting tools. Their lighter weight can make room-to-room baseboard cleaning easier.
A robot vacuum can collect floor debris beside a baseboard, but it cannot properly clean the vertical face or upper trim edge. I treat it as floor maintenance, not baseboard cleaning.
What about HEPA filtration?
HEPA means high-efficiency particulate air. A vacuum equipped with suitable filtration can be useful when controlling fine household dust is a priority.
Filtration does not replace careful technique. A clogged filter, overflowing bin, loose connection, or dirty brush can reduce how well a vacuum handles dust.
How Do You Vacuum Baseboards Step by Step?

The easiest routine is to divide the room into short wall sections and clean each section completely before moving on. This prevents skipped areas and keeps the hose from dragging across freshly cleaned trim.
1. Prepare the room
Move lightweight objects away from the wall. You do not need to empty the room.
- Pick up cords and charging cables.
- Move wastebaskets, shoes, toys, and plant pots.
- Pull small furniture forward when practical.
- Leave heavy furniture in place unless dust buildup behind it needs attention.
2. Check the vacuum
Make sure the bin or bag has enough capacity for the job. Inspect the hose and attachment for grit that could rub against painted trim.
I also check the dusting brush before starting. A brush packed with hair and debris will not glide across the surface cleanly.
3. Vacuum the upper ledge
Attach the soft brush and begin at one corner. Hold the brush nearly level with the top edge instead of pressing downward.
Move at a steady pace. If you can still see a dust line after one pass, repeat it rather than pushing harder.
4. Clean the front face
Run the dusting brush horizontally along the painted surface. Use light contact and let suction do most of the work.
Decorative baseboards may have grooves or stepped molding. Follow those contours with the brush instead of trying to cover the entire profile in one pass.
5. Switch to the crevice tool
Use the crevice tool along the bottom seam and inside corners. Keep the hard nozzle edge from scraping the paint.
For a tight corner, vacuum from one wall and then the adjoining wall. This usually works better than jamming the nozzle directly into the corner.
6. Inspect before damp cleaning
Run a finger over a small section or inspect it under side lighting. If a gray film remains, finish with a barely damp microfiber cloth.
Let painted trim dry before moving furniture back against the wall. Avoid soaking MDF or wood baseboards because moisture can enter seams or damaged finishes.
Section Takeaway: Use the vacuum for loose material first, then use minimal moisture only where needed. Slow passes work better than extra pressure.
How Do You Clean Corners, Pet Hair, and Sticky Grime?
Vacuuming works best on loose dust, hair, crumbs, and dry debris. Sticky residue and scuff marks need a different finishing step.
Pet hair along the floor edge
Pet hair often gathers where carpet or flooring meets the baseboard. A crevice tool can pull loose hair from this narrow strip.
On carpet, work slowly so the nozzle has time to lift hair from the edge fibers. Do not scrape painted trim with the hard plastic tip.
Dust packed into corners
I loosen stubborn corner dust gently with a clean soft brush while holding the vacuum nozzle nearby. The goal is to capture the particles as they break free.
Avoid blowing into corners or brushing aggressively. Both methods can scatter the same dust across nearby surfaces.
Sticky residue and fingerprints
Vacuum first. Then wipe the mark with a soft cloth lightly dampened with water or a mild cleaner that is safe for the finish.
The CDC distinguishes routine cleaning from disinfecting, and ordinary household surfaces do not automatically need disinfectant after every cleaning. Follow the product label whenever you use a cleaner.
What if you see mold?
Do not simply vacuum visible mold and assume the problem is solved. Mold growth usually means moisture needs attention as well.
The CDC’s mold cleanup guidance recommends appropriate precautions because disturbing mold can create exposure to spores and debris.
Expert Alert: If mold covers more than a small isolated area, keeps returning, follows major water damage, or appears inside walls, contact a qualified mold or moisture professional instead of relying on routine baseboard cleaning.
How Do You Vacuum Baseboards Without Damaging Paint?
Use soft attachments, light pressure, and a clean nozzle. Most scratches happen because a hard tool edge or trapped grit gets dragged across the finish.
- Inspect the attachment: Remove sand, grit, and sharp debris before it touches paint.
- Avoid hard scraping: Hold crevice tools just off delicate painted faces.
- Test cleaners first: Try any damp-cleaning product in a hidden area.
- Limit moisture: Do not saturate MDF, unfinished wood, seams, or damaged paint.
- Skip abrasive pads: They can dull or remove the finish.
Be careful with damaged paint in older homes
Older painted surfaces deserve extra care. If your home was built before 1978 and the baseboard paint is peeling, cracking, or chipping, avoid aggressively disturbing it.
The EPA’s lead-safe home guidance gives specific precautions for deteriorated paint and household dust. The agency notes that intact surfaces and damaged painted surfaces may require different cleaning approaches.
Expert Alert: If you suspect lead-based paint or see significant deterioration on older trim, use appropriate lead-safe guidance or contact a qualified professional before sanding, scraping, or performing repairs.
Watch for moisture damage
Swollen MDF, dark staining, soft wood, or recurring dampness can indicate a problem beyond surface dirt. Vacuuming can remove dust but cannot fix the moisture source.
Check nearby plumbing, exterior walls, windows, or flooring for signs of water. Persistent leaks should be inspected and repaired rather than repeatedly cleaned over.
How Often Should You Vacuum Baseboards?
For many homes, baseboards do not need attention every time the floor is vacuumed. I prefer a quick inspection and clean them when the visible dust line starts forming.
Homes with pets, heavy foot traffic, open windows, or allergy concerns may need more frequent attention. Quiet guest rooms usually need less.
A practical cleaning schedule
- Weekly: Check high-traffic rooms and obvious pet-hair zones.
- Every 2–4 weeks: Vacuum visible dust from commonly used rooms.
- Every 1–3 months: Move accessible furniture and clean less-visible sections.
- During deep cleaning: Inspect corners, door trim, vents, and areas behind movable furniture.
This is a practical household schedule, not a health rule. Adjust it based on how fast dust actually returns in your home.
What if someone in the home has allergies?
Dusting and vacuuming can temporarily disturb particles while you clean. The Asthma and Allergy Foundation of America advises people with dust mite allergies to reduce dust buildup and notes that vacuuming can stir dust during the process.
The National Institute of Environmental Health Sciences also recommends damp dusting rather than dry dusting for dust-mite allergen control and discusses HEPA-filter vacuum use.
If fine dust is a recurring concern, focus on source control as well as filtration. A vacuum handles settled material, while an air purifier or HVAC filter deals with certain airborne particles and should be used according to its manufacturer guidance.
The EPA notes that frequent cleaning, damp dusting, and suitable vacuum filtration can help reduce indoor particulate buildup.
Section Takeaway: Clean according to the dust load in your home rather than following a rigid calendar. Homes with pets or dust-sensitive occupants may benefit from more frequent attention.
Frequently Asked Questions About Vacuuming Baseboards
Can I vacuum baseboards instead of wiping them?
Yes, if the baseboards only have loose dust, hair, or crumbs. Vacuuming often handles routine buildup well, but fingerprints, greasy residue, dried spills, and scuff marks may still need a lightly damp microfiber cloth.
What vacuum attachment should I use for baseboards?
Start with a soft dusting brush for the top and painted face. Use a crevice tool along the floor seam, behind furniture, and in tight corners where a wider brush cannot reach.
Should I vacuum baseboards before or after the floor?
Vacuum baseboards before your final floor cleaning. Some debris can fall from the trim while you work, and cleaning the floor afterward lets you collect it in one pass.
Can a robot vacuum clean baseboards?
A robot vacuum can collect debris beside the baseboard at floor level. It cannot properly vacuum the vertical face, upper ledge, decorative grooves, or most corners, so occasional manual cleaning is still useful.
Can I use a brush directly on painted baseboards?
Yes, provided the brush is soft and clean and the paint is in good condition. Check the bristles for trapped grit first, and avoid aggressive pressure on delicate, peeling, or freshly painted surfaces.
Do I need a HEPA vacuum for baseboards?
Not everyone needs one solely for baseboard cleaning. However, households concerned about fine dust or allergens may prefer a well-maintained vacuum with suitable filtration, especially when cleaning dusty areas regularly.
Why do my baseboards get dusty so quickly?
Baseboards sit where airborne particles, pet hair, floor debris, and normal household dust can settle along a wall. Their narrow horizontal ledges also make buildup easy to see, especially on white or dark trim.
The simplest routine is the one I keep coming back to: brush attachment first, crevice tool second, and a damp microfiber cloth only when needed. Once you clean baseboards in that order, the job becomes much faster and there is less dust to chase around the room.