How to Replace Robot Vacuum Side Brushes

Quick Answer
To replace robot vacuum side brushes, turn the robot off, flip it over, and identify how the brush attaches. Remove the screw or release the removable brush, clean the mounting post, fit the correct replacement, and test it before your next full cleaning cycle. The exact attachment varies by model, so check the manufacturer’s instructions, such as iRobot’s official side-brush replacement guidance.
Quick replacement steps
- Power off: Shut down the robot and remove it from its charging dock.
- Flip it over: Place the vacuum upside down on a soft, stable surface.
- Check the mount: Look for a retaining screw or removable press-fit brush.
- Remove the brush: Unscrew or carefully pull off the worn side brush.
- Clean underneath: Remove hair, thread, and packed debris from the mounting post.
- Install and test: Fit the replacement securely and confirm that it rotates freely.
One important check
- Match the replacement brush to your exact robot vacuum model before installation.
A robot vacuum depends on more than suction. Its little side brush reaches along walls, corners, furniture legs, and other places the main cleaning head cannot easily reach.
I’ve found that this small part is easy to ignore until edge cleaning suddenly gets worse. This guide explains how to replace robot vacuum side brushes safely, how to spot wear, and what to check if a new brush still won’t spin.
In This Guide
- What does a robot vacuum side brush do, and when should you replace it?
- What do you need before replacing a robot vacuum side brush?
- How do you replace robot vacuum side brushes step by step?
- How can you tell the new side brush is installed correctly?
- Why is the new robot vacuum side brush not spinning?
- How can you make robot vacuum side brushes last longer?
- Frequently asked questions
What does a robot vacuum side brush do, and when should you replace it?
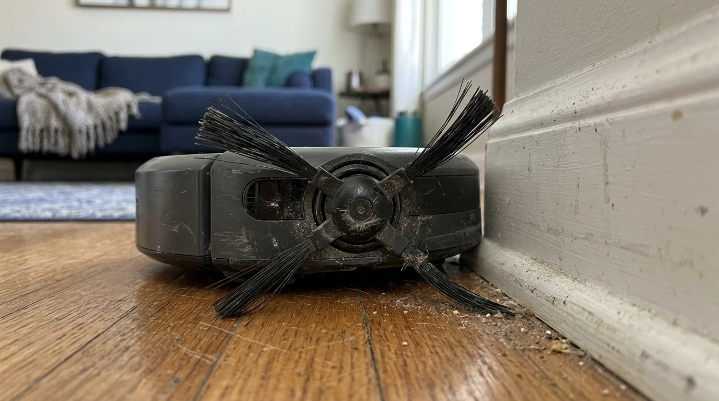
A robot vacuum side brush sweeps debris away from edges and toward the machine’s main cleaning path. Replace it when cleaning no longer restores its normal shape or performance.
A robot vacuum side brush is a small rotating brush mounted near an outer edge of the vacuum. Depending on the machine, there may be one side brush or two.
Signs a side brush needs replacement
You don’t need to replace a brush just because it looks dusty. Hair and lint can make a healthy brush look worse than it is.
Clean it first. Then look for these problems:
- Permanently bent arms: The bristles stay curled or flattened after cleaning.
- Missing bristles: One or more brush arms have broken or worn away.
- Cracked center hub: The mounting area is split, loose, or damaged.
- Poor edge pickup: Debris remains beside walls despite a clean brush and normal suction.
- Repeated detachment: The brush will not remain securely attached.
- Severe bristle wear: The ends are shortened enough that they barely contact the floor.
A few bent bristles don’t always mean replacement. If the hub is sound and the arms still sweep the floor evenly, cleaning may be enough.
Should you clean, replace, or repair?
| What you see | Best first action | Why |
|---|---|---|
| Hair wrapped around the hub | Clean it | Debris can restrict rotation even when the brush itself is usable. |
| Bent, shortened, or missing bristles | Replace the brush | The brush may no longer reach edges effectively. |
| New brush will not turn | Troubleshoot the mount or module | The problem may be underneath the replaceable brush. |
| Cracked or damaged drive post | Check manufacturer service guidance | Replacing only the brush may not correct mechanical damage. |
As of 2026, manufacturers still use different side-brush mounting designs. That makes your model number more useful than the brush’s appearance alone.
Section Takeaway: Clean the brush before replacing it, but don’t keep using a cracked hub or badly worn bristles just to extend service life.
What do you need before replacing a robot vacuum side brush?
Most side-brush replacements need few tools. The important part is having the correct replacement and checking the attachment method first.
- Correct replacement side brush: Match the exact robot model or manufacturer compatibility list.
- Small screwdriver: Use the size specified for a screw-mounted brush.
- Soft towel or mat: Protects the robot’s top surface while it’s upside down.
- Tweezers: Helpful for lifting hair from around the mounting shaft.
- Dry cleaning cloth: Useful for removing loose dust around the brush area.
- Small container: Keeps a retaining screw from disappearing during the job.
Don’t start by forcing the brush upward. Some brushes are retained by a screw, while other designs are meant to pull off.
If you’re unsure, find the model number before touching the fastener. It is often printed on a label underneath the machine or listed in its app.
Tip: Take a quick photo of the old brush before removal. It gives you an easy reference for brush orientation and screw placement.
How do you replace robot vacuum side brushes step by step?

Start with the robot fully stopped and removed from its dock. Then replace the brush using the attachment method designed for your model.
1. Turn off the robot vacuum
Stop any cleaning cycle and power the robot down. Remove it from the charging dock before flipping it over.
This prevents the brush from starting unexpectedly. It also makes the machine easier to handle.
2. Place the robot upside down
Put a towel on a table or clean floor. Turn the robot over gently so the underside faces upward.
Don’t balance it on a raised sensor housing. Use a flat, stable working surface.
3. Identify the side-brush mounting style
Look at the center of the brush. A visible retaining screw usually indicates a screw-mounted design.
For example, Roborock’s official S5 maintenance guidance instructs owners to unscrew the side brush for cleaning and reinstall it afterward.
Other robot vacuums may use removable press-in or model-specific assemblies. Never assume two similar-looking robots use the same attachment.
4. Remove the worn side brush
For a screw-mounted brush, hold the brush steady and loosen its retaining screw. Put the screw somewhere safe.
Lift the brush straight away from the mounting post. Avoid twisting aggressively against the drive mechanism.
For a pull-off design, grip the brush close to its center hub. Pull according to the manufacturer’s service instructions rather than yanking the bristles.
5. Clean the brush mount
This is the step I wouldn’t skip. Hair often winds tightly underneath a side brush where you can’t see it during normal cleaning.
- Lift away wrapped hair and thread.
- Remove packed dust around the shaft.
- Check the mounting post for visible cracks.
- Inspect the screw hole if your brush uses a fastener.
- Make sure nothing blocks free rotation.
Don’t pour water or cleaner into the brush drive area. Keep moisture away from motors and electrical parts unless the manufacturer specifically allows it.
6. Compare the old and new brushes
Place them side by side before installation. Check the center opening, overall shape, mounting point, and any left/right markings.
A replacement that looks close isn’t always compatible. Small differences at the hub can prevent proper seating.
7. Install the replacement brush
Set the new brush onto the mounting post in the correct position. It should sit flat rather than leaning to one side.
For a screw-mounted design, reinstall the original fastener and tighten it securely. Don’t overtighten a small plastic hub.
For removable press-in designs, seat the brush using the method specified for that model. Confirm that it doesn’t lift off with normal light handling.
8. Rotate the brush by hand and test the robot
Before turning the machine upright, gently check for obvious binding. The brush should not scrape against a misplaced part.
Then return the vacuum to the floor and run a short cleaning test. Watch whether the side brush rotates and reaches the floor normally.
Section Takeaway: The safest replacement sequence is power off, identify the mount, remove the brush, clean underneath, match the new part, install it, and test it.
How can you tell the new side brush is installed correctly?
A correctly installed side brush should sit securely, rotate without obvious binding, and contact the floor as intended. It shouldn’t wobble loosely or fall off during normal cleaning.
Run the vacuum in an open area first. That lets you observe the brush without furniture blocking your view.
Use this quick installation check
- Brush sits flat: The center hub is properly seated on its post.
- Fastener is secure: A screw-mounted brush doesn’t wobble because of a loose screw.
- Bristles can move: No packaging, thread, or debris traps the brush.
- No harsh noise: You don’t hear new scraping, clicking, or grinding.
- Edge sweeping returns: The brush reaches debris along walls during a test pass.
Some brushes may change speed during normal operation. Don’t diagnose a fault from a few seconds of observation alone.
Instead, watch a short cleaning cycle on a suitable floor. Look for consistent operation and normal edge contact.
Why is the new robot vacuum side brush not spinning?
If a new side brush doesn’t spin, remove it and check the mounting area before buying another brush. Hair, incorrect installation, incompatible parts, or a deeper drive problem may be responsible.
Hair is still trapped underneath
A clean-looking brush can hide tightly wound hair below its center hub. Remove the brush again and inspect the shaft closely.
Manufacturer maintenance instructions support this approach. iRobot’s edge-sweeping brush care guidance includes removing the brush so trapped debris can be cleaned from the area.
The replacement isn’t fully seated
A brush installed at an angle may bind or fail to engage its drive point. Remove it and reinstall it carefully.
Don’t compensate by forcing the screw tighter. Correct seating comes first.
The replacement brush is incompatible
Third-party accessory listings sometimes cover several machines. Confirm that your exact robot model appears in the compatibility information.
Pay special attention to the center hub. That’s where small design differences matter most.
The brush module may have a problem
If the old and new brushes both fail after cleaning and correct installation, the problem may sit below the replaceable brush. A drive module, internal gear, connector, or motor may need inspection.
Some manufacturers provide model-specific repair resources. For example, eufy’s RoboVac R500 support page includes maintenance resources for the side-brush system.
Expert Alert: If troubleshooting requires opening electrical assemblies, testing internal wiring, or repairing a motor, use the manufacturer’s service procedure or a qualified repair technician.
Section Takeaway: When a new brush won’t spin, check debris, seating, compatibility, and the mounting mechanism before assuming the replacement itself is defective.
How can you make robot vacuum side brushes last longer?
Regular cleaning is the easiest way to protect side brushes. Hair and thread create resistance around the hub and can deform the bristles over time.
Check the brush during routine maintenance
Turn the robot over periodically and look for tangles. Homes with long hair or shedding pets may need more frequent checks.
Don’t wait until the brush is completely wrapped. Early removal usually makes cleanup easier.
Clear problem objects from the floor
Side brushes can catch lightweight or string-like objects. These are especially troublesome because the rotating arms can wind them around the hub.
- Loose charging cables
- Thread and yarn
- Long hair clumps
- Thin fabric ties
- Small plastic wrappers
- Frayed rug fibers
Don’t replace brushes on a calendar alone
Wear depends on floor type, cleaning frequency, debris, and the brush material. A fixed replacement interval isn’t equally useful for every household.
Inspect condition instead. Replace the brush when permanent deformation or damage begins affecting its job.
Use the manufacturer’s maintenance information
Robot vacuum designs change between models and generations. Your manual should take priority over a generic replacement tutorial.
The Roborock Support Center, for example, provides model-specific manuals, tutorials, troubleshooting information, and maintenance resources.
Maintenance tip: When you clean the side brush, inspect the main brush, wheels, sensors, filter, and charging contacts at the same time.
Frequently asked questions
How often should I replace robot vacuum side brushes?
There isn’t one correct replacement interval for every robot vacuum. Inspect the brush regularly and replace it when the bristles stay badly bent, pieces are missing, the hub is damaged, or edge-cleaning performance remains poor after cleaning.
Can I use a robot vacuum with a broken side brush?
The robot may still move and vacuum, but edge cleaning can suffer. A cracked or loose brush can also detach. Replacing a damaged brush is usually better than continuing to run it until more pieces break off.
Can I replace only one side brush?
Yes, if your robot has multiple side brushes and only one is damaged, you can usually replace the worn part. However, check your model’s instructions and compare the condition of both brushes so their wear doesn’t go unnoticed.
Why is my robot vacuum side brush spinning slowly?
Slow or irregular movement can result from wrapped hair, heavy debris, poor brush seating, or a mechanical issue. Clean underneath the brush first. If the behavior continues, check the manufacturer’s troubleshooting instructions for your exact model.
Can I straighten bent robot vacuum side brushes?
Minor temporary bending may improve after the brush is cleaned and left uncompressed. If the bristles remain badly warped, shortened, cracked, or unable to contact the floor correctly, replacement is the more dependable option.
Are replacement robot vacuum side brushes universal?
No. Side brushes can differ in hub shape, mounting method, dimensions, screw design, and model compatibility. Buy using your exact robot model number rather than choosing a replacement only because its bristles look similar.
What if the side brush falls off after replacement?
Stop the robot and check whether the brush is fully seated. For screw-mounted models, verify that the correct fastener is installed securely. If the hub or mounting post is damaged, consult the manufacturer before running the vacuum again.
Final takeaway: Replacing a robot vacuum side brush is usually a simple home-hygiene maintenance job. The key is matching the correct part, respecting your model’s mounting design, cleaning the hidden debris underneath, and testing the new brush before returning to normal cleaning.
If your robot keeps leaving dirt beside walls, inspect the side brush before assuming the vacuum has lost suction. A few minutes of maintenance can often reveal whether the brush only needs cleaning or is ready for replacement.