
How Do You Maintain a Shop Vacuum?

Quick Answer
To maintain a shop vacuum, empty the tank regularly, clean or replace its filter, inspect the hose for clogs or damage, clean the attachments, and keep the vacuum dry before storage. For fine household dust, proper filtration also matters because EPA guidance on indoor particulate matter notes that vacuuming can stir settled dust into the air.
Quick shop vacuum maintenance steps
- Unplug first: Disconnect the vacuum before opening the tank or touching the filter.
- Empty the tank: Don’t wait until debris or liquid completely fills the container.
- Check the filter: Remove accumulated dust and replace torn, heavily clogged, or unsuitable filters.
- Clear the hose: Remove anything restricting airflow through the hose, wand, or nozzle.
- Dry wet parts: Let the tank, hose, and appropriate washable components dry before storage.
- Inspect the cord: Stop using the vacuum if the cord, plug, switch, or housing appears damaged.
Best rule to remember
- Use the filter and maintenance procedure specified for your exact wet/dry vacuum model.
I’ve found that shop vacuums usually don’t lose performance all at once. Suction slowly drops as filters load with dust, hoses collect debris, and tanks stay dirty after jobs.
A few minutes of routine care can prevent many of those problems. This guide explains how I maintain a wet/dry shop vacuum without turning a simple cleaning appliance into another complicated project.
In This Guide
What Does Shop Vacuum Maintenance Include?
Shop vacuum maintenance means keeping the tank, filter, hose, attachments, seals, and exterior clean enough for unrestricted airflow. It also includes checking electrical parts for visible damage before use.
A shop vacuum, often called a wet/dry vacuum, is a high-capacity vacuum designed to collect dry debris and, on compatible models, liquids. Its maintenance needs differ from those of a normal household upright or stick vacuum.
The parts that need the most attention
I focus on the components that directly affect airflow or hold collected material. Those are the places where small problems usually become obvious first.
- Collection tank: Holds dirt, debris, or liquid and should be emptied before excessive buildup develops.
- Filter: Captures particles before air reaches the motor and exhaust.
- Hose: Carries debris into the tank and can lose airflow when partially clogged.
- Wands and nozzles: Frequently trap wood chips, hair, screws, leaves, and other bulky debris.
- Tank lid and seals: Must sit correctly to maintain strong airflow.
- Power cord and plug: Need routine visual checks for cuts, exposed conductors, or damaged connections.
Shop-Vac’s current troubleshooting information lists clogged filters, full tanks, loose hose connections, and damaged hoses among common causes of lost suction. That matches what I check first when a wet/dry vacuum suddenly feels weak.
If dust starts coming from the exhaust, stop and inspect the filtration system. A missing, damaged, clogged, or unsuitable filter can allow collected material to escape.
Section Takeaway: Good shop vacuum maintenance is mostly airflow maintenance. Keep the tank, filter, hose, and connections clean and unobstructed.
How Do You Clean a Shop Vacuum After Use?
Unplug the shop vacuum, empty its contents, remove loose dirt, clean the appropriate filter, and inspect the hose and attachments. After liquid pickup, clean and dry wet components before putting the vacuum away.
1. Disconnect the power
Switch the vacuum off and unplug it before removing the motor head. I make this the first step even when I only plan to empty the tank.
Never reach through a hose inlet or work around the motor assembly while the machine remains connected to power.
2. Empty the collection tank
Remove dry debris in a location where you can control the dust. Avoid aggressively dumping fine material where it can blow back into your living space.
EPA guidance notes that indoor dust can contain pollen, mold spores, pet dander, dust-mite material, soil, and other particles. Vacuuming and cleaning can temporarily disturb that settled material.
- Dry debris: Empty the tank before it becomes packed around the filter area.
- Wet debris: Drain or pour out the liquid promptly after use.
- Muddy material: Remove residue before it dries into a hard layer.
3. Wipe or rinse the tank when needed
I usually wipe a dry tank rather than washing it after every minor job. A wet or dirty tank deserves more thorough cleaning.
If you rinse the container, keep water away from the motor head and electrical components. Let the tank dry before reassembly or long-term storage.
4. Clean the hose and attachments
Look through the hose from both ends. A flashlight helps me find plugs that aren’t visible from the inlet.
Clean dusty wands and floor tools with a damp cloth when appropriate. Completely dry anything you wash before storage.
Expert Alert: If water has entered the motor housing, switch, cord connection, or another electrical section, stop using the vacuum and have it inspected by a qualified repair professional.
Section Takeaway: Emptying the tank isn’t enough after messy jobs. Check every part that carried debris and make sure wet components dry completely.
How Should You Maintain a Shop Vacuum Filter?
Inspect the filter frequently and clean or replace it according to its type and the vacuum manufacturer’s instructions. Never assume every cartridge, foam sleeve, bag, or HEPA-style filter can be cleaned the same way.
Match the filter to the job
Filter choice matters as much as filter cleanliness. Fine drywall-type dust needs different filtration from large workshop debris, while liquid pickup may require another configuration entirely.
Shop-Vac advises using filtration capable of handling the material being collected. Its troubleshooting guidance also recommends a more efficient filter when dust is too fine for the installed filter.
| Filter situation | What I check | Likely action |
|---|---|---|
| Light surface dust | Pleats, seating, airflow | Remove loose debris if the manufacturer allows it |
| Heavy clogging | Packed material between filter pleats | Clean using the approved method or replace |
| Tear or damaged seal | Holes, cracks, deformation | Replace the filter |
| Fine dust escaping | Filter type and installation | Use approved higher-efficiency filtration |
| Liquid pickup | Model-specific wet pickup setup | Follow the manual’s wet-filter instructions |
Can you wash a shop vacuum filter?
Some filters are washable, but others aren’t. Check the markings or owner’s manual before putting any filter under running water.
If a washable filter gets rinsed, let it dry as directed before using it for dry pickup. Installing a wet filter where the manufacturer requires a dry one can create performance problems.
What about HEPA filtration?
HEPA stands for high-efficiency particulate air. EPA defines a HEPA filter as capable of capturing at least 99.97% of 0.3-micron particles under its HEPA definition.
However, adding a HEPA filter doesn’t automatically turn an ordinary shop vacuum into a fully sealed HEPA vacuum. EPA specifically distinguishes machines designed as HEPA vacuums from vacuums that have simply been retrofitted with a HEPA filter.
This difference matters for hazardous renovation dust. Follow EPA lead-safe renovation guidance when dealing with potential lead dust rather than relying on a standard shop vacuum.
Section Takeaway: Use the correct filter for both your vacuum and the material you’re collecting. Replace damaged filters instead of trying to stretch their service life.
Why Does a Shop Vacuum Lose Suction?
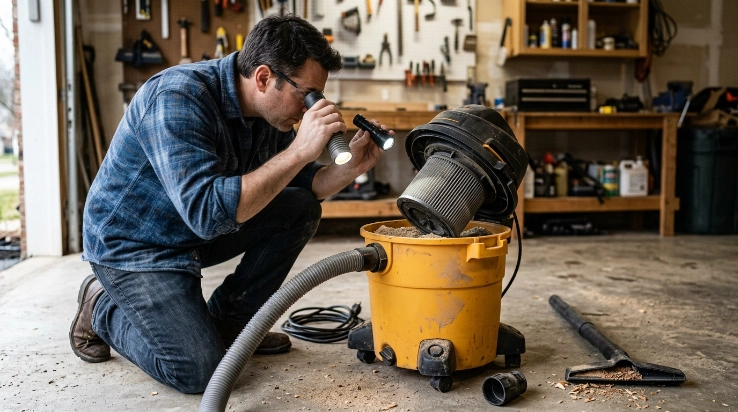
A shop vacuum usually loses suction because airflow is being restricted or air is leaking into the system. The fastest checks are the tank, filter, hose, attachments, and lid connection.
Check these problems in order
- Full tank: Empty accumulated debris or liquid.
- Dirty filter: Inspect for heavy dust loading or blocked pleats.
- Hose blockage: Look for stuck debris along the full hose length.
- Blocked attachment: Check narrow elbows and nozzle openings.
- Loose hose: Reseat the hose at the vacuum inlet.
- Damaged hose: Look for splits or punctures that leak air.
- Poor lid seal: Make sure the motor head is seated and latched correctly.
These checks closely match the manufacturer troubleshooting sequence published by Shop-Vac. A clogged filter, full tank, loose hose, or damaged hose can all reduce suction.
Don’t ignore dust from the exhaust
Dust blowing from the exhaust isn’t normal maintenance noise. Stop using the vacuum and inspect the filter installation before continuing.
A torn filter or wrong filtration setup can send collected particles back into the room. That’s especially undesirable when you’re cleaning fine household dust.
EPA recommends considering HEPA filtration to reduce the amount of vacuumed dust that escapes back into indoor air. You can read its broader home air-cleaning guidance for more filtration context.
How Often Should You Maintain a Shop Vacuum?
There isn’t one maintenance interval that fits every shop vacuum. The right frequency depends on what you collect, how often you use the machine, and your manufacturer’s instructions.
I use condition-based maintenance rather than waiting for a fixed calendar date. Heavy construction dust needs attention much sooner than a few wood chips from a weekend project.
| Maintenance task | Practical timing | Why it matters |
|---|---|---|
| Empty wet material | After the job | Prevents liquid and dirty residue sitting in the tank |
| Inspect filter | Before demanding jobs and when suction drops | Restricted filters reduce airflow |
| Check hose and nozzle | Whenever airflow suddenly changes | Clogs can develop quickly |
| Inspect cord and plug | Before use | Visible electrical damage needs attention before operation |
| General deep clean | Periodically based on workload | Removes accumulated grime from the tank and accessories |
Watch performance instead of the calendar
Reduced suction, louder airflow, exhaust dust, unpleasant tank odors, and visible filter loading are more useful signals than an arbitrary monthly rule.
As of 2026, manufacturer instructions remain the best source for model-specific filter cleaning and wet-pickup procedures. Different wet/dry vacuums don’t always use the same filtration arrangement.
Section Takeaway: Check high-wear parts when performance changes, and clean wet components promptly. Your owner’s manual should override generic schedules.
How Should You Store a Shop Vacuum Safely?
Store a shop vacuum clean, dry, unplugged, and protected from weather or standing moisture. Keep its hose and cord arranged without sharp bends that could damage them.
Dry the vacuum first
This matters most after wet pickup. I don’t close a damp tank and forget about it in a warm garage.
Moisture and organic debris make a poor storage combination. EPA’s guidance on biological contaminants and indoor air quality emphasizes controlling moisture as part of preventing biological growth indoors.
Don’t wrap the cord too tightly
Use the built-in cord storage when provided. Avoid forcing tight bends near the plug or where the cable enters the machine.
If the insulation becomes cut, crushed, melted, or exposed, don’t solve it with an improvised repair and continue using the machine.
Know when maintenance becomes repair
Routine maintenance covers cleaning filters, clearing hoses, emptying tanks, and replacing approved consumable parts. Motor, switch, or internal electrical work is different.
Expert Alert: Stop DIY maintenance and contact a qualified repair technician if you notice electrical burning smells, repeated breaker trips, motor sparking, damaged wiring, water inside electrical components, or unusual internal noises.
The same caution applies to hazardous dust. A normal wet/dry vacuum isn’t automatically suitable for lead, asbestos, or other regulated contaminants.
Section Takeaway: Clean and dry storage protects the vacuum between jobs. Electrical faults and hazardous-material cleanup belong outside normal DIY maintenance.
Shop Vacuum Maintenance FAQ
Should you empty a shop vacuum after every use?
You don’t necessarily need to empty a lightly used dry tank after every small job. However, empty wet material promptly and don’t let dry debris pack around the filter or fill the tank enough to restrict airflow.
How do I know when my shop vacuum filter needs cleaning?
Inspect it when suction decreases, dust begins escaping, or you can see substantial buildup on the filter surface. Clean it only using a method approved for that specific filter, and replace it if damaged.
Can I use a shop vacuum without a filter?
Don’t remove filtration unless your specific manufacturer’s instructions explicitly call for a different configuration for a particular task. Dry debris normally requires appropriate filtration to protect the machine and reduce material blowing from the exhaust.
Why is my shop vacuum blowing dust back out?
The filter may be missing, incorrectly installed, damaged, clogged, or unable to capture the fine material being collected. Stop the vacuum, inspect the filtration setup, and use the correct manufacturer-approved filter for the job.
Can I wash the inside of a wet/dry vacuum?
You can clean the collection tank on many wet/dry vacuums, but keep water away from the motor head and electrical parts. Check the manual first, especially before washing filters or components whose water resistance isn’t clear.
Do I need a HEPA filter in my shop vacuum?
Not for every cleanup task. Higher-efficiency filtration can help with fine particles, but a HEPA filter fitted to an ordinary shop vacuum doesn’t necessarily make the entire machine a certified or fully sealed HEPA vacuum.
What is the easiest way to extend a shop vacuum’s life?
Keep airflow unrestricted. Empty the tank before excessive buildup, maintain the correct filter, clear hose blockages, avoid storing wet debris, and stop using the machine when electrical or motor problems appear.
Keep Your Shop Vacuum Ready for the Next Job
The best shop vacuum maintenance routine is simple: empty it, keep its filter working, maintain clear airflow, and store it dry. Those habits solve or prevent many of the suction problems I see most often.
Don’t treat every filter or wet/dry vacuum the same. Check your model’s manual before washing filters, changing the wet-pickup configuration, or replacing filtration components.
Give the vacuum a quick inspection before your next cleanup. Five minutes spent checking the tank, filter, hose, cord, and attachments can save a frustrating troubleshooting session later.
“`
