
How Do You Maintain a Robot Vacuum?

Quick Answer
To maintain a robot vacuum, empty its dustbin, remove hair from the main and side brushes, check the wheels, clean the filter as your manual allows, wipe the sensors, and keep the charging contacts clean. I also recommend checking the manufacturer’s schedule first, because maintenance rules vary between models; Consumer Reports is also a useful independent source for broader vacuum-care guidance.
Quick robot vacuum maintenance steps
- Empty the bin: Remove debris before the onboard container becomes packed.
- Untangle brushes: Cut away hair and thread from the main roller and side brushes.
- Inspect wheels: Pull out hair or fibers wrapped around wheel axles.
- Maintain filters: Clean or replace them only as the manufacturer directs.
- Wipe sensors: Use the method approved for your particular robot.
- Check the dock: Keep charging contacts and accessible dock areas free from dust.
One rule I never ignore
- Never wash a filter, sensor, battery area, charging contact, or other component unless your model’s instructions specifically allow it.
Robot vacuums make everyday home hygiene easier, but they aren’t maintenance-free. Dust, pet hair, crumbs, and long fibers eventually collect around the parts that keep the machine moving and cleaning.
I’ve found that small, regular checks are much easier than waiting for a robot to stop cleaning, docking, or navigating correctly. This 2026 guide covers the complete routine I use as a practical starting point.
In This Guide
- Why Does Robot Vacuum Maintenance Matter?
- How Often Should You Maintain a Robot Vacuum?
- How Do You Maintain a Robot Vacuum Step by Step?
- How Do You Maintain the Brushes and Wheels?
- How Should You Maintain the Dustbin and Filter?
- How Do You Care for Sensors, the Dock, and Battery?
- Robot Vacuum Maintenance FAQ
- Final Takeaway
Why Does Robot Vacuum Maintenance Matter?
Robot vacuum maintenance helps keep debris pathways clear, brushes moving freely, sensors unobstructed, and charging surfaces usable. These areas work together every time the robot cleans.
A robot vacuum maintenance routine is a regular set of checks and cleaning tasks for the bin, filter, brushes, wheels, sensors, charging system, and dock.
Small parts collect a surprising amount of debris
The first place I notice trouble is usually around the brushes. Long hair can wrap tightly around a roller long before the top of the vacuum looks dirty.
- Main brush: Collects hair, thread, carpet fibers, and dust around its roller and end caps.
- Side brush: Can trap hair around its center hub.
- Caster wheel: Often hides strands around the axle.
- Drive wheels: Can pick up string, hair, grit, and sticky debris.
- Dustbin: Gradually fills with fine dust, crumbs, fur, and fibers.
Dirty sensors can cause confusing behavior
A robot relies on sensors for navigation, obstacle detection, drop detection, and docking. The exact sensor system depends on the model.
Dust on accessible sensor windows can sometimes contribute to navigation or docking problems. That is why sensor inspection belongs in routine maintenance.
Maintenance also supports cleaner dust handling
Household dust can contain many types of particles and allergens. The U.S. Environmental Protection Agency provides broader indoor-air guidance for homeowners who want to reduce dust and other indoor contaminants.
I try to empty a dusty robot bin low inside a trash can instead of shaking it at chest height. That simple habit creates less visible dust around me.
How Often Should You Maintain a Robot Vacuum?
There is no universal maintenance schedule that fits every robot vacuum. Your owner’s manual should always take priority.
Homes with several pets, long hair, heavy dust, or daily robot use usually need more frequent inspections. A lightly used robot on mostly bare floors may need less attention.
| Component | Practical Check Point | What I Look For |
|---|---|---|
| Dustbin | After cleaning runs or as needed | Full bin, packed pet hair, blocked opening |
| Main and side brushes | Regular visual check | Wrapped hair, thread, worn or bent parts |
| Wheels | During brush cleaning | Hair around axles, stuck debris, poor movement |
| Filter | According to manufacturer guidance | Heavy dust, damage, replacement alert |
| Sensors | Periodically or after navigation trouble | Dust, fingerprints, film, blocked openings |
| Charging contacts | Periodically or after charging trouble | Dust, grime, visible contamination |
Think of this table as an inspection routine, not a replacement schedule. Exact service intervals can differ greatly by brand and model.
Let your household change the schedule
I check a new robot more often during its first few weeks. That quickly shows which parts collect debris fastest in that particular home.
- Shedding pets: Inspect brushes, wheels, bin, and filter more often.
- Long hair: Pay extra attention to roller ends and wheel axles.
- Daily cleaning: Check high-debris components sooner.
- Fine household dust: Watch the filter and bin closely.
- Self-emptying dock: Inspect both the robot and the dock system.
How Do You Maintain a Robot Vacuum Step by Step?
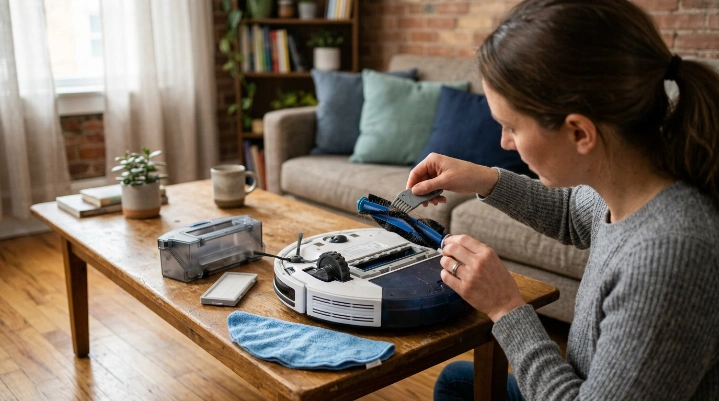
Start by stopping the robot and following its shutdown instructions. Move it away from the dock before handling removable components if your manual recommends doing so.
I like to work in the same order every time. It keeps me from forgetting a small wheel or sensor.
1. Empty the dustbin
Remove the collection bin and empty it directly into a trash container. Avoid aggressively shaking fine dust into the room.
- Remove hair caught around the bin opening.
- Check that the debris door closes correctly.
- Inspect seals for trapped grit.
- Look at the filter area for visible buildup.
2. Clean the main brush
Remove the main roller if your robot is designed for user removal. Hair often collects around both the center and the end caps.
- Lift or release the brush cover.
- Remove the roller according to the manual.
- Cut through wrapped hair carefully.
- Pull fibers away from the roller ends.
- Check that removable caps turn freely.
- Reinstall the brush securely.
3. Inspect the side brush
Side brushes sweep debris away from walls and corners. Hair can wind tightly around the hub underneath them.
Remove the brush only if your model allows it. Replace it when the hub is damaged or the bristles remain badly distorted and the manufacturer recommends replacement.
4. Check the wheels
Turn the robot over on a stable surface and inspect its front caster and drive wheels. Pull out visible hair, thread, and other debris without forcing the wheel assemblies apart.
- Check the caster axle.
- Inspect the gaps beside drive wheels.
- Confirm accessible wheels move normally.
- Remove sticky debris from approved surfaces.
5. Check the filter
Remove loose dust only with the method approved by your manufacturer. Never assume a robot vacuum filter is washable.
A filter that looks like another washable filter may use different materials. Model-specific instructions matter here.
6. Wipe accessible sensors
Use a clean, soft cloth and follow the manufacturer’s instructions for moisture. Never spray cleaner directly onto optical components or openings.
7. Inspect the dock
Look at exposed charging contacts, docking sensors, and debris-transfer openings. Self-emptying systems may also have bags, bins, seals, or air channels requiring separate maintenance.
Section Takeaway: A consistent order makes robot vacuum maintenance easier. Start with collected dirt, work through moving parts, then finish with filters, sensors, and the dock.
How Do You Maintain the Brushes and Wheels?
Brushes and wheels are the areas I check most closely when a robot starts sounding different or moving strangely. Hair can hide where it is difficult to see from above.
Main roller vs. side brush
| Part | Common Buildup | Maintenance Focus |
|---|---|---|
| Main roller | Hair, thread, carpet fibers | Roller surface, grooves, end caps |
| Side brush | Hair around hub, bent fibers | Hub area, mounting point, bristle condition |
| Caster wheel | Hair around axle, grit | Free rotation and axle area |
| Drive wheels | Thread, hair, sticky dirt | Accessible gaps and tread |
Be careful when cutting wrapped hair
I prefer lifting the hair slightly before cutting it. This makes it easier to avoid damaging rubber fins, bristles, wiring, or plastic surfaces.
- Use the cleaning tool supplied with the robot when practical.
- Work away from your fingers.
- Never cut blindly into a narrow opening.
- Stop if wiring or electrical parts become exposed.
What if a wheel will not turn?
First look for visible hair, string, or a small object. Remove only components the manufacturer identifies as user-serviceable.
Expert Alert: If a wheel remains jammed after accessible debris is removed, or you hear grinding from inside the drive assembly, contact the manufacturer or a qualified appliance technician instead of opening sealed electrical components.
How Should You Maintain the Dustbin and Filter?
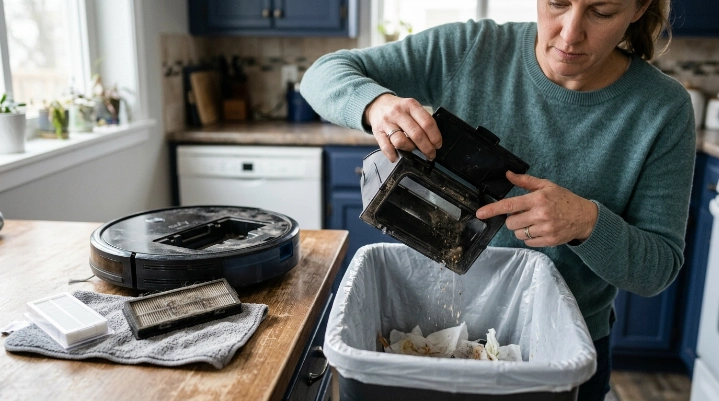
Emptying the bin is one of the most frequent robot vacuum maintenance jobs. A full or poorly seated bin can quickly turn an automated cleaner into another troubleshooting project.
Empty the bin without creating a dust cloud
Hold the bin low inside a lined trash container before opening it. Fine dust can become airborne if you shake the bin aggressively.
For households dealing with allergies, the Asthma and Allergy Foundation of America offers broader information about household allergens and cleaning practices.
Can you wash the dustbin?
Only wash it when the manufacturer says the bin is washable. Some bins sit beside filters, sensors, electrical contacts, or other parts that must stay dry.
- Remove non-washable components first.
- Follow the recommended cleaning method.
- Keep electronic areas dry.
- Allow approved washable parts to dry fully.
- Reassemble everything in the correct position.
Can you wash a robot vacuum filter?
Sometimes, but never assume so. Some filters are designed for dry cleaning or replacement rather than rinsing.
If your robot specifically uses a genuine HEPA filter, the National Institutes of Health is one useful starting point for broader health and environmental research, while your vacuum manufacturer remains the correct source for model-specific filter care.
When should you replace the filter?
Use your manufacturer’s replacement guidance rather than a universal calendar rule. Replace a filter sooner if the instructions call for it because of damage, deformation, or another condition.
- Check the exact robot model.
- Use a compatible filter.
- Seat it in the correct direction.
- Make sure the filter housing closes fully.
How Do You Care for Sensors, the Dock, and Battery?
These components need a gentler approach than brushes and bins. Water, aggressive cleaners, and unnecessary disassembly can create much bigger problems than dust.
How should you clean robot vacuum sensors?
Find the accessible sensors using your manual. Depending on the robot, they may be underneath, around the bumper, on the front, or near a navigation module.
- Cliff sensors: Keep accessible windows free from visible dust.
- Navigation sensors: Wipe approved external surfaces gently.
- Dock sensors: Keep signal areas unobstructed.
- Bumper areas: Remove debris without forcing the mechanism.
Use a clean microfiber or lint-free cloth when that matches the manufacturer’s guidance. Avoid spraying liquid directly onto the robot.
How do you maintain the charging dock?
Keep the base on a stable surface and inspect exposed charging contacts for dust. Make sure cords and loose clutter do not interfere with docking.
For a self-emptying dock, inspect the debris bag or container as well. Check accessible transfer passages if the dock suddenly stops emptying the robot correctly.
How do you protect the battery?
Use the charger and dock specified for the robot. Keep battery compartments and charging hardware away from liquid.
Normal battery runtime can change as rechargeable batteries age. A sudden charging fault, unusual heat, or physical battery damage deserves more attention than routine cleaning.
- Keep charging contacts reasonably clean.
- Use approved charging hardware.
- Follow storage instructions during long periods of non-use.
- Do not open or modify a sealed battery pack.
- Stop using a visibly damaged or swollen battery.
Expert Alert: Stop using the robot if you notice battery swelling, smoke, a burning smell, melted plastic, damaged charging pins, sparking, or liquid inside electrical areas. Contact the manufacturer or a qualified repair professional.
What if maintenance does not fix the problem?
Repeated errors may come from software, mapping, damaged hardware, or a part that needs replacement. Write down the exact error message before resetting anything.
- Restart the robot using the manufacturer’s procedure.
- Check the app for a specific error message.
- Confirm the dock has power.
- Check brushes and wheels again for hidden debris.
- Review model-specific troubleshooting instructions.
- Contact support when the same fault returns.
A factory reset should not be the first response to a mechanical problem. It cannot remove hair from a wheel or repair damaged charging hardware.
Robot Vacuum Maintenance FAQ
Do you need to clean a robot vacuum after every use?
Not every component needs cleaning after every run. Check the dustbin and obvious debris regularly, then maintain brushes, filters, sensors, wheels, and the dock according to their condition and your manufacturer’s instructions.
How often should I clean robot vacuum brushes?
Inspect them regularly and clean them whenever you see wrapped hair, thread, or packed debris. Homes with shedding pets, long hair, or frequent cleaning cycles may need brush maintenance much more often.
Can I use water to clean my robot vacuum?
Only on parts your manufacturer specifically identifies as washable. Keep water away from batteries, motors, electrical contacts, charging components, sensors, cameras, and other electronic areas unless the instructions clearly say otherwise.
Why is my robot vacuum suddenly moving strangely?
Check the wheels, bumper, brushes, and accessible sensors first. Hair, thread, dust, or a small obstruction can sometimes affect movement, but repeated navigation errors may require model-specific troubleshooting.
Why will my robot vacuum not return to its dock?
Check that the dock has power and that its surrounding area is clear. Clean accessible charging contacts and docking sensors according to the manual, then run another docking test.
Should I replace robot vacuum parts on a fixed schedule?
Follow your manufacturer’s schedule for filters, brushes, batteries, bags, and other consumables. Usage conditions vary too much for one replacement interval to fit every robot and every household.
Does a self-emptying robot vacuum still need maintenance?
Yes. The dock reduces how often you manually empty the onboard bin, but brushes, filters, wheels, sensors, charging contacts, and the dock’s own debris system still require attention.
Final Takeaway
Maintaining a robot vacuum is mostly about preventing small amounts of debris from becoming bigger problems. Empty the bin, untangle the brushes, inspect the wheels, care for the filter correctly, wipe sensors, and keep the dock clean.
The most important habit is following the instructions for your exact model. A cleaning method that is safe for one robot may damage another.
I prefer doing short maintenance checks regularly instead of waiting for suction, navigation, or charging to fail. It takes less effort and makes troubleshooting much simpler when something eventually does go wrong.
Make the check part of your normal home-hygiene routine. Your robot will be easier to live with, and you will know which component to inspect first when its behavior changes.