
How Do You Clean Upholstery Tools?

Quick Answer
To clean upholstery tools, disconnect them from the vacuum, remove hair and lint, then wipe or wash only the parts the manufacturer says are washable. Let every washed piece dry completely before reconnecting it. The EPA’s indoor dust guidance also explains why regular household cleaning matters for controlling settled dust.
Quick Cleaning Steps
- Disconnect it: Switch off and unplug the vacuum before removing the upholstery attachment.
- Remove dry debris: Pull away hair, lint, threads, crumbs, and dust before adding moisture.
- Check washability: Confirm whether the tool has motors, contacts, sensors, or non-washable materials.
- Clean safely: Wash approved passive tools with mild soap and water, or wipe non-washable tools instead.
- Dry fully: Keep the tool disconnected until its surfaces, bristles, seams, and openings are completely dry.
One Rule That Prevents Damage
- Never soak a powered upholstery attachment unless its manufacturer specifically says the removable part is washable.
Upholstery tools spend their working lives touching sofas, mattresses, fabric chairs, pet beds, and car seats. That means these vacuum cleaner accessories can collect hair, lint, dust, crumbs, and fine debris surprisingly quickly.
I used to wipe only the visible face of my upholstery attachment. Once I looked around the intake and lint strips, I found tightly packed fibers that a quick surface wipe had missed.
This guide explains how to clean upholstery tools safely in 2026. I’ll cover standard upholstery heads, bristled tools, mini powered brushes, lint strips, clogs, odors, and drying.
In This Guide
What Is an Upholstery Tool?
An upholstery tool is a vacuum attachment designed for fabric-covered surfaces. Its wider opening spreads suction across sofas, cushions, mattresses, fabric chairs, stairs, and similar materials.
Some upholstery tools are simple plastic attachments. Others include bristles, lint-catching strips, rotating brushes, electrical contacts, or small motors.
The construction matters. It determines whether you can rinse the tool or must keep it mostly dry.
- Standard upholstery head: A wide passive nozzle for fabric surfaces.
- Bristled upholstery brush: Adds fibers or bristles that loosen surface debris.
- Lint-strip tool: Uses textured strips to collect hair and lint while vacuuming.
- Mini powered tool: Uses a rotating brush to agitate compatible upholstery.
- Combination attachment: May switch between a brush and plain upholstery surface.
Why does an upholstery attachment get dirty?
The tool repeatedly contacts material that holds dry household debris. Fine dust can also settle around its intake, joints, bristles, and connection collar.
The EPA notes that indoor dust may contain pollen, mold spores, pet dander, dust-mite material, skin flakes, hair, and tracked-in soil. Regular cleaning helps reduce the buildup of this settled material.
Definition: Cleaning an upholstery tool means removing accumulated debris from the attachment without damaging its materials, airflow path, moving parts, or electrical components.
Cleaning is not always the same as disinfecting
Routine attachment care usually means removing dirt, hair, lint, and residue. It does not automatically mean applying a disinfectant.
The CDC’s cleaning and disinfecting guidance distinguishes normal cleaning from disinfection. In most household situations, cleaning with soap and water removes dirt and many germs from washable surfaces.
Don’t spray disinfectant into a vacuum intake or powered attachment unless the manufacturer approves that method. Liquid can reach parts you cannot easily dry.
How Do You Clean Upholstery Tools Step by Step?
Start with dry cleaning, then introduce water only when you know the attachment can safely get wet. This method works for most household upholstery vacuum tools.
1. Turn off and disconnect the vacuum
Unplug a corded vacuum before removing its attachment. Switch off a cordless model and prevent accidental activation.
Detach the upholstery tool from the hose, wand, or handheld unit. Move it to a well-lit work area.
2. Remove loose hair, lint, and crumbs
Hold the tool over a trash container and pull away visible debris. Concentrate on the intake opening, edges, bristle bases, lint strips, and connector.
- Pull loose hair away with your fingers.
- Use a small comb on compatible bristles.
- Loosen packed dust with a soft cleaning brush.
- Remove threads before they wind more tightly around moving parts.
- Check both sides of the airflow opening.
Dry debris is usually easier to remove before it becomes wet. Damp hair and lint can stick together and lodge deeper around bristles.
3. Inspect the tool before washing it
Look for electrical contacts, a motor, lights, sensors, a belt, or a rotating brush. Treat the tool as non-washable if you’re unsure about any component.
Check the vacuum manual for model-specific instructions. Manufacturer directions should always override a general household cleaning routine.
4. Wash approved non-powered tools
If the manufacturer confirms the attachment is washable, use mild dish soap and warm or cool water. You usually don’t need strong chemicals for ordinary dust and lint.
- Remove as much dry debris as possible.
- Place the washable tool in soapy water or rinse it as directed.
- Gently work around grooves and corners with a small brush.
- Rinse away remaining soap when permitted.
- Shake off excess water without striking the attachment.
Avoid extremely hot water unless the manufacturer specifies it. Excess heat can distort some plastics, adhesives, and flexible materials.
5. Wipe powered upholstery tools
Keep the main powered housing dry unless the manual explicitly says otherwise. I use a slightly damp microfiber cloth for the outer shell after removing loose debris.
- Keep water away from electrical contacts.
- Don’t spray cleaner directly into openings.
- Remove washable brush rolls only as directed.
- Clean hair from rotating parts before wiping the housing.
- Inspect the ends of the roller for tightly wound fibers.
6. Let every washable part dry completely
Place cleaned parts on a dry towel in a ventilated location. Position hollow attachments so trapped water can drain from their openings.
Don’t reconnect a part merely because its outside feels dry. Moisture may remain around bristle bases, seams, channels, or hollow sections.
7. Reassemble and test the attachment
Reconnect only fully dry parts. Start the vacuum and confirm that the upholstery tool has normal airflow and no unusual noise.
Check the connector if suction feels weak. A loose fit or hidden blockage can imitate a vacuum performance problem.
Section Takeaway: Clean dry first, check washability second, and reconnect only when every part is completely dry.
How Should You Clean Different Upholstery Tools?
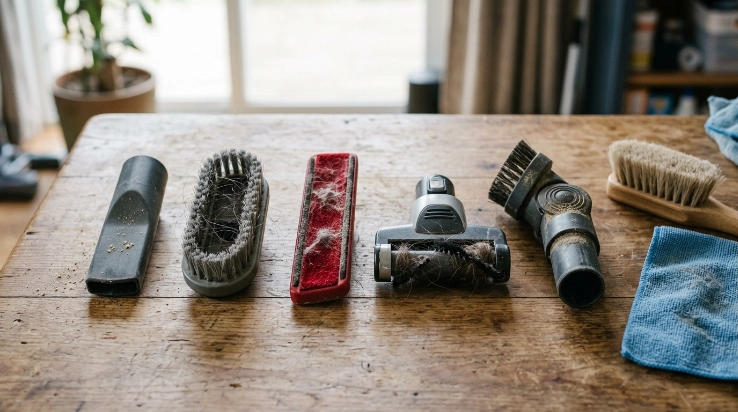
The safest method depends more on the attachment’s construction than its name. Two upholstery heads can look similar while needing completely different care.
| Tool Type | Common Buildup | Best Starting Method | Water? |
|---|---|---|---|
| Plain plastic upholstery head | Dust, lint, crumbs | Brush and wipe | Only if manufacturer permits |
| Bristled upholstery brush | Hair and fine dust | Comb bristles while dry | Check instructions |
| Lint-strip attachment | Hair and fibers | Pull debris from strips | Depends on materials |
| Mini powered brush | Wrapped hair and dust | Dry debris removal and wiping | Keep powered housing dry |
| Combination tool | Dust around hinges and bristles | Brush joints and wipe | Model-specific |
How do you clean an upholstery brush?
Start by removing dry hair from the bristles. Run a small comb or cleaning brush through the rows without pulling hard enough to bend them.
Wipe the plastic body afterward. If the entire brush is washable, rinse it only according to its care instructions.
How do you clean lint strips?
Lint strips work by gripping fibers as the attachment moves across fabric. Their textured surface can become packed with hair and fuzzy debris.
- Pull larger strands away by hand.
- Use a clean, soft brush for stubborn fibers.
- Work in the direction that releases the trapped lint.
- Avoid scraping aggressively with metal tools.
Replace a detachable lint strip if it becomes damaged and your manufacturer provides replacements. A torn strip may catch delicate upholstery.
How do you clean a mini motorized upholstery tool?
Disconnect it completely before maintenance. Remove accessible wrapped hair from the brush roll without damaging the bristles, bearings, belt, or housing.
Some models let you remove the roller separately. Follow the manual because the roller and powered housing may have different cleaning rules.
Expert Alert: Stop using a powered upholstery tool if you find exposed wiring, melted plastic, damaged electrical contacts, or a cracked motor housing. Replace the affected part or have it inspected instead of attempting an electrical repair.
Section Takeaway: Match the cleaning method to the tool’s construction. Powered upholstery heads need much more moisture protection than simple passive attachments.
How Do You Remove Hair, Odors, and Clogs From Upholstery Tools?
Hair, odor, and restricted airflow are different problems. Treating all three with the same soaking method can create unnecessary risks.
How do you remove stubborn pet hair?
Pet hair often catches around lint strips, bristles, rotating brushes, and corners of the intake. Remove it before it forms compact mats.
- Disconnect the attachment.
- Find the densest hair buildup.
- Pull loose strands away by hand.
- Cut wrapped hair only where the tool design permits safe access.
- Remove loose fibers from both brush-roll ends.
- Check that the roller turns normally before reassembly.
I find the ends of small brush rolls easy to overlook. A thin ring of hair can hide where the roller meets its support.
What should you do if the tool smells?
Start by locating the source instead of masking it with fragrance. Food debris, damp material, pet residue, or dirty fibers may be responsible.
- Remove all visible debris.
- Wash approved surfaces with mild soap.
- Rinse washable parts as directed.
- Dry everything thoroughly.
- Check the vacuum bin, filter, and hose if the smell remains.
Don’t put essential oil, perfume, or scented liquids inside the airflow opening. Added residue can collect dirt and may not be compatible with the tool.
How do you clear an upholstery-tool clog?
Disconnect the attachment and inspect both sides of its airflow path. Shine a light through simple hollow tools when possible.
Pull accessible debris toward the nearest opening. Avoid forcing sharp objects through plastic bends because punctures and scratches can create new problems.
Cleaning tip: If dusty attachments bother someone with asthma or allergies, avoid shaking them aggressively indoors. The EPA’s biological contaminant guidance notes that vacuuming and cleaning can stir settled particles into indoor air.
How Often Should Upholstery Tools Be Cleaned?
There is no universal schedule for every home. The right interval depends on how often you vacuum furniture and what the attachment collects.
Visible buildup is usually a better signal than the calendar. I check an upholstery tool after any job involving heavy hair, crumbs, or dusty fabric.
- After heavy pet-hair cleaning: Remove wrapped hair and packed lint immediately.
- After food debris: Clear crumbs before storing the attachment.
- After dusty furniture: Brush or wipe the intake and tool surface.
- During routine vacuum maintenance: Inspect bristles, lint strips, openings, and connectors.
- Whenever airflow drops: Check the attachment and hose for a clog.
Should you clean the tool before using it on a mattress?
Yes, I prefer starting with a visibly clean upholstery attachment before moving from dirtier furniture to a mattress. It reduces the chance of transferring lint, hair, or visible debris between surfaces.
You can use the same principle when moving between pet beds, couches, fabric chairs, and vehicle seats. Inspect and clean the contact surface whenever cross-contamination concerns you.
Should you disinfect an upholstery attachment after every use?
Routine household use does not automatically require disinfection after every cleaning session. Removing dirt and debris is usually the first maintenance step.
If disinfection is needed because of a specific contamination concern, follow the attachment manufacturer’s instructions and the disinfectant label. Never assume an electrical or porous component can tolerate a disinfecting liquid.
Section Takeaway: Clean upholstery tools according to visible buildup and use. Heavy hair, food debris, odors, and reduced airflow deserve attention sooner than a lightly dusty attachment.
Frequently Asked Questions
Can you wash an upholstery vacuum attachment?
You can wash an upholstery attachment only when its manufacturer confirms that the part is washable. Simple plastic heads are more likely to tolerate water than powered tools, but appearance alone is not enough to determine washability.
Can you soak an upholstery tool in soapy water?
Only soak it if the manufacturer’s instructions allow immersion. Never soak an attachment containing a motor, wiring, lights, sensors, electrical contacts, or other powered components unless the manufacturer specifically approves it.
What soap should you use to clean a vacuum upholstery tool?
A small amount of mild dish soap is a practical choice for many washable non-powered attachments. Avoid strong cleaners unless the manufacturer recommends them, and rinse approved washable parts well so sticky residue does not attract more dirt.
How do you get pet hair out of an upholstery attachment?
Disconnect the tool and remove loose hair by hand first. Use a comb or small brush around bristles and lint strips, and carefully clear wrapped hair from a removable brush roll according to the manufacturer’s maintenance instructions.
How long should an upholstery tool dry after washing?
There is no universal drying time because attachment designs and room conditions differ. Keep the part disconnected until the exterior, internal channels, bristle bases, seams, and connection areas are completely dry.
Why does my upholstery attachment have weak suction?
Check the intake opening, connection collar, brush area, and hose for blockages. Also inspect whether hair or lint has packed around narrow passages, then confirm that the attachment fits securely when you reconnect it.
Can you use disinfectant spray on an upholstery tool?
Don’t spray disinfectant into the tool unless both the attachment manufacturer and product label support that use. For normal household maintenance, physical cleaning is usually the safer starting point, especially around powered components.
Final Takeaway: Keep Upholstery Tools Clean and Dry
Cleaning upholstery tools is simple once you separate passive attachments from powered ones. Remove dry debris first, check the manufacturer’s instructions, wash only approved parts, and protect electrical components from moisture.
Pay special attention to hair around bristles, lint strips, roller ends, and narrow airflow passages. Those hidden areas often collect more debris than the visible face of the attachment.
Most importantly, don’t rush reassembly. A clean upholstery tool should also be completely dry before it goes back onto your vacuum.
