How Do You Clean Robot Vacuum Wheels? Complete 2026 Guide

Quick Answer
To clean robot vacuum wheels, turn the robot off, remove loose hair and debris, clean around the wheel axles, and wipe the wheel treads with a slightly damp microfiber cloth when your manufacturer allows it. If a caster wheel is removable, take it out according to the manual and clean underneath it; Consumer Reports’ robot vacuum cleaning guidance also recommends checking wheel cavities for trapped dirt and hair.
Quick wheel-cleaning steps
- 1. Power it off: Stop the robot and follow your model’s shutdown instructions before turning it over.
- 2. Remove loose debris: Pull away visible hair, thread, lint, and crumbs from the wheel gaps.
- 3. Clean the caster: Remove the front caster only if your manufacturer’s instructions allow it.
- 4. Check drive wheels: Press and rotate accessible wheels gently while removing debris from their edges.
- 5. Wipe the tread: Use a dry or slightly damp microfiber cloth as approved for your model.
- 6. Test movement: Reassemble everything and confirm the wheels rotate and move normally.
One rule that matters
- Never force a wheel assembly apart or spray liquid directly into a wheel opening, motor housing, sensor, or electrical component.
Robot vacuum wheels collect much more than visible dust. Hair, thread, pet fur, carpet fibers, crumbs, and sticky floor residue can work into tiny spaces around the axles.
I’ve found that checking the wheels is especially useful when a robot suddenly starts turning poorly or dragging one side. This guide explains how to clean robot vacuum wheels safely without turning routine maintenance into an unnecessary repair job.
In This Guide
- Why Do Robot Vacuum Wheels Need Cleaning?
- What Do You Need to Clean Robot Vacuum Wheels?
- How Do You Clean Robot Vacuum Wheels Step by Step?
- How Do You Clean Caster Wheels vs. Drive Wheels?
- What If the Robot Vacuum Wheels Are Stuck or Squeaky?
- Robot Vacuum Wheel Cleaning FAQ
- Final Takeaway: Keep the Wheels Moving Freely
Why Do Robot Vacuum Wheels Need Cleaning?
Robot vacuum wheels need cleaning because small debris can collect around their tread, axle, and surrounding cavities. That buildup may restrict normal wheel movement or reduce traction on the floor.
A robot vacuum wheel cleaning routine is the process of removing hair, fibers, dust, grit, and residue from the robot’s caster and drive-wheel areas so the wheels can move as designed.
Hair often hides around the axle
Long human hair and pet fur are common troublemakers. A strand can wrap around an axle many times before you notice anything from above.
Thread, yarn, and thin carpet fibers can behave the same way. They may tighten as the wheel continues rotating.
- Human hair: Often forms tight rings around narrow axles.
- Pet fur: Mixes with dust and becomes packed around moving parts.
- Thread and string: Can wind deeply into wheel gaps.
- Fine grit: Collects around the tread and wheel cavity.
- Sticky residue: Can reduce grip and attract more dirt.
Wheels bring floor debris into small spaces
A robot travels across carpet, hard flooring, thresholds, and high-traffic areas during one cleaning run. The wheels constantly contact debris that the suction path may never capture.
The EPA notes that routine cleaning can help reduce indoor dust and particulate matter. Its guidance on indoor particulate matter also recommends regular vacuuming and damp dusting as part of household dust control.
Dirty wheels can change how the robot moves
A heavily obstructed caster may stop swiveling freely. A dirty drive-wheel tread may also slip more easily on smooth flooring.
That does not mean every navigation problem comes from dirty wheels. Sensors, brushes, software, thresholds, or damaged wheel hardware can cause similar symptoms.
Section Takeaway: Wheel cleaning is simple preventive maintenance. Focus on hair around axles, debris in wheel gaps, and residue on the tread before assuming the robot has a larger mechanical problem.
What Do You Need to Clean Robot Vacuum Wheels?
You only need a few basic tools for most robot vacuum wheel cleaning. Choose small tools that give you control around delicate plastic parts.
- Microfiber cloth: For wiping wheel tread and accessible plastic surfaces.
- Tweezers: For gripping hair, thread, and lint inside narrow gaps.
- Small scissors: For cutting wrapped hair after lifting it away from the wheel.
- Soft cleaning brush: For loosening dry dust around cavities and edges.
- Cotton swabs: Useful for accessible narrow areas when the manual permits them.
- Manufacturer cleaning tool: Often the safest option when one came with the robot.
Do you need soap or cleaning spray?
Usually, you do not need strong cleaners. A dry microfiber cloth handles ordinary dust, while a lightly dampened cloth may help with approved washable surfaces.
The CDC advises using cleaning products that are suitable for the surface being cleaned. Its home cleaning guidance also emphasizes following product and surface instructions.
What should you avoid?
I keep liquid use minimal around robot vacuums. Wheel openings may sit close to motors, sensors, wiring, and other components that should stay dry.
- Do not spray cleaner directly onto the robot.
- Do not pour water into a wheel cavity.
- Do not use a sharp blade blindly inside a narrow opening.
- Do not pry a wheel out unless the manual shows it is user-removable.
- Do not apply oil or lubricant unless the manufacturer specifically recommends it.
How Do You Clean Robot Vacuum Wheels Step by Step?
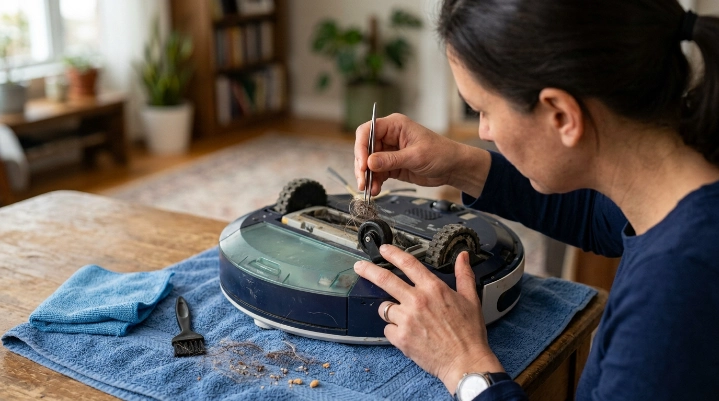
Start by shutting the robot down and placing it upside down on a stable, soft surface. Then work from loose surface debris toward the harder-to-reach axle areas.
1. Stop the robot and prepare your workspace
End the cleaning cycle and follow your model’s power-off instructions. Remove it from the charging dock before working on the underside.
Place a folded towel on a table or floor. This protects the robot’s top surface while keeping it steady.
2. Inspect every wheel before removing anything
Most robot vacuums have a small front caster plus two larger powered drive wheels. Look closely at the spaces beside each wheel.
- Check for wrapped hair.
- Look for thread or string.
- Inspect the tread for sticky marks.
- Check the caster for trapped grit.
- Look for visibly damaged rubber or plastic.
3. Pull out loose hair and debris
Use tweezers or the manufacturer’s cleaning tool to pull out visible material. Work slowly so you do not push the debris deeper into the housing.
If hair is wrapped tightly, lift a small section away from the axle first. Cut only the exposed strand, then pull the loosened pieces out.
4. Clean the front caster wheel
Some front caster wheels are designed for user removal, while others are not. Check the manual before pulling upward or using any tool for leverage.
If removal is approved, clean both the wheel and its axle area. Hair frequently hides underneath the caster where it cannot be seen during a quick inspection.
- Remove the caster using the manufacturer’s method.
- Pull hair from the axle and wheel hub.
- Brush dry debris from the cavity.
- Wipe the wheel tread.
- Dry any damp-cleaned surface fully.
- Reinstall the caster securely.
5. Clean the powered drive wheels
Drive wheels are more complex because they connect to powered internal mechanisms. I avoid disassembling these assemblies unless the manufacturer provides a user-service procedure.
Gently rotate each accessible wheel while removing hair from its edges. Many designs also allow some vertical wheel movement, but never force a wheel beyond its normal travel.
6. Wipe the wheel tread
Use a clean microfiber cloth to remove dust and residue. For stubborn marks, use only the amount of moisture and cleaning method approved for your robot.
Clean tread can improve normal contact with smooth floors. Let every damp area dry before restarting the vacuum.
7. Reassemble and test the robot
Confirm that every removable component is seated correctly. Turn each accessible wheel gently by hand and check for obvious obstruction.
Place the robot on a clear section of floor and run a short test. Watch whether it travels straight, turns normally, and crosses an ordinary floor transition without dragging.
Section Takeaway: The safest cleaning order is inspect, remove loose debris, clean approved removable parts, wipe the tread, reassemble, and test. Never turn routine wheel cleaning into internal disassembly unless your manufacturer instructs you to do it.
How Do You Clean Caster Wheels vs. Drive Wheels?
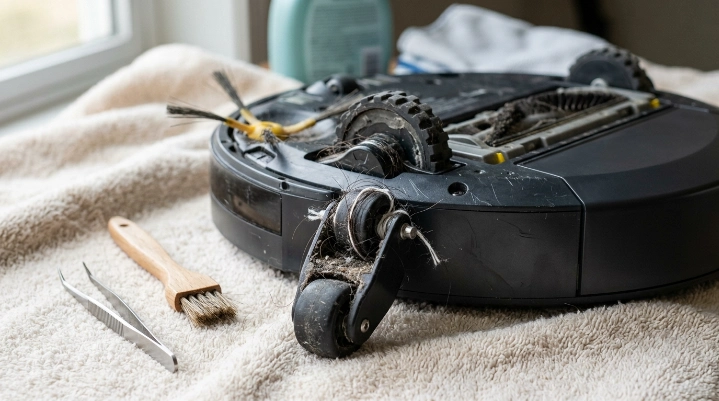
The front caster and powered drive wheels need different treatment. The caster mainly swivels and rolls, while drive wheels actively move the robot.
| Wheel area | Main job | Common buildup | Practical check | Cleaning approach |
|---|---|---|---|---|
| Front caster | Supports turning and directional changes | Hair, thread, grit around axle | About weekly in hair-heavy homes | Remove only if manufacturer-approved, then clean axle and cavity |
| Drive wheels | Propel and steer the robot | Hair at edges, grit, sticky tread | Inspect weekly and after unusual movement | Clean accessible gaps and tread without opening the drive module |
| Wheel cavities | Provide clearance around moving wheels | Lint, compacted dust, crumbs | Check whenever wheels are cleaned | Brush or tweeze accessible debris without pushing tools deeply inside |
Which wheel usually traps the most hair?
The front caster often hides an impressive amount of hair around its axle. Its small size and constant swiveling create narrow places where fibers can collect.
Drive wheels can trap hair too, especially along their inside edges. Their powered mechanisms make aggressive disassembly a much worse idea.
How often should you check the wheels?
There is no universal schedule for every model. A weekly visual check is a useful starting point for homes with pets, long hair, rugs, or frequent robot-vacuum use.
Inspect sooner if the robot starts moving differently. As of 2026, robot vacuum designs still vary enough that model-specific maintenance instructions should take priority over a generic schedule.
For homes dealing with allergens, the Asthma and Allergy Foundation of America also recommends regular vacuuming as part of broader indoor allergen control. Wheel cleaning is only one small part of keeping the whole cleaning system maintained.
What If the Robot Vacuum Wheels Are Stuck or Squeaky?
If a wheel stays stuck after visible debris is removed, stop forcing it. The problem may be deeper inside the wheel assembly or drive mechanism.
Start with the simple causes
Recheck the axle area under strong lighting. Fine hair can form a tight band that looks like part of the wheel until you lift it with tweezers.
- Wheel will not rotate: Look for hair, string, or a hard object lodged beside the wheel.
- Robot pulls to one side: Compare both drive wheels for debris or visible damage.
- Caster will not swivel: Check the caster axle and cavity for compacted hair.
- Wheel slips: Wipe dirt or sticky film from the tread using an approved method.
- Squeaking continues: Stop adding products and check the manufacturer’s troubleshooting guidance.
Should you lubricate a robot vacuum wheel?
Do not automatically add oil, grease, or household lubricant to a squeaky robot vacuum wheel. Lubricants can migrate into unwanted areas or attract more dust.
Only use a lubricant when your specific manufacturer calls for one and identifies the correct product. Otherwise, cleaning and professional service are safer choices.
When does a wheel need repair instead of cleaning?
A visibly cracked wheel, damaged tread, loose axle, repeated wheel error, or wheel that remains seized after cleaning may need replacement or service. Internal drive-wheel modules may contain motors, gears, wiring, and sensors.
Expert Alert: If fixing the wheel requires opening an electrical drive module, disconnecting wiring, or dismantling the robot beyond user-serviceable parts, contact the manufacturer or a qualified appliance repair professional.
Regular maintenance also helps limit the dust carried around a home. The EPA’s broader indoor air quality guidance emphasizes source control and routine household maintenance alongside ventilation and filtration.
Section Takeaway: Cleaning can solve many wheel problems caused by hair, grit, and residue. Persistent mechanical symptoms deserve troubleshooting or repair rather than stronger force, extra liquid, or unapproved lubricant.
Robot Vacuum Wheel Cleaning FAQ
Can I remove the front wheel from my robot vacuum?
Only remove the front caster if your model’s instructions identify it as user-removable. Many casters can be lifted out for cleaning, but designs vary. Never pry aggressively against the robot’s body because you could damage the wheel mount or surrounding plastic.
Can I wash robot vacuum wheels with water?
Avoid washing an attached wheel assembly under running water. For an approved removable non-electrical wheel, follow the manufacturer’s washing instructions. Otherwise, use a dry or lightly damp microfiber cloth and keep moisture away from motors, charging components, sensors, and openings.
How do I remove hair wrapped around a robot vacuum wheel?
Lift the hair gently with tweezers or the supplied cleaning tool. If it is tightly wrapped, carefully cut the exposed strand with small scissors, then pull the pieces away. Avoid pushing a blade deeply into the wheel cavity.
How often should I clean robot vacuum wheels?
Check the wheels about weekly if your home has pets, long hair, rugs, or frequent cleaning runs. Lighter-use homes may need attention less often. Clean them sooner whenever you see buildup or notice unusual turning, dragging, or wheel movement.
Why does my robot vacuum keep getting hair around the wheels?
Loose hair and fibers lie across the same floors the robot travels over. As the wheels rotate, strands can catch at the wheel edge and gradually wind around the axle. Regular inspection prevents a small tangle from becoming tightly packed.
Why is my robot vacuum turning in circles after I cleaned the wheels?
The problem may not be wheel dirt. Check that removable wheels were reinstalled correctly, then inspect accessible sensors and brushes according to the manual. A damaged drive wheel, sensor problem, software issue, or internal fault may require manufacturer troubleshooting.
Final Takeaway: Keep the Wheels Moving Freely
Cleaning robot vacuum wheels is a small job that can prevent hair and debris from turning into a stubborn movement problem. I focus first on the caster axle, drive-wheel edges, and tread because those spots hide buildup easily.
Make wheel inspection part of your normal robot vacuum maintenance routine. Use gentle tools, keep unnecessary moisture away from the machine, and let the owner’s manual decide which components you can safely remove.
If cleaning does not restore normal movement, stop before forcing the mechanism apart. A wheel module that remains stuck or damaged is better handled through manufacturer-approved service than risky home disassembly.