How to Clean Robot Vacuum Brushes: Step-by-Step Guide

Quick Answer
To clean robot vacuum brushes, power the robot off, remove the main brush and side brushes, cut away wrapped hair, pull out threads, and wipe away dust. Check each brush for damage before reinstalling it. Consumer Reports’ robotic vacuum cleaning guidance also recommends routine brush and component cleaning.
Quick cleaning steps
- Power it off: Shut down the robot and remove it from the charging dock.
- Remove the brushes: Take out the main roller and detachable side brushes according to your manual.
- Cut tangled hair: Slice through wrapped hair and thread without cutting the brush material.
- Clean the ends: Remove debris hiding around roller caps, axles, and brush hubs.
- Wipe everything: Use a dry or slightly damp microfiber cloth where your manufacturer permits it.
- Inspect and reinstall: Replace damaged brushes and make sure every part turns freely before running the vacuum.
One rule that prevents problems
- Don’t rinse a brush, bearing, or brush module unless the manual for your exact robot says that part is washable.
Robot vacuum brushes do the dirty mechanical work of grabbing crumbs, hair, fibers, and loose household dust. Keeping them clean is one of the simplest parts of robot vacuum cleaner maintenance.
I’ve found that the most important areas are often the least visible ones: the roller ends, side-brush hubs, and narrow gaps where hair packs tightly. This guide shows you how to clean those areas without damaging the robot.
In This Guide
- How Often Should You Clean Robot Vacuum Brushes?
- What Do You Need Before Cleaning the Brushes?
- How Do You Clean Robot Vacuum Brushes Step by Step?
- Do Main, Side, and Rubber Brushes Need Different Cleaning?
- What Should You Avoid When Cleaning Robot Vacuum Brushes?
- Frequently Asked Questions
- Keep the Brushes Clean and the Robot Ready
How Often Should You Clean Robot Vacuum Brushes?
Check the brushes after several cleaning runs and clean them whenever you see hair, thread, string, or packed debris. Homes with pets or long-haired occupants usually need more frequent checks.
There isn’t one universal cleaning interval because brush design and household conditions vary. Your robot’s manual should take priority over any generic schedule.
A robot vacuum brush is the rotating or sweeping component that moves floor debris toward the vacuum’s suction inlet. Most robots use a central roller, one or more side brushes, or a combination of both.
Signs the brushes need attention
You don’t need to wait for an app notification. A quick visual check often reveals the problem first.
- Visible hair: Long strands are wrapped around the main roller or its ends.
- Thread buildup: Carpet fibers, string, or rug tassels have wound around the brush.
- Slow rotation: A removable brush feels harder to turn than usual when inspected safely.
- Bent side brushes: The arms no longer spread evenly across the floor.
- Debris at the axle: Hair has worked underneath an end cap or around a mounting post.
- Repeated brush errors: The robot reports a jam even after loose debris is removed.
Pet hair deserves special attention because strands can wrap below the obvious surface. I often find the tightest bundle sitting against the roller cap rather than across the middle.
A practical inspection routine
A simple routine works better than waiting for a major tangle. I check the underside whenever I empty the bin after an especially hairy or debris-heavy run.
- Look across the full main roller.
- Inspect both ends of the roller.
- Check side-brush hubs.
- Look around the suction opening.
- Remove any string before the next run.
This inspection only needs to tell you whether cleaning is necessary. Don’t dismantle parts that your manufacturer describes as non-user-serviceable.
What Do You Need Before Cleaning the Brushes?
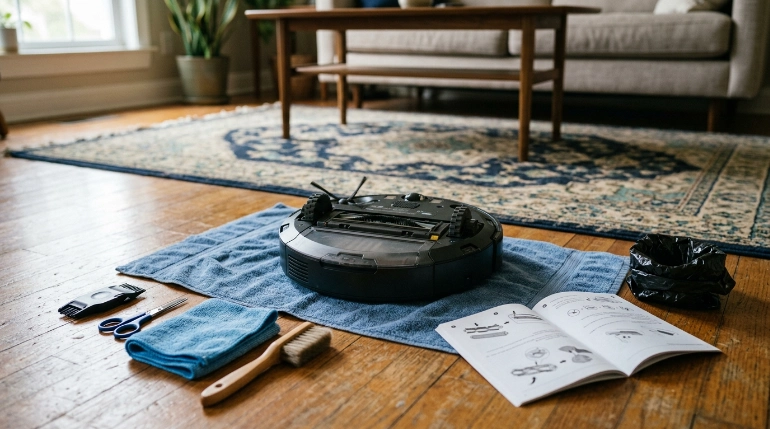
You usually need only a few basic tools. The safest choice is the cleaning tool supplied with the robot whenever one is included.
- Robot vacuum cleaning tool or hair cutter
- Small scissors with controlled tips
- Dry microfiber cloth
- Soft cleaning brush
- Trash bin or bag
- Manufacturer’s manual or support instructions
A seam ripper can sometimes help cut wrapped thread, but use it carefully. Keep any blade pointed away from rubber fins, bristles, wiring, and your hands.
Prepare the robot first
Turn the vacuum off before touching a moving component. Remove it from an active charging position and place it upside down on a stable surface.
- Pause the current cleaning job.
- Turn the robot off using its normal shutdown procedure.
- Move it away from the dock.
- Place a towel or soft mat beneath it.
- Confirm that the brushes have stopped completely.
- Check the manual before removing unfamiliar parts.
Avoid spraying household cleaner into the underside of the vacuum. Liquid can migrate into bearings, sensors, connectors, or the brush-drive assembly.
For general household surfaces, the CDC distinguishes ordinary cleaning from disinfecting. A robot’s brush assembly normally needs debris removal rather than routine chemical disinfection.
Should you use water?
Only wash a removable brush if the manufacturer specifically identifies it as washable. A part that looks like plain plastic can still contain a bearing, cap, magnet, or other component that should stay dry.
If washing is permitted, let the component dry completely according to the manufacturer’s instructions before reinstalling it. Never reinstall a wet part simply because its surface feels dry.
How Do You Clean Robot Vacuum Brushes Step by Step?
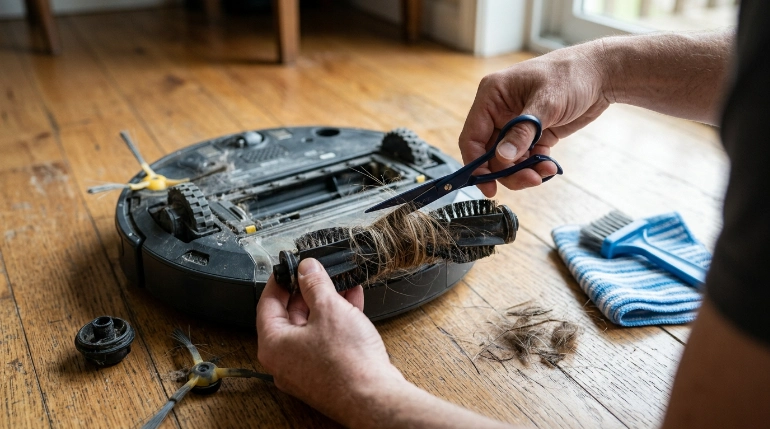
Remove tangled material first, then clean the hidden contact points at each end. This order prevents you from missing the debris that commonly restricts movement.
1. Remove the main brush or roller
Open the brush guard or retaining cover according to your model’s instructions. Lift the roller out without forcing clips or tabs.
Set the cover nearby so you can inspect it later. Dust often collects along its edges and around the roller opening.
2. Cut through wrapped hair
Look for grooves in the roller where a cleaning tool can safely pass beneath tangled hair. Many brush designs provide these channels specifically to make cutting easier.
- Slide the cleaning tool beneath a small section of hair.
- Cut across the tangle in several places.
- Pull the loosened strands away with your fingers.
- Repeat until the roller surface is clear.
Don’t drag scissors along the roller. That can nick soft rubber fins or trim useful bristles.
3. Clean both roller ends
This is the step I see people skip most often. Hair can squeeze into the small space between the rotating roller and its end cap.
If the cap is designed to come off, remove it as the manual shows. Pull out hair, lint, and thread from the axle area before replacing the cap.
- Check the removable end cap.
- Check the opposite drive end.
- Remove compacted lint from narrow gaps.
- Make sure removable pieces seat correctly afterward.
Don’t pry off a fixed end cap. If it doesn’t release in the way your manual describes, leave it installed.
4. Remove and clean the side brushes
Side brushes sweep debris away from edges and toward the center intake. Hair often winds around the post underneath the visible brush arms.
Some side brushes pull straight off, while others use a small screw. Follow the design used by your specific robot.
- Remove the side brush correctly.
- Pull hair from the hub and mounting post.
- Wipe loose dust from the brush arms.
- Check for splits or permanently deformed arms.
- Reattach the brush securely.
5. Clean the brush compartment
With the roller removed, inspect the cavity around it. Pick out hair and crumbs without pushing debris deeper into the vacuum.
Use a dry microfiber cloth or soft brush on accessible surfaces. Keep liquids away from the drive mechanism unless your manual explicitly permits them.
6. Inspect the brush guard
Hair can collect around the guard, retaining frame, and intake edges. Remove anything that could rub against the roller when it spins.
- Clear packed fibers from corners.
- Check tabs for cracks.
- Remove string crossing the opening.
- Make sure the guard closes flush.
7. Reinstall everything and test it
Return the roller in the correct orientation and secure the brush guard. Reinstall every side brush using the correct mounting method.
Before starting a full cleaning cycle, make sure no tools or loose debris remain underneath the robot. Then run a short test on an open section of floor.
Section Takeaway: Clean the visible roller, both hidden roller ends, the side-brush hubs, and the surrounding compartment. Removing hair from only the center of the brush can leave the real restriction untouched.
Do Main, Side, and Rubber Brushes Need Different Cleaning?
Yes. Each brush handles debris differently, so the places where hair collects also change.
The table below provides a safe generic starting point. Always follow your model’s manual when its instructions differ.
| Brush part | Where debris collects | Best first cleaning method | Water? |
|---|---|---|---|
| Bristled main roller | Between bristles and around both end caps | Cut hair in sections, pull fibers out, then clean the ends | Only if the manufacturer says it is washable |
| Rubber roller | Grooves, ends, and axle areas | Pull or cut wrapped strands without nicking rubber fins | Follow the model-specific instructions |
| Side brush | Around the center hub and mounting post | Remove the brush and unwind hair from underneath | Usually unnecessary unless specifically permitted |
| Brush guard | Edges, corners, and intake openings | Dry brush or microfiber wipe | Keep moisture away from nearby electronics |
Bristle rollers
Bristles grab fibers effectively, but hair can weave through them instead of sitting on top. Cut the hair into short sections before pulling it out.
Don’t trim bristles just because a few strands are difficult to remove. Damaging the brush itself creates a different problem.
Rubber rollers
Rubber rollers may shed hair more easily from their center surface. Their end caps can still collect tightly wound strands.
Inspect the flexible fins for tears while cleaning. Replace a damaged roller according to the manufacturer’s guidance rather than trying to glue it.
Side brushes
A side brush can look clean from above while its mounting post is wrapped with hair. Remove it periodically when your model allows user removal.
If the arms stay badly bent after normal use, check whether the manufacturer recommends reshaping or replacement. Don’t use high heat unless the manufacturer specifically instructs you to do so.
What Should You Avoid When Cleaning Robot Vacuum Brushes?
The biggest mistakes involve forcing components, adding unnecessary liquids, and ignoring hidden hair around rotating ends. Safe cleaning should leave the brush assembly intact and freely moving.
Don’t pull against tightly wrapped hair
A large hair bundle can become surprisingly tight. Pulling hard may bend bristles, stress a side brush, or place force on the roller ends.
Cut the bundle into smaller sections first. Then peel those sections away.
Don’t spray cleaner into the robot
Sprays can travel beyond the surface you intended to clean. The safest generic approach around the underside is dry mechanical cleaning unless your manual permits something else.
Disinfectants also aren’t a substitute for physically removing hair and packed debris. A tangled roller needs the obstruction removed.
Don’t ignore household dust
Dust collected by a vacuum can contain more than visible dirt. The EPA notes that indoor particulate matter can include materials such as pollen, mold spores, pet dander, and dust-mite-related debris.
You can read the EPA’s overview of sources of indoor particulate matter for broader indoor-air context.
If you’re sensitive to household allergens, avoid shaking dusty brushes around indoors. Place removed hair and debris directly into a trash bag or bin.
The Asthma and Allergy Foundation of America discusses controlling indoor allergens such as dust mites, pet dander, and mold as part of a broader home-management strategy.
Cleaning a robot vacuum brush does not replace HEPA filtration, source control, or other home-hygiene measures. It simply keeps one frequently used cleaning appliance maintained.
Don’t forget sensors and wheels
Brush cleaning is a good time for a visual inspection of the rest of the underside. Remove obvious loose debris without turning a brush-maintenance job into unnecessary disassembly.
- Check wheels for wrapped hair.
- Look for debris around the caster wheel.
- Inspect sensor windows for dust.
- Empty the dustbin if needed.
- Check the filter according to its own cleaning instructions.
Don’t assume a vacuum filter can be washed because a brush can be washed. Filter materials and cleaning requirements vary by model.
What if the brush still won’t turn?
Remove the brush again and inspect the ends, mounting points, and guard for hidden material. Confirm that every removable component is seated in the correct orientation.
If the robot still reports a brush error after accessible debris is removed, stop forcing the assembly. The problem may involve a damaged bearing, drive connection, motor, or another internal component.
Expert Alert: If troubleshooting requires opening the brush motor, electrical housing, battery compartment, or internal wiring, use manufacturer support or a qualified repair technician instead of continuing DIY disassembly.
Section Takeaway: Use the least aggressive method that removes the obstruction. Cutting away hair and cleaning accessible parts is safer than forcing rollers, soaking components, or opening the robot’s electrical systems.
Frequently Asked Questions
Can I wash robot vacuum brushes with water?
Only if the manufacturer says the specific brush is washable. Some removable rollers can tolerate washing, while other designs contain caps or components that should remain dry. Check your exact model’s manual and allow any approved washable part to dry fully before reinstalling it.
How do I remove long hair from a robot vacuum brush?
Remove the roller, slide a cleaning tool beneath the wrapped hair, and cut the bundle in several places. Pull the smaller sections away, then inspect both roller ends because tightly wrapped strands often collect around the end caps.
Why does hair keep getting stuck in my robot vacuum?
Long human hair, pet hair, thread, and rug fibers can wind around rotating brushes instead of entering the dustbin. Regular inspection reduces large tangles, but some wrapping is normal for many brush-based vacuum designs.
How often should I replace robot vacuum brushes?
There is no universal replacement interval for every robot vacuum. Replace a brush when it reaches the wear limit described by its manufacturer, becomes damaged, loses its shape, or triggers persistent problems that normal cleaning does not correct.
Can I use scissors to clean a robot vacuum roller?
Yes, with care. Cut only the tangled hair or thread, and keep the blade away from bristles, rubber fins, belts, wiring, and your hands. A manufacturer-supplied hair-cutting tool is usually easier to control.
Why is my robot vacuum brush making noise after cleaning?
Check whether the roller is installed in the correct direction, both end caps are seated properly, and the guard is locked into place. Also inspect for leftover hair or a small object rubbing against the roller.
Should I clean the side brushes too?
Yes. Hair can wrap around the side-brush mounting post even when the visible arms look clean. Remove detachable side brushes as directed by the manufacturer, clear the hub area, and inspect the arms for wear before reinstalling them.
Keep the Brushes Clean and the Robot Ready
Learning how to clean robot vacuum brushes comes down to one simple routine: power off, remove accessible brushes, cut away tangles, clean the hidden ends, inspect for wear, and reinstall everything correctly.
As of 2026, brush designs vary widely across robot vacuums from brands such as Shark, Dyson, and other major manufacturers. Your model’s manual should always overrule generic cleaning advice.
I pay closest attention to the roller ends and side-brush hubs because that’s where hidden hair tends to surprise me. A brush that looks clean across the middle isn’t necessarily clean where it rotates.
Make brush inspection part of your regular home-hygiene routine instead of waiting for a jam. That small habit makes robot vacuum maintenance simpler and helps you spot worn or obstructed components before the next scheduled cleaning run.
“`