How Do You Clean Inside a Vacuum Motor Housing?

Quick Answer
To clean inside a vacuum motor housing, unplug the vacuum or remove its battery first. Remove only user-accessible covers, then loosen dry dust with a soft brush and wipe accessible plastic surfaces with a dry microfiber cloth. Keep water, cleaning sprays, and damp tools away from the motor, wiring, bearings, and circuit boards, and follow your model’s maintenance instructions, as recommended in Consumer Reports’ vacuum maintenance guidance.
Safe quick steps
- Disconnect power: Unplug a corded vacuum or remove the cordless battery before touching the motor area.
- Empty debris first: Remove the bag or dustbin and clean accessible filters before approaching the motor housing.
- Use dry tools: Loosen visible dust with a soft detailing brush or clean, dry microfiber cloth.
- Protect the motor: Never pour, spray, or drip liquid into vents, wiring, bearings, or motor components.
- Don’t force access: Stop if reaching the motor requires dismantling sealed electrical sections that the manual doesn’t identify as serviceable.
- Inspect before reuse: Reassemble covers, filters, and seals correctly before reconnecting power.
When to stop
- If you find burned wiring, melted plastic, motor damage, moisture, sparking, or a persistent electrical smell, leave the vacuum unplugged and arrange qualified service.
I treat a vacuum motor housing differently from the dustbin, hose, or washable filter. The motor area is an electrical zone, so aggressive washing can turn a simple cleaning job into a damaged appliance.
This guide explains what you can safely clean, what should stay dry, and when it’s smarter to stop. I’ll also show you how to prevent fine dust from reaching the motor area again.
In This Guide
- What exactly is a vacuum motor housing?
- How do you clean inside a vacuum motor housing safely?
- What should you never use inside the motor housing?
- Should you remove or open the motor housing?
- How do you know if dust around the motor is causing problems?
- How can you keep dust out of the vacuum motor area?
- Frequently asked questions
What Exactly Is a Vacuum Motor Housing?
A vacuum motor housing is the section of the appliance that surrounds and protects the electric motor and related components. Depending on the design, it may also contain wiring, cooling passages, seals, sound insulation, and electronic controls.
It’s different from the dirt collection chamber. That distinction matters because parts designed to hold dirt aren’t automatically safe to clean the same way as the motor area.
Which vacuum parts are normally user-cleanable?
Most routine maintenance happens before dirt reaches the motor. Accessible bins, bags, filters, hoses, brush rolls, cyclones, and air passages are the areas I check first.
Manufacturers commonly tell owners to unplug the machine before maintenance, empty the dirt container, inspect blockages, and service filters according to the model instructions. Washability varies by component.
| Vacuum area | Typical safe cleaning approach | Use water? | Typical DIY access |
|---|---|---|---|
| Dustbin | Empty, wipe, or wash if the manual allows | Sometimes | Yes |
| Washable pre-motor filter | Rinse as directed and dry completely | Only if labeled washable | Usually |
| Non-washable filter | Tap, brush, vacuum, or replace as directed | No | Usually |
| Motor-housing surface | Dry brush or dry microfiber cloth | No | Only if exposed normally |
| Motor, wiring, or circuit board | Professional service when cleaning or repair is needed | No | Generally no |
A pre-motor filter exists partly to keep dirt from reaching the motor. That makes filter maintenance one of the best ways to keep the housing cleaner.
The EPA’s explanation of HEPA filtration describes HEPA as high-efficiency particulate air filtration. However, not every vacuum filter is HEPA, and not every HEPA-style component is washable.
How Do You Clean Inside a Vacuum Motor Housing Safely?
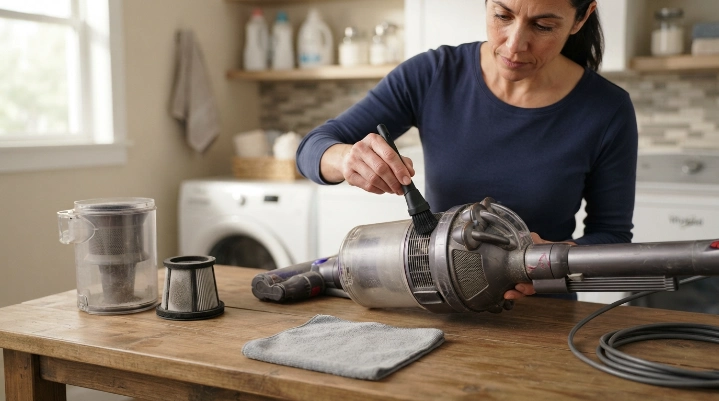
How do you clean inside a vacuum motor housing with a soft brush after unplugging the vacuum?
The safest approach is to clean only the part of the housing that becomes accessible during normal owner maintenance. You shouldn’t dismantle the actual motor just to remove ordinary dust.
1. Disconnect every source of power
Unplug a corded vacuum from the wall. For a cordless model with a removable battery, switch the machine off and remove the battery.
Don’t rely only on the power switch. You don’t want the motor or brush system starting while your fingers or tools are near internal parts.
2. Let a hot vacuum cool
If the machine recently overheated or shut itself down, leave it disconnected until it cools. Don’t start disassembly around a hot motor.
Heat can also be a clue that you need to check airflow first. A packed bin, clogged hose, dirty filter, or obstructed floor head can restrict airflow.
3. Remove the dustbin, bag, and accessible filters
Take out the dirt container or bag so loose debris can’t fall back into the machine. Remove only filters that your manual identifies as owner-removable.
Clean those filters separately according to their instructions. A washable foam filter and a non-washable pleated filter shouldn’t be treated the same way.
4. Remove loose dust before touching the housing
Hold the vacuum where loosened debris won’t spread through your living space. A garage, porch, or easy-to-clean floor can make the job simpler.
Use a soft, clean detailing brush to loosen dust from accessible plastic surfaces, vent openings, and edges. Work gently around seals, wires, and delicate parts.
5. Wipe accessible surfaces dry
Use a clean, dry microfiber cloth on surfaces you can reach without forcing anything apart. Fold the cloth around a finger for narrow plastic ledges.
Don’t push the cloth deep into the motor. The goal is surface dust removal, not internal motor disassembly.
6. Inspect the airflow path
Look at the inlet leading toward the motor and the exhaust path leaving it. Remove accessible lint or debris only when you can do so without contacting electrical components.
I always check the airflow path before assuming the motor itself is dirty. A clog several inches away can create symptoms that feel like a motor problem.
- Check the hose: Look for packed hair, paper, pet fur, or larger debris.
- Check the intake: Remove lint caught around accessible openings.
- Check the filter seat: Make sure dust hasn’t collected around a poor seal.
- Check the brush roll: Cut away hair or string that prevents free rotation.
- Check the exhaust: Make sure vents aren’t blocked by dust or objects.
7. Reassemble the vacuum carefully
Return every filter to its correct position. A misaligned filter, bin, gasket, or cover can create leaks or reduce normal airflow.
If you washed any manufacturer-approved component, reinstall it only after it is completely dry. Follow your own manual’s drying time rather than guessing.
8. Test the vacuum briefly
Reconnect power only after every cover and filter is installed. Run the vacuum briefly and listen for abnormal grinding, rattling, surging, or scraping.
Stop immediately if you notice smoke, sparks, a sharp electrical odor, or rapidly increasing heat.
Section Takeaway: Clean the accessible motor-housing area dry, but solve airflow problems at the bin, filters, hose, brush roll, and vents first. Never treat the electrical motor cavity like a washable dust cup.
What Should You Never Use Inside the Motor Housing?
A vacuum motor can tolerate moving air and ordinary operating dust better than it can tolerate careless cleaning. Liquids and aggressive tools can create new problems.
Don’t spray cleaner or water into the housing
Never spray household cleaner, disinfectant, degreaser, or water through motor vents. Liquid can reach wiring, bearings, insulation, connectors, or electronic controls.
This is different from washing a removable bin or a filter specifically labeled washable. Keep the boundary clear.
Don’t reinstall damp parts
A filter that feels only slightly damp still doesn’t belong back beside a powered motor. Let washable parts dry completely according to the manufacturer’s directions.
Consumer Reports notes that many vacuum filters need careful cleaning and complete drying, while some filters shouldn’t be washed at all. Model instructions should always win.
Be cautious with compressed air
A powerful blast of compressed air can push dust farther into a motor, bearing, connector, or cooling passage. It can also scatter fine dust throughout the room.
If a manufacturer specifically permits compressed air, follow its pressure and distance instructions. Otherwise, I prefer a soft brush for accessible dry dust.
Don’t add oil unless the service manual requires it
Household oil, penetrating lubricant, and spray lubricant shouldn’t be applied randomly to a vacuum motor. Modern motors and bearings aren’t universally designed for owner lubrication.
Oil can also collect dust. That may turn a dry contamination problem into sticky buildup.
The EPA notes that vacuuming and other cleaning activities can temporarily disturb settled indoor dust. Its indoor particulate matter guidance recommends good cleaning practices and notes that HEPA-filtered vacuums can help limit some dust escaping back indoors.
Should You Remove or Open the Motor Housing?
Usually, you shouldn’t open a sealed motor compartment for routine cleaning. Stop at the point your owner’s manual defines as normal maintenance.
Removing a dust cup is routine. Removing a screwed electrical enclosure, motor assembly, wiring harness, or control board is a different level of work.
When opening the housing may be reasonable
Some vacuums have an outer service cover that the manufacturer specifically instructs owners to remove. In that case, follow the model-specific procedure and limit cleaning to the areas described.
Keep screws organized and note seal positions. An incorrectly fitted cover or gasket can affect airflow and dust containment.
When should you stop?
- Live electrical parts are exposed: Don’t continue into wiring, capacitors, switches, or control boards.
- The motor needs dismantling: Internal motor cleaning isn’t normal household maintenance.
- Plastic looks melted: Heat damage needs diagnosis, not cosmetic cleaning.
- You find burned wiring: Leave the machine disconnected.
- Liquid entered the motor area: Don’t power the machine just to see whether it still works.
- The vacuum repeatedly trips power: Stop using it until the electrical problem is addressed.
Expert Alert: If cleaning requires electrical diagnosis, motor disassembly, rewiring, capacitor work, or repair of burned components, use a qualified appliance technician instead of attempting a DIY repair.
The U.S. Consumer Product Safety Commission’s electrical safety guidance is a useful reminder that abnormal electrical behavior shouldn’t be ignored.
How Do You Know If Dust Around the Motor Is Causing Problems?
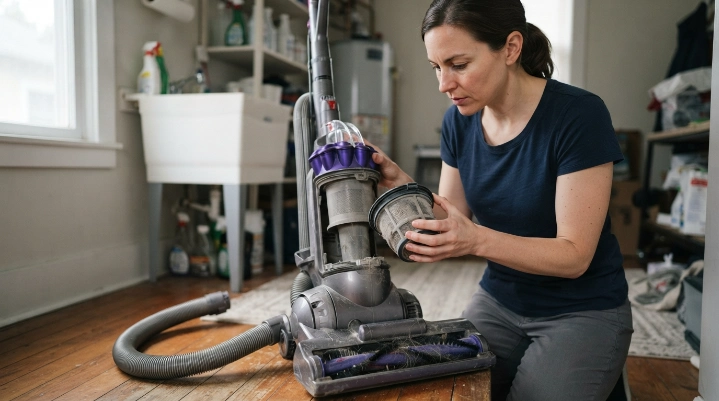
Visible dust around the motor area doesn’t prove the motor itself has failed. Start by checking airflow and mechanical resistance because those problems are common and easier to correct.
As of 2026, mainstream vacuum maintenance guidance still centers on bins, filters, clogs, rollers, and correctly seated components before internal motor work. That sequence protects both the machine and the person servicing it.
| Symptom | Check first | When to stop using it |
|---|---|---|
| Weak suction | Bin, bag, filters, hose, inlet, seals | If suction stays absent at the motor path after approved checks |
| Vacuum gets hot | Restricted airflow and brush-roll resistance | If heat returns quickly after blockages are cleared |
| Dust blows from exhaust | Filter condition, installation, seals, cracks | If housing or filtration seals appear damaged |
| Burning smell | Brush obstruction, belt area, airflow | Immediately if smell seems electrical or smoke appears |
| Grinding or metal noise | Brush roll and accessible moving parts | If noise comes from the motor itself |
Repeated overheating can damage components if you keep running the machine. Let the vacuum cool and correct obvious airflow restrictions before testing it again.
A persistent burning smell deserves more caution. Dust on an accessible surface may smell warm, but scorched insulation or electrical components require professional attention.
How Can You Keep Dust Out of the Vacuum Motor Area?
Prevention works better than repeatedly opening the motor area. Your vacuum’s filtration and airflow system are designed to intercept debris before it reaches sensitive components.
Keep the bin or bag from becoming overloaded
Empty a bagless bin before debris packs tightly around the inlet or separator. Replace bags according to the machine’s indicator or manufacturer guidance.
An overfilled collection system can interfere with normal airflow. It can also make filter contamination happen faster.
Maintain the pre-motor filter correctly
The pre-motor filter is an important barrier between collected dirt and the motor. Inspect it at the interval specified for your model.
Wash it only if the manufacturer says it’s washable. Replace disposable or damaged filters instead of trying to restore them with water.
Keep seals and filter seats clean
A filter can’t work properly if air and dust bypass it through a gap. Wipe accessible sealing surfaces before reinstalling the bin and filter assembly.
Check that filters sit flat and covers close fully. Don’t force a cover that doesn’t align.
Clear clogs before airflow collapses
- Hose: Remove lodged debris before it becomes tightly packed.
- Wand: Check narrow bends where paper and hair can catch.
- Floor head: Clear lint from the intake opening.
- Brush roll: Remove wrapped hair and thread regularly.
- Exhaust vents: Keep them uncovered during use.
Good filtration also affects what comes back into the room. EPA guidance explains that a properly designed HEPA vacuum routes captured air through its high-efficiency filtration system rather than allowing unfiltered bypass.
I also avoid vacuuming material the machine wasn’t built to handle. Fine construction dust, fireplace ash, wet debris, and large sharp objects may require specialized equipment rather than an ordinary household vacuum.
Section Takeaway: Protect the motor by maintaining everything upstream of it. Clean filters, clear airflow, intact seals, and sensible debris choices reduce the need to touch the motor housing at all.
Frequently Asked Questions
Can I wash the inside of a vacuum motor housing?
No, you generally shouldn’t wash a vacuum motor housing or allow water to reach its motor, wiring, bearings, or electronic components. Wash only removable parts that your manufacturer specifically identifies as washable, and let them dry completely before reassembly.
Can I vacuum dust out of another vacuum’s motor housing?
You can sometimes use a second vacuum to collect loose dust near an accessible opening, provided you don’t strike wiring, seals, fans, or delicate components. Don’t insert a hard nozzle deeply into the motor assembly.
Can I use compressed air to clean a vacuum motor?
I wouldn’t use strong compressed air unless the manufacturer specifically recommends it. Air pressure can drive debris deeper into bearings, windings, connectors, or cooling passages while also blowing fine dust into the room.
Why is there dust inside my vacuum near the motor?
A small amount may accumulate over time, but heavy buildup can point to a dirty, damaged, poorly seated, or missing pre-motor filter. Check filter seals, the dustbin or bag installation, and any visible cracks or bypass paths.
Will cleaning the motor housing fix low suction?
Not usually by itself. Low suction more often deserves checks of the bag or bin, filters, hose, wand, intake, seals, and floor head before you suspect contamination inside the motor assembly.
What should I do if the vacuum smells burned after cleaning?
Turn it off and disconnect power. Check only safe, user-accessible areas for a jammed brush or obvious blockage, and arrange professional service if the odor appears electrical, returns quickly, or comes with smoke, sparks, or unusual heat.
How often should I clean the vacuum motor housing?
There’s no universal schedule for opening a vacuum motor housing. For most owners, routine maintenance should focus on the bin, bag, filters, brush roll, hose, and vents, while the motor area is inspected only when accessible or when the manual calls for it.
The main takeaway is simple: clean around a vacuum motor with dry, gentle methods, but don’t turn routine maintenance into motor disassembly.
Keep the filtration and airflow system maintained first. If the motor still overheats, smells electrical, loses power, or makes abnormal noises, qualified service is safer than deeper DIY cleaning.