How Do You Clean Robot Vacuum Side Brushes?

Quick Answer
To clean robot vacuum side brushes, switch the robot off, remove it from the dock, detach each side brush as your manual directs, and pull away wrapped hair and thread. Clean the hub and mounting post, inspect the bristles, then reinstall the brush securely. Model designs differ, so check the manufacturer’s side-brush maintenance instructions before removing unfamiliar parts.
Quick side-brush cleaning steps
- Power it off: Stop the robot completely and move it away from its charging dock.
- Check the mount: Look for a retaining screw, press-fit hub, or another model-specific attachment.
- Remove the brush: Detach it carefully without twisting or forcing the drive post.
- Clear the hair: Pull or cut away hair, thread, lint, and fibers wrapped around the hub.
- Inspect the arms: Look for cracked hubs, missing bristles, or permanently distorted brush arms.
- Reinstall securely: Fit the brush correctly and confirm it sits flat before the next cleaning run.
Robot vacuum side brushes work along walls, corners, chair legs, and other edges where the main roller cannot always reach. Because they spin close to the floor, hair and thread can wind around their small mounting hubs quickly.
I recommend treating the hidden hub as the main cleaning target, not just the visible bristles. A side brush can look clean from above while a tight ring of hair underneath restricts its movement.
In This Guide
- How Often Should You Clean Robot Vacuum Side Brushes?
- What Do You Need to Clean a Robot Vacuum Side Brush?
- How Do You Clean Robot Vacuum Side Brushes Step by Step?
- Do Different Side-Brush Designs Need Different Cleaning?
- What Should You Avoid When Cleaning Side Brushes?
- Why Is the Side Brush Still Not Spinning After Cleaning?
- Frequently Asked Questions
How Often Should You Clean Robot Vacuum Side Brushes?
Check side brushes regularly and clean them whenever you see wrapped hair, thread, lint, or restricted movement. Homes with pets, long hair, rugs, or heavy floor debris may need more frequent checks.
There is no single maintenance interval that applies to every robot. As of 2026, manufacturers still use different brush materials, attachment systems, and recommended service schedules.
Definition: A robot vacuum side brush is a small rotating brush near the outer edge of the machine that sweeps loose debris toward the vacuum’s central cleaning path.
Some manufacturers provide specific intervals. Certain Roborock manuals, for example, recommend monthly side-brush cleaning and replacement every three to six months for particular models.
- After debris-heavy runs: Check for string, pet hair, rug fibers, and other visible tangles.
- During routine maintenance: Look underneath the hub instead of inspecting only the brush tips.
- After a brush warning: Stop the robot and check for an obstruction before running it again.
- When edge cleaning changes: Inspect for bent arms, a loose mount, or debris around the drive post.
Cleaning frequency also depends on what the robot encounters. Consumer Reports’ 2026 robot-vacuum testing notes that hair can become caught in the brushes of some models.
A fast visual check can prevent a small tangle from becoming a dense bundle around the hub. It also gives you a chance to spot worn bristles before they become a bigger maintenance issue.
Section Takeaway: Use your owner’s manual as the main schedule, but inspect the side brush sooner whenever hair or fibers are common in your home.
What Do You Need to Clean a Robot Vacuum Side Brush?
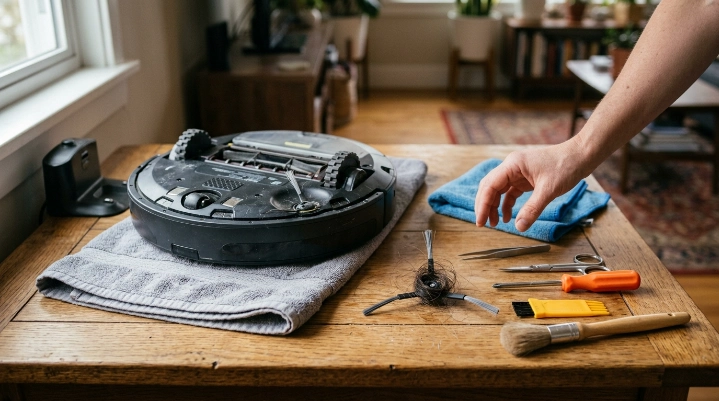
You usually need only a few simple tools. The safest choices are those that help remove debris without scratching the robot or damaging flexible brush arms.
- Microfiber cloth: Useful for wiping loose dust from the removable brush and accessible plastic surfaces.
- Tweezers: Helpful for pulling hair from narrow gaps around the brush hub.
- Small scissors: Useful for carefully cutting tightly wrapped hair or thread.
- Small screwdriver: Needed only when the manufacturer’s instructions show a retaining screw.
- Manufacturer cleaning tool: Use the supplied tool when your robot includes one.
- Soft brush: A small dry brush can loosen lint around accessible mounting areas.
Keep liquids away from the robot itself unless your manual specifically allows moisture on that component. A removable brush being made of plastic does not automatically mean the whole brush assembly is washable.
Do not reach underneath a robot that can start automatically. Switch it off first and remove it from the charging station.
How Do You Clean Robot Vacuum Side Brushes Step by Step?
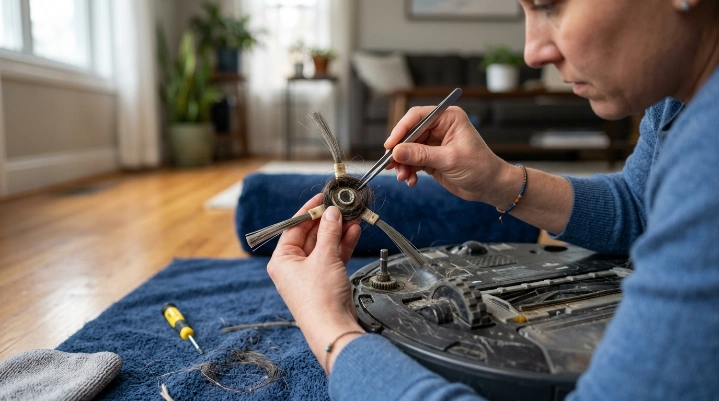
Start by removing loose debris, then focus on the hidden mounting area. This order makes it easier to see hair wrapped tightly against the hub or drive post.
1. Turn the robot off
Stop the current cleaning cycle and power the vacuum down according to its manual. Move it away from the charging dock before touching the underside.
Place the robot upside down on a clean, soft, stable surface. Avoid resting it where delicate sensors or raised components could be damaged.
2. Identify how the side brush attaches
Look closely at the center of the side brush. Some designs use a screw, while others fit onto a peg or removable post.
- Do not assume the brush pulls straight off.
- Do not pry against the robot’s housing.
- Check the model manual when the attachment is unclear.
3. Remove the side brush
If your model uses a retaining screw, use the correct screwdriver size and remove it carefully. Put the screw somewhere safe while you clean.
If the brush is designed to lift from a peg, pull only as the manufacturer describes. Excessive twisting can damage the hub or mounting post.
4. Remove wrapped hair and thread
Turn the removed brush over and inspect the center hole or hub. Hair often forms a tight ring where the brush meets the robot.
- Pull loose strands away with your fingers or tweezers.
- Cut dense tangles in one or two places if needed.
- Keep scissors away from the bristles and plastic hub.
- Remove every cut strand instead of leaving short pieces behind.
- Inspect the mounting post for another hidden ring of hair.
Work slowly around the hub. Forcing a compacted hair bundle can bend flexible arms or scratch the mounting surface.
5. Wipe away dust
Use a soft, dry microfiber cloth to remove dust from the brush and accessible mounting area. A soft dry brush can help with lint trapped in narrow gaps.
If the manufacturer explicitly says the removable side brush can be washed, follow its washing and drying instructions. Never reinstall a wet component simply because the outside feels dry.
6. Inspect and reinstall the brush
Check the hub for cracks and look across every brush arm. Severely shortened, missing, split, or permanently distorted bristles may justify replacement.
Reinstall the brush in the correct position and tighten any retaining screw securely without overtightening it. Turn the robot upright before testing it.
Section Takeaway: The most important cleaning spot is often the underside of the hub, where hair can wrap tightly around the mounting post.
Do Different Side-Brush Designs Need Different Cleaning?
Yes. The basic goal is always to remove tangles and debris, but the removal method and maintenance schedule can differ by brand and model.
The examples below show why generic instructions should never override your owner’s manual.
| Example | Attachment / Cleaning Method | Manufacturer Guidance |
|---|---|---|
| Roborock E2/E3/E4 | Screw-mounted side brush | Unscrew, remove trapped hair, reinstall, and tighten the screw. |
| Roborock Qrevo series | Screw-mounted removable brush | Some Qrevo documentation specifies monthly cleaning and replacement every 3–6 months. |
| Shark 2400WD series | Brush lifts from its peg | Manufacturer guidance says to replace the side brush if it is bent or damaged. |
Shark’s maintenance documentation is a good example of why you should identify the attachment system before pulling on a brush.
Newer robots may also use redesigned side brushes intended to reduce hair tangling. Even then, regular inspection matters because thread, carpet fibers, and long strands can still collect around moving parts.
What Should You Avoid When Cleaning Side Brushes?
Aggressive cleaning can create a bigger problem than the original tangle. Use the least force necessary and keep sharp tools away from the brush material.
- Do not clean while powered: Automatic movement can start unexpectedly.
- Do not pull blindly: Confirm whether the brush is screwed on or press-fit first.
- Do not cut the bristles: Position scissors only beneath the tangled material.
- Do not spray cleaner underneath: Liquid can reach sensors, connectors, or drive components.
- Do not force the drive post: Resistance may indicate a deeper obstruction or mechanical problem.
- Do not use replacement intervals universally: Follow the schedule for your exact model.
Routine robot-vacuum cleaning is mainly about removing collected debris rather than chemically disinfecting the machine. Strong cleaners can also be incompatible with plastics, rubber, coatings, or electronic components.
The EPA’s guidance on indoor particulate matter and dust recommends regular household cleaning as part of reducing accumulated indoor dust. That does not mean you need disinfectant on a robot’s brush mechanism.
Why Is the Side Brush Still Not Spinning After Cleaning?
If a side brush still will not turn normally, first switch the robot off again. Recheck the installation and look for debris you may have missed underneath the hub.
- Hair remains underneath: A thin strand can tighten around the drive post and be hard to see.
- The brush is installed incorrectly: A screw may be loose, or the brush may not be fully seated.
- The hub is cracked: The motor may turn while the damaged brush slips.
- The arms are badly distorted: Bent bristles can drag against the floor or robot body.
- The mounting area is obstructed: Fine thread, grit, or other debris may remain in the gap.
- The drive module has a problem: Cleaning the removable brush will not repair an internal mechanical or electrical fault.
After reinstalling the brush, run a brief test on an open floor. Stop the robot if you hear scraping, repeated clicking, or another unusual sound.
If the brush problem continues, check the robot’s app or manual for a model-specific error message. Manufacturer troubleshooting instructions should take priority over further disassembly.
Expert Alert: If the brush-drive post does not move normally, looks damaged, or appears to require opening the robot’s powered drive assembly, stop DIY disassembly and contact the manufacturer or a qualified appliance repair technician.
Section Takeaway: A clean brush that still will not operate correctly may have an installation, hub, or drive-system problem rather than another simple hair tangle.
Frequently Asked Questions
Can you wash robot vacuum side brushes with water?
Only if the manufacturer says that specific removable brush can be washed. Side-brush designs vary, and nearby bearings, drive components, sensors, or connectors may need to remain dry. When washing is permitted, allow the brush to dry completely before reinstalling it.
Can I use scissors to remove hair from a robot vacuum side brush?
Yes, but use small scissors carefully. Cut only the tangled hair or thread, and keep the blade away from flexible bristles and the plastic hub. Tweezers or a manufacturer-supplied cleaning tool may be safer for thin strands near the mounting hole.
Why does hair collect underneath the side brush?
The rotating brush can draw long hair, thread, and fibers toward its center. Those strands may wind around the narrow mounting post beneath the visible brush, creating a tight ring that is easy to miss during a quick surface inspection.
How do I know when a robot vacuum side brush needs replacing?
Clean it first, then inspect it. Replacement may be appropriate when the hub is cracked, bristles are missing, the arms remain badly bent, or the brush no longer sits securely. Follow your manufacturer’s wear and replacement guidance for the exact model.
Can a dirty side brush affect edge cleaning?
It can. A brush restricted by wrapped hair or damaged bristles may not sweep debris toward the robot’s cleaning path as intended. However, poor edge pickup can also come from brush design, navigation, floor conditions, or another mechanical issue.
Should I clean both side brushes if my robot has two?
Yes. Inspect and clean both sides even if only one looks tangled. Each brush can collect different amounts of hair depending on the robot’s travel pattern, wall-following behavior, floor layout, and where debris tends to gather.
Final takeaway: Cleaning robot vacuum side brushes is simple once you know how they attach. Power the robot off, remove the brush correctly, clear the hidden hub, inspect for wear, and reinstall it securely.
Make that inspection part of your normal robot vacuum maintenance rather than waiting for a jam. A few minutes spent clearing hair and thread can also help you spot a damaged brush before the next scheduled run.