
Spring Vacuum Maintenance Tips: A Complete 2026 Checklist

Quick Answer
Spring vacuum maintenance means clearing winter buildup, checking filters and airflow, removing hair from the brush roll, inspecting hoses, and cleaning the parts that collect dust. It is also a good time to prepare your vacuum for increased pollen, pet shedding, and tracked-in spring debris while following EPA guidance on controlling household particulate matter.
Your spring vacuum checklist
- Empty collected dirt: Empty the dust bin or check the bag before compacted debris restricts normal airflow.
- Inspect the filters: Remove loose buildup and clean only filters the manufacturer labels as washable.
- Clear the brush roll: Cut away hair, thread, pet fur, and carpet fibers wrapped around the roller.
- Check the airflow path: Inspect the floor head, wand, hose, and intake openings for hidden clogs.
- Clean smaller parts: Check attachments, wheels, vents, seals, sensors, and charging contacts where applicable.
- Look for damage: Stop using the vacuum if you find electrical damage, abnormal heat, sparking, or a burning smell.
One rule matters most
- Your vacuum’s owner manual should override any general maintenance schedule, especially for filters, batteries, belts, and powered cleaning heads.
Spring is when I like to give a vacuum more than its normal empty-the-bin routine. Winter can leave behind fine dust, hair, fibers, tracked-in grit, and debris hidden inside parts you rarely inspect.
A good spring reset doesn’t require taking the entire machine apart. The goal is to restore clear airflow, free-moving brushes, clean filtration, and reliable dirt collection before spring cleaning gets busy.
In This Guide
- What should spring vacuum maintenance include?
- How do you clean vacuum filters safely in spring?
- How do you clean the brush roll and floor head?
- How do you check the hose and airflow path for clogs?
- Does spring maintenance change by vacuum type?
- How can you control spring pollen and dust while vacuuming?
- Spring vacuum maintenance FAQ
What Should Spring Vacuum Maintenance Include?
Spring vacuum maintenance should cover the parts responsible for collecting dirt, moving air, filtering exhaust, and contacting your floors. Start with the bin or bag, filters, brush roll, floor head, hose, wand, attachments, wheels, vents, and seals.
Spring vacuum maintenance is a seasonal inspection and cleaning routine that removes accumulated debris and identifies developing problems before heavier spring cleaning begins.
Start with the dirt collection system
Disconnect the vacuum from power before removing components. Unplug a corded machine, or switch off a cordless or robot vacuum according to its manual.
- Bagless models: Empty the dust cup and inspect the fill line, hinges, latches, and seals.
- Bagged models: Check the bag level and replace it when the manufacturer recommends.
- Robot vacuums: Empty the smaller onboard bin and check the opening leading into it.
Fine dust often collects around the bin seal or bag connection. A dry microfiber cloth or soft brush works well for loose residue.
Use a simple spring maintenance schedule
The table below is a practical starting point rather than a universal manufacturer schedule. Homes with pets, long hair, carpeting, or frequent cleaning may need shorter intervals.
| Vacuum Part | Spring Maintenance | Practical Check Timing | Warning Sign |
|---|---|---|---|
| Dust bin or bag | Empty or replace as needed | After use or at the stated fill level | Packed debris or weaker pickup |
| Brush roll | Remove hair and fibers | Weekly during heavy shedding | Slow rotation or visible wrapping |
| Filters | Inspect, clean, or replace per manual | Every 2–4 weeks during frequent use | Heavy dust coating or weak airflow |
| Hose and wand | Check for obstructions | Monthly or after sudden suction loss | Whistling or reduced suction |
| Wheels, vents, and seals | Brush clean and inspect | During the seasonal deep clean | Hair buildup, dust, cracks, or leaks |
Inspect the vacuum before reassembly
Look closely at the areas you normally ignore. Spring is a convenient time to notice cracked hoses, loose connections, damaged seals, worn wheels, or missing attachment pieces.
- Check the power cord and plug for cuts or exposed conductors.
- Check cordless batteries for swelling, leakage, or unusual heat.
- Inspect flexible hoses for splits or crushed sections.
- Make sure the bin, filter covers, and access doors latch correctly.
- Check wheels and casters for wrapped hair.
Expert Alert: Stop using a vacuum with damaged wiring, sparking, persistent overheating, battery swelling, or a burning electrical smell. Have electrical or internal motor problems inspected by a qualified repair professional.
Section Takeaway: Spring maintenance works best as an airflow-first inspection. Clean the collection system, filters, brushes, and air passages before worrying about cosmetic dust on the housing.
How Do You Clean Vacuum Filters Safely in Spring?
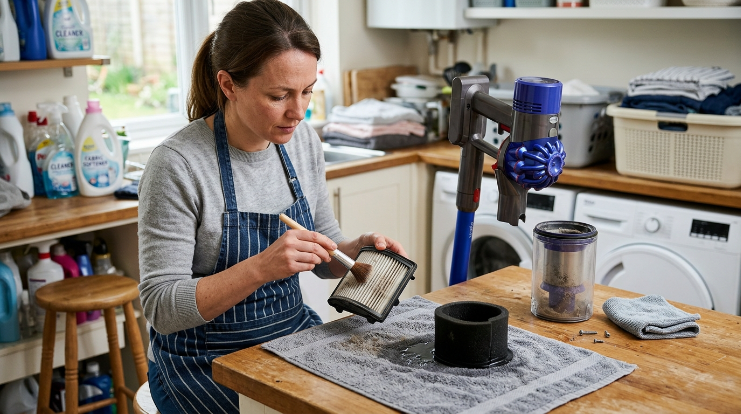
First, identify the filter type and confirm the manufacturer’s cleaning instructions. Some filters are washable, while others should stay dry and be replaced instead.
Don’t assume a filter can go under the faucet because it looks like foam or fabric. Water can damage certain filter materials and may compromise the way the filter fits or performs.
Know what kind of filter you have
- Pre-motor filter: Helps keep debris from reaching the motor area.
- Post-motor filter: Filters air before it leaves the vacuum.
- Foam filter: May be washable on some models, but check first.
- Cartridge filter: May require dry cleaning or replacement.
- HEPA filter: A high-efficiency particulate air filter used in many filtration systems.
The U.S. EPA defines a HEPA filter as a pleated mechanical filter that can theoretically capture at least 99.97% of airborne particles measuring 0.3 microns under the defined test conditions. You can read the EPA’s HEPA filter explanation for the technical definition.
That specification doesn’t mean every vacuum labeled around HEPA technology has identical whole-machine containment. Seals, filter fit, and the airflow path also matter.
If the filter is washable
- Remove the filter according to the manual.
- Tap off loose debris outdoors when appropriate.
- Rinse only if the manufacturer specifically allows washing.
- Avoid detergents unless the instructions call for them.
- Let the filter dry completely before reinstalling it.
A damp filter should never go back into the vacuum. Trapped moisture can create odors and may damage components that are not designed to become wet.
If the filter is not washable
Follow the manufacturer’s dry-cleaning or replacement instructions. Avoid brushing delicate pleated material aggressively because it can deform or tear.
Replacement timing varies too much by model and household to use one universal number. Check the manual, filter label, maintenance indicator, or manufacturer’s instructions.
Section Takeaway: Never wash a vacuum filter based on appearance alone. Identify the filter first, then follow its model-specific cleaning or replacement instructions.
How Do You Clean the Brush Roll and Floor Head?
Remove wrapped hair, thread, pet fur, and fibers before they form a tight layer around the brush roll. Spring shedding can make this area clog faster than expected.
When I do a seasonal vacuum check, the roller is one of the first places I inspect. A machine can look clean from above while the underside is packed with hair.
Clean the roller safely
- Disconnect the vacuum from its power source.
- Turn the floor head over on a stable surface.
- Remove the roller only if the manual permits it.
- Cut long hair wraps carefully with scissors or the supplied cleaning tool.
- Pull loose fibers away from the roller and end areas.
- Clear the suction opening behind the brush.
- Reinstall removable parts securely.
Pay attention near the roller’s ends. Hair often winds tightly around those areas even when the middle looks fairly clean.
Don’t forget the floor-head wheels
Small wheels and casters collect hair around their axles. That buildup can make the vacuum drag or steer poorly.
- Remove visible hair without forcing wheel assemblies apart.
- Check narrow suction channels for compacted lint.
- Inspect rubber strips or seals for damage.
- Wipe exterior dust with a dry or slightly damp cloth where allowed.
Watch for problems that cleaning doesn’t solve
A brush roll should move as its design intends after visible debris is removed. Persistent jamming, grinding, or failure to rotate can point to a belt, bearing, motor, or drive problem.
Don’t force a stuck powered roller by hand. That can damage the mechanism or create a safety problem.
Section Takeaway: Spring shedding makes brush-roll maintenance especially important. Clear hair early instead of waiting until the roller becomes tightly wrapped or stops moving normally.
How Do You Check the Hose and Airflow Path for Clogs?
Inspect the entire route air follows through the vacuum when suction suddenly feels weaker. A partial blockage can make a powerful machine perform like a much smaller one.
Start at the floor head and work toward the bin or bag. This simple order helps narrow down where airflow is being restricted.
Check these areas in sequence
- Floor-head opening: Look for paper, hair clumps, carpet fibers, or larger debris.
- Lower intake: Inspect bends where debris can lodge out of sight.
- Wand: Look through the tube when the design allows it.
- Flexible hose: Check both ends and inspect the hose for crushed areas.
- Bin inlet: Remove compacted debris around narrow entry points.
- Filter area: Look for heavy dust buildup that could restrict airflow.
Use light instead of sharp tools
A flashlight at one end of a detachable hose often reveals an obstruction. It is safer than blindly pushing a sharp object through flexible material.
If the manual allows a blockage tool, use one that won’t puncture or scratch the hose. Avoid knives, screwdrivers, or rigid metal rods inside flexible tubing.
Check for air leaks too
Not every suction problem is a clog. A cracked hose, loose connection, damaged seal, or poorly seated bin can let air enter before it reaches the cleaning head.
- Reconnect each detachable section firmly.
- Inspect rubber gaskets for cracking or distortion.
- Check that the dust cup closes completely.
- Make sure a replacement bag is installed correctly.
- Confirm filters sit in their intended positions.
If suction returns after clearing one section, you’ve probably found the restriction. Persistent weakness after basic maintenance may require model-specific troubleshooting.
Section Takeaway: Follow the airflow path from the floor head to the exhaust. That method makes spring suction problems easier to isolate without unnecessary disassembly.
Does Spring Maintenance Change by Vacuum Type?
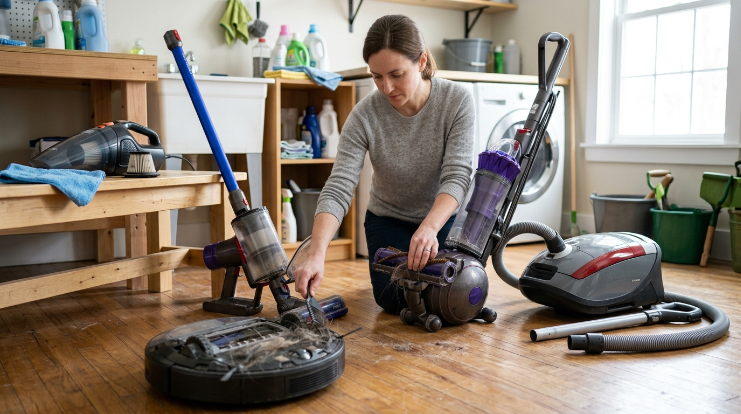
Yes. The basic goals stay the same, but upright, canister, cordless stick, robot, and handheld vacuums have different parts that deserve attention.
There is no single maintenance routine that fits every design. Consumer Reports’ vacuum cleaner section also separates vacuums into distinct categories because their designs and use cases differ.
Upright vacuums
- Inspect the main brush roll carefully.
- Check the lower hose and floor-head intake.
- Look for belt wear if the belt is user-accessible.
- Inspect the cord, plug, wheels, and height-adjustment mechanism.
Canister vacuums
- Check the long flexible hose for partial clogs.
- Inspect wand connections for air leaks.
- Clean wheels and caster areas.
- Check powered floor heads and electrical contacts without wetting them.
Cordless stick vacuums
- Empty the smaller dust bin frequently.
- Inspect narrow airflow passages for compacted debris.
- Remove hair from slim brush rolls.
- Wipe charging contacts with a dry cloth if the manual allows it.
- Stop using batteries that swell, leak, or become abnormally hot.
Robot vacuums
Robot vacuums add several small maintenance points that full-size machines don’t have. Dust on sensors and hair around small wheels can interfere with normal operation.
- Empty the onboard bin.
- Clean the main roller and side brushes.
- Remove hair from the front caster.
- Wipe sensors according to the manufacturer’s directions.
- Clean charging contacts without applying liquids unless approved.
- Check self-emptying dock bags, filters, or channels where applicable.
Handheld vacuums
These machines have short airflow paths, but their small bins and filters can load quickly. Spring is a good time to inspect narrow nozzles and upholstery tools for packed lint.
Section Takeaway: Match your spring routine to the vacuum’s design. The manual remains the safest source for removable filters, powered heads, batteries, belts, and sensors.
How Can You Control Spring Pollen and Dust While Vacuuming?
Vacuuming removes settled debris, but cleaning can also disturb particles temporarily. Spring pollen, pet dander, dust, and fibers make good containment and sensible cleaning habits more important.
The EPA recommends frequent cleaning and notes that a vacuum with a HEPA filter can help keep some captured dust from escaping through the machine’s exhaust.
Use a clean vacuum before a big spring clean
Don’t begin a whole-house cleaning session with an overfilled bin or heavily loaded filter. Give the vacuum a quick inspection first.
- Empty the dust container or check the bag.
- Inspect the filter condition.
- Remove obvious brush-roll tangles.
- Check the floor-head opening.
- Make sure the bin, bag, and filters are seated correctly.
Work from cleaner surfaces toward dirtier ones
Dust high surfaces before vacuuming the floor so fallen particles are collected afterward. A damp microfiber cloth can help keep settled dust from becoming airborne during surface cleaning.
The Asthma and Allergy Foundation of America recommends regular vacuuming as part of indoor-allergen control. Its indoor allergen guidance also notes that people with allergies may want precautions while doing housework.
Pay extra attention during pollen season
Pollen enters through open doors and windows and can arrive on clothing, shoes, bags, and pets. Much of it eventually settles onto floors and soft furnishings.
- Vacuum high-traffic entrances more frequently.
- Use appropriate upholstery tools on fabric furniture.
- Clean pet-hair tools before they become packed.
- Empty a dirty bin carefully to avoid creating a dust cloud.
- Follow local pollen conditions when deciding when to open windows.
Don’t use the vacuum for unsafe contamination
A normal household vacuum isn’t the right tool for every dusty situation. Lead dust, asbestos-containing material, substantial mold contamination, hot ash, liquids, and hazardous materials require different safety procedures or specialized equipment.
Expert Alert: If you suspect asbestos, lead contamination, significant mold growth, electrical hazards, or another hazardous material, stop ordinary cleaning and contact a qualified professional for appropriate assessment and remediation.
Section Takeaway: A well-maintained vacuum is only one part of spring dust control. Combine good filtration and containment with regular surface cleaning and careful handling of collected debris.
Spring Vacuum Maintenance FAQ
How often should I deep-clean my vacuum?
A seasonal deep clean is a useful reminder, but many components need attention more often. Empty bins, full bags, brush-roll tangles, and obvious clogs should be handled whenever you notice them, while the manufacturer’s manual should set model-specific filter and replacement intervals.
Should I wash my vacuum filter during spring cleaning?
Only wash a vacuum filter if the manufacturer identifies it as washable. Some filters must remain dry or be replaced instead, and every approved washable filter should dry completely before you reinstall it.
Why does my vacuum have weaker suction after winter?
Common possibilities include a full bin or bag, dirty filter, tangled brush roll, blocked floor head, clogged hose, or leaking connection. Check the airflow path in order before assuming the motor has failed.
How do I know if the vacuum brush roll needs cleaning?
Look for visible hair, pet fur, thread, or carpet fibers wrapped around the roller. Slow rotation, unusual noise, a burning odor, or poor carpet pickup can also indicate that the brush area needs inspection.
Can I clean a vacuum hose with water?
Only if the manufacturer says that specific hose is washable. Some hoses contain electrical wiring or powered connections, and even a basic hose must be completely dry before it returns to the vacuum.
Do robot vacuums need spring maintenance?
Yes. Inspect the dust bin, filters, main roller, side brushes, caster wheels, sensors, and charging contacts. Self-emptying models may also need attention around the dock’s bag, filter, or debris channel.
When should I stop maintaining a vacuum and call for repair?
Seek professional service for damaged wiring, repeated overheating, sparking, battery swelling, persistent burning smells, serious motor noise, or failures that continue after safe user-accessible maintenance. Don’t open electrical components unless you’re qualified to repair them.
Spring takeaway: Start with airflow, not appearance. A clean bin or bag, properly maintained filter, free-moving brush roll, clear hose, and correctly fitted seals will do more for everyday vacuum performance than polishing the outside of the machine.
Once you’ve completed the seasonal reset, keep the routine simple. A few short checks throughout spring can prevent another large buildup and make your next whole-house cleaning session much easier.