
What Parts of a Vacuum Need Regular Cleaning?

Quick Answer
The vacuum parts that need regular cleaning are the dust bin or bag area, filters, brush roll, floor head, hose, wand, attachments, air vents, seals, and wheels. Cleaning these areas helps maintain airflow and keeps trapped household dust from building up inside the machine; the EPA’s indoor particulate matter guidance also notes that household dust can contain pollen, mold spores, pet dander, dust mites, hair, and other particles.
Parts to check regularly
- Dust bin or bag: Empty or replace it before debris restricts airflow.
- Vacuum filters: Check for fine dust and clean only if the filter is washable.
- Brush roll: Remove wrapped hair, thread, fibers, and pet fur.
- Floor head: Clear debris from the intake opening and small wheels.
- Hose and wand: Check for clogs when suction suddenly drops.
- Vents and seals: Remove dust and inspect for blocked airflow or damaged seals.
The safest rule
- Check the manufacturer’s instructions before washing a filter, powered floor head, or other removable component.
I’ve found that vacuum maintenance becomes much easier when you focus on airflow first. Dust usually causes trouble where air enters, passes through filters, or exits the machine.
You don’t need to dismantle the whole vacuum every week. A few quick checks can prevent many common suction, odor, and brush-roll problems.
In This Guide
Which vacuum parts need cleaning most often?
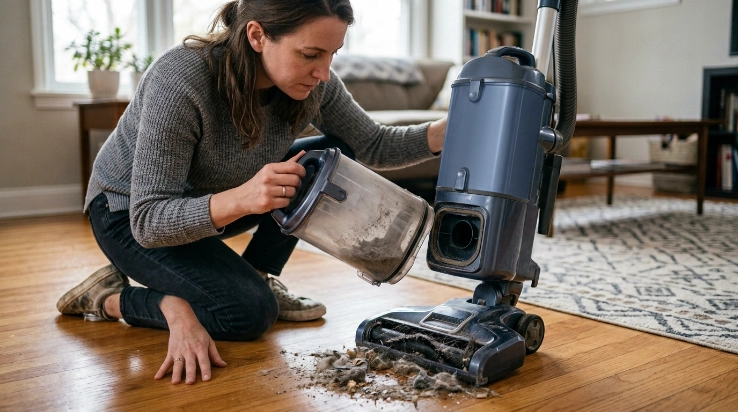
The parts exposed to the most dust, hair, and airflow usually need the most attention. These include the bin, filters, brush roll, floor head, and air passages.
Vacuum maintenance is the routine removal of debris from parts that collect dirt, move air, or contact the floor. It also includes checking parts for clogs, wear, and damage.
Dust bin or bag compartment
A bagless vacuum’s dust cup collects everything from fine dust to hair. Letting debris sit above the fill line can interfere with normal airflow.
Empty the bin over a trash container and wipe the inside when dusty residue builds up. Let any washable parts dry completely before reinstalling them.
With a bagged vacuum, replace the bag according to its indicator or manufacturer instructions. Don’t shake out a disposable vacuum bag and reuse it.
Filters
Filters trap fine particles before air moves farther through the vacuum or returns to the room. A dust-covered filter can become a major airflow restriction.
- Pre-motor filters help protect internal components from debris.
- Post-motor filters filter air leaving the machine.
- HEPA filters are high-efficiency particulate air filters used on some models.
Some filters are washable. Others must stay dry and be replaced when dirty.
Brush roll and floor head
The brush roll is one of the fastest places for debris to accumulate. Long hair, carpet fibers, thread, and pet fur can wrap tightly around it.
The intake opening around the brush also collects compacted debris. Small front wheels may trap hair around their axles.
How often should you clean each vacuum part?
There isn’t one schedule that fits every vacuum. Homes with pets, long hair, carpeting, or frequent cleaning usually need shorter maintenance intervals.
As a practical 2026 starting point, I use the schedule below for visual checks. Your vacuum’s manual should override any general recommendation.
| Vacuum Part | Practical Check Schedule | What to Look For | Basic Care |
|---|---|---|---|
| Dust bin | After each use | Full bin, fine dust | Empty and wipe |
| Brush roll | Weekly to monthly | Hair and thread | Cut and remove wraps |
| Filters | Every 2–4 weeks | Dust coating, reduced airflow | Clean or replace per manual |
| Hose and wand | Monthly or after suction loss | Clogs and lodged objects | Remove blockage |
| Vents and seals | Every 1–3 months | Dust or damaged seals | Brush clean and inspect |
If suction weakens before your scheduled check, inspect the vacuum immediately. A full bin, dirty filter, blocked hose, or clogged floor head is often easier to find early.
How do you clean vacuum filters safely?
First, identify whether your filter is washable. Never assume a filter can be rinsed simply because it can be removed.
- Unplug the vacuum or remove the battery before opening the filter compartment.
- Remove loose dust according to the manufacturer’s directions.
- Wash only approved filters using the method stated in the manual.
- Let washable filters dry completely before putting them back.
- Replace damaged filters rather than trying to repair the filter media.
Installing a damp filter can introduce moisture into an appliance designed for dry debris. It can also turn trapped dust into a sticky layer.
Don’t scrub delicate filter media unless the manufacturer allows it. Aggressive brushing can damage the material.
What about HEPA filters?
A HEPA-equipped vacuum still needs proper maintenance. The filter cannot work as intended when it is damaged, incorrectly installed, or neglected.
The EPA’s HEPA vacuum guidance emphasizes using and maintaining HEPA vacuums according to manufacturer instructions. For household machines, that same manual-first approach prevents accidental damage.
How do you clean the brush roll and floor head?
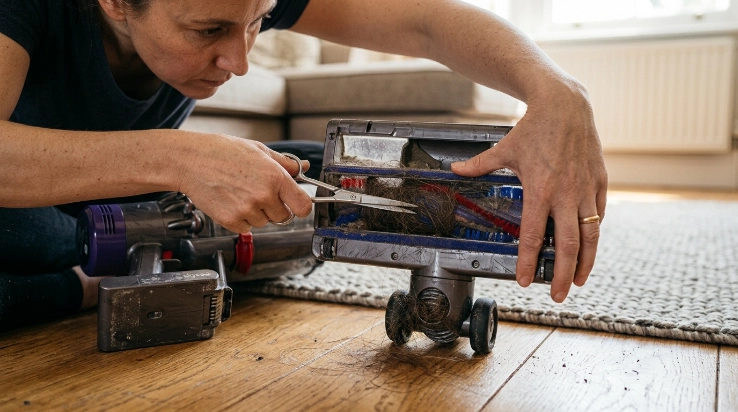
Disconnect power before working around the brush roll. A cordless vacuum should have its battery removed when the design allows it.
Turn the floor head over and inspect the roller from end to end. Pay special attention near the bearings and end caps.
- Use scissors or the vacuum’s cleaning tool to cut long hair wraps.
- Pull loose hair and fibers away from the roller.
- Clear debris from the suction channel behind the brush.
- Check small wheels for hair wrapped around their axles.
- Reinstall removable rollers exactly as the manual describes.
Avoid pulling hard on a jammed brush roll. If it won’t rotate after visible debris is removed, a belt, bearing, or drive component may need attention.
Pet owners may need to perform this check weekly. Long human hair can create the same problem surprisingly quickly.
How should you clean the hose, wand, and attachments?
A partial hose blockage can make a powerful vacuum feel weak. Large pieces of paper, pet hair clumps, small toys, and compacted dust are common causes.
Disconnect the hose and look through it when possible. A flashlight at one end can make hidden blockages easier to locate.
Use a blunt, non-damaging tool only if the manufacturer allows it. Avoid sharp objects that could puncture flexible hoses.
Cleaning vacuum attachments
- Crevice tools: Remove compacted dust from the narrow opening.
- Upholstery tools: Pull hair and lint from fabric-catching surfaces.
- Dusting brushes: Remove debris between the bristles.
- Non-powered tools: Wash only when the manufacturer says they are washable.
- Powered tools: Never immerse motors, electrical contacts, or powered sections in water.
Let washable attachments dry fully before storage. Moisture trapped inside a hose or tool can create unpleasant odors.
What vacuum parts are commonly overlooked?
Several smaller areas can collect enough dirt to affect normal operation. I include them whenever I do a deeper monthly inspection.
Air vents
Exterior vents allow heat and moving air to leave the machine. Dust around these openings should be removed with a soft brush or dry cloth.
Seals and gaskets
Rubber seals help keep the airflow path closed. Check them for trapped debris, distortion, cracking, or obvious damage.
Wheels and casters
Hair can wind around wheel axles and make the vacuum harder to move. Remove visible strands without forcing the wheel assembly apart.
Robot vacuum sensors
Robot vacuums may have optical sensors, charging contacts, side brushes, and small caster wheels. Wipe sensors and contacts only as directed by the manufacturer.
Areas around the bag or bin
Fine dust often collects around the bin seal or bag connection. A dry microfiber cloth can clean loose residue without pushing dust deeper inside.
For households concerned about allergens, the Asthma and Allergy Foundation of America’s indoor-allergen guidance recommends regular vacuuming while recognizing that cleaning can temporarily stir dust into the air.
Expert Alert: Stop using the vacuum if you notice sparking, damaged wiring, persistent overheating, or a burning electrical smell. Motor, cord, and internal electrical repairs should be handled by a qualified repair professional.
Vacuum cleaning FAQ
Should I clean my vacuum after every use?
You usually don’t need a full cleaning after every use. Emptying a bagless bin and checking for obvious brush-roll tangles is often enough, while filters, hoses, vents, and attachments can follow a longer inspection schedule.
Can I wash every vacuum filter?
No. Some vacuum filters are washable, while others are designed for dry cleaning or replacement only. Check the filter label and owner’s manual before using water because washing a non-washable filter may permanently damage it.
What happens if you don’t clean a vacuum filter?
Dust can accumulate on the filter and restrict airflow. You may notice weaker pickup, higher operating temperatures, or more frequent clogging, depending on the vacuum’s design.
Why does hair need to be removed from the brush roll?
Hair and thread can wrap tightly around the roller and its ends. Heavy buildup can restrict brush movement and place extra strain on belts, bearings, or the powered brush mechanism.
How do I know if my vacuum hose is clogged?
A sudden drop in suction is a common clue, especially when the bin and filters look normal. Disconnect the hose, inspect both ends, and look through the tube when its design allows you to do so.
Can I wash the inside of a vacuum cleaner?
Don’t pour water into the main vacuum body. Only wash removable parts specifically identified as washable, and keep motors, electrical contacts, batteries, wiring, and powered components dry.
What is the most important vacuum part to keep clean?
There isn’t a single part that matters in every design. The best approach is to protect the complete airflow path by keeping the bin or bag, filters, intake, brush roll, hose, and vents free of excessive debris.
The easiest vacuum maintenance routine is simple: empty the debris container, check the brush roll, watch the filters, and investigate suction changes early. A few minutes of regular cleaning is far easier than dealing with a deeply clogged machine.
Before cleaning any unfamiliar component, check your vacuum’s manual. Manufacturer instructions should always take priority over a general maintenance schedule.