
How Do You Clean Crevice Tools?

Quick Answer
To clean a vacuum crevice tool, disconnect it, remove trapped debris, brush or wipe away dry dust, and wash it with mild soapy water only if the manufacturer says it is washable. Let the tool dry completely before reconnecting it. For general household cleaning guidance, the CDC explains the difference between cleaning and disinfecting.
Quick Cleaning Steps
- Disconnect it: Switch off the vacuum and remove the crevice tool.
- Empty debris: Tap out crumbs, hair, lint, and other loose material.
- Clear clogs: Use a narrow brush or blunt tool to loosen packed dirt.
- Wipe it: Clean the outside with a damp microfiber cloth.
- Wash carefully: Use mild soap and water only when the tool is confirmed washable.
- Dry fully: Leave every internal channel dry before reinstalling the attachment.
One Important Rule
- Never assume a powered or wired attachment can be washed just because a plain plastic crevice tool can.
Crevice tools look simple, but mine collect an impressive amount of dust, hair, and crumbs. The narrow opening also makes small clogs easy to miss.
I clean them differently from powered vacuum heads. This guide explains the safe method I use for everyday home hygiene without assuming every attachment can go underwater.
In This Guide
What Does Cleaning a Crevice Tool Involve?
Cleaning a crevice tool means removing debris from its narrow air channel and cleaning its outer surfaces. Water is optional, not automatic.
A crevice tool is a slim vacuum attachment designed for narrow gaps, corners, edges, seams, and other difficult spaces.
The tool usually has no brush roll or motor. Its long, narrow shape directs airflow toward debris a wider vacuum head cannot easily reach.
- Loose dust: Fine particles can coat the inside walls.
- Crumbs: Food debris often wedges near the narrow tip.
- Hair and lint: Fibers can combine into surprisingly firm clogs.
- Pet debris: Fur may lodge where the nozzle begins to narrow.
- Sticky residue: Damp or oily debris may cling instead of falling out.
I usually notice a dirty crevice tool after cleaning sofa seams. The attachment may look clear from one end while a compact lint plug sits deeper inside.
Hold yours toward a bright light. If you cannot see through an open-ended tool that normally has a clear channel, inspect it for a blockage.
Cleaning is different from disinfecting
Routine vacuum-tool maintenance is mainly about removing dirt. It usually does not require disinfecting chemicals.
CDC guidance distinguishes cleaning, which removes dirt and impurities, from disinfecting, which uses chemicals to kill remaining germs.
That difference matters here. Spraying disinfectant into a vacuum attachment can leave moisture or chemical residue where the manufacturer never intended it.
For a normal dusty crevice tool, I start with physical debris removal and mild cleaning.
Section Takeaway: Cleaning a crevice tool mainly means clearing its airflow path and surfaces. Disinfection is a separate process and usually is not needed for ordinary maintenance.
How Do You Clean a Crevice Tool Step by Step?
The safest method is to start dry. Add water only after checking that the attachment is washable.
Here is the routine I use in 2026 for ordinary non-powered crevice tools.
1. Switch off and disconnect the vacuum
Turn off the machine before removing attachments. Unplug a corded vacuum when you will be doing more than a quick exterior wipe.
For a cordless model, make sure it cannot start while you handle the accessory.
2. Remove the crevice tool
Pull or release the tool according to your vacuum’s design. Do not twist delicate plastic connectors harder than necessary.
Inspect both ends while the attachment is disconnected.
3. Tap out loose debris
Hold the tool over a trash container. Gently tap the side to release crumbs, sand, lint, and loose dust.
Avoid aggressively shaking a heavily dusty attachment around the room. The EPA notes that indoor dust can become airborne during cleaning activities.
4. Brush the inside
Use a narrow cleaning brush, bottle brush, or another soft tool that fits comfortably inside the nozzle.
- Work from the wider end when possible.
- Loosen debris instead of packing it farther inside.
- Check corners around connection points.
- Avoid sharp metal objects that could scratch or puncture plastic.
5. Wipe the exterior
Dampen a microfiber cloth with plain water or a small amount of mild soapy water. Wipe the outer plastic and connector area.
Do not leave dripping water around electrical contacts if your attachment has them.
6. Wash only if permitted
If the manufacturer identifies the plain plastic tool as washable, clean it with mild soap and water. Rinse away remaining soap afterward.
Never treat model-specific instructions as optional. Vacuum accessories that look similar can have different construction.
7. Let the tool dry completely
Shake out excess water and place the tool where air can move through both openings. Do not reconnect a wet attachment.
I usually stand a hollow tool at an angle instead of laying it flat. That makes it easier for hidden droplets to drain.
8. Inspect before reinstalling
Look through the air channel again. Check that no lint, cleaning cloth fibers, or water remain.
Reconnect it only after the attachment is clean and completely dry.
Section Takeaway: Start with dry debris removal, verify washability, and dry the attachment completely. Those three habits prevent most avoidable crevice-tool cleaning mistakes.
Can You Wash a Vacuum Crevice Tool With Water?
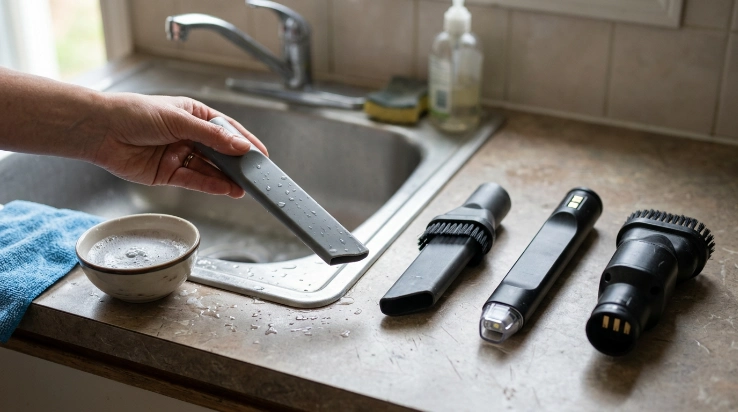
You can wash many simple plastic crevice tools, but only when the manufacturer allows it. Powered, wired, or combination attachments need more caution.
The word “crevice tool” describes the tool’s purpose, not its internal construction.
| Attachment Type | Safe Starting Method | Water? | Main Concern |
|---|---|---|---|
| Plain plastic crevice tool | Tap, brush, and wipe | Only if manufacturer permits | Trapped moisture |
| Crevice tool with brush | Remove hair and dry dust first | Check care instructions | Debris around bristles |
| Lighted crevice tool | Dry clean and lightly wipe | Avoid unless explicitly approved | Electronics |
| Powered narrow attachment | Remove debris and wipe housing | Keep housing dry unless specified | Motor and electrical contacts |
What soap should you use?
For a manufacturer-approved washable plastic attachment, a small amount of mild dish soap is usually a sensible starting point. You do not need a strong chemical cleaner for routine dust.
Rinse compatible parts thoroughly. Soap residue inside the nozzle can make later dust stick more easily.
Should you disinfect a crevice tool?
Most ordinary household crevice tools need cleaning more often than disinfecting. If disinfection is needed after contamination, follow both the vacuum manufacturer’s instructions and the disinfectant label.
Never mix bleach with other cleaners. The CDC’s bleach safety guidance specifically warns against mixing household bleach with other cleaners or disinfectants.
Expert Alert: Stop and seek qualified service if the attachment contains damaged wiring, melted plastic, exposed electrical contacts, or a cracked powered housing. Do not attempt electrical repairs while cleaning it.
How Do You Remove Dust, Hair, and Clogs From a Crevice Tool?
Disconnect the tool and work the blockage toward the nearest opening. Gentle removal is safer than forcing a sharp object through it.
Narrow nozzles can turn loose hair and crumbs into surprisingly dense plugs.
For loose dust
- Tap the attachment over a trash container.
- Use a soft narrow brush inside the channel.
- Wipe accessible surfaces with a microfiber cloth.
- Clean the wider connector where dust often forms a ring.
For hair and lint
Hair often wraps around rough edges or combines with lint. Pull accessible strands outward rather than pushing them deeper.
If necessary, use blunt tweezers or another non-sharp tool where you can clearly see the debris.
For a packed clog
- Remove the attachment completely.
- Look through both openings with good lighting.
- Identify which end sits closest to the blockage.
- Loosen the clog with a suitable soft or blunt cleaning tool.
- Pull or push it toward the nearest opening without excessive force.
- Inspect the channel again before reinstalling the tool.
Do not ram screwdrivers, knives, or other sharp objects through the attachment. A damaged inner wall can create cracks or rough edges that catch future debris.
What if the tool smells bad?
First remove the material causing the odor. A fragrance does not remove trapped organic debris.
- Clear all visible debris.
- Wash approved plastic parts with mild soap.
- Rinse away residue.
- Dry the attachment completely.
- Check the vacuum bin, filter, and hose if the odor remains.
Indoor dust itself can contain pollen, mold spores, pet dander, dust-mite material, hair, and other particles. The EPA’s indoor particulate matter guidance recommends regular cleaning to reduce dust buildup.
That does not mean a dirty crevice tool is automatically dangerous. It simply makes regular cleaning a sensible part of vacuum maintenance.
Section Takeaway: Remove clogs gently and address the source of odors rather than masking them. A clear air channel is the main goal.
How Often Should You Clean Crevice Tools?
There is no universal schedule for every vacuum. Clean the tool when debris, reduced airflow, odor, or visible contamination makes maintenance necessary.
I prefer condition-based cleaning instead of waiting for a fixed calendar date.
- After messy jobs: Check it after vacuuming pet hair, food crumbs, car interiors, or dusty tracks.
- When suction changes: Inspect the nozzle whenever airflow suddenly seems weaker.
- When debris is visible: Clear dust or hair before it becomes tightly compacted.
- Before storage: Remove organic debris that could create odors while the tool sits unused.
- After damp contamination: Clean an approved washable tool promptly rather than leaving damp material inside.
What about homes with allergies?
Regular household dust can include pollen, pet dander, mold spores, and dust-mite material. People sensitive to these particles may prefer handling heavily dusty attachments carefully.
The National Institute of Environmental Health Sciences recommends damp dusting and discusses HEPA-filtered vacuuming as part of dust-mite reduction strategies.
Cleaning the crevice tool does not turn the vacuum into an allergy-control device. The vacuum’s filtration, seals, maintenance, and overall cleaning routine still matter.
Should a crevice tool be cleaned after every use?
Usually not. A tool used briefly on a clean baseboard may need nothing more than a quick inspection.
A tool packed with pet hair after cleaning a sofa is different. Maintenance should match what the attachment picked up.
Frequently Asked Questions
Can I soak my vacuum crevice tool?
Only soak it if the vacuum manufacturer confirms the attachment is washable or submersible. Plain plastic tools may tolerate washing, but accessories containing electrical contacts, lights, sensors, or powered components should not be soaked unless their instructions explicitly allow it.
Can I put a crevice tool in the dishwasher?
Do not put it in a dishwasher unless the manufacturer specifically states that it is dishwasher-safe. Heat, detergent, and aggressive washing can distort plastic or damage seals and fittings even when ordinary hand washing is allowed.
Can I use bleach to clean a crevice tool?
For normal dust and crumbs, mild cleaning is usually enough. If you believe disinfection is necessary, check the attachment manufacturer’s instructions and the disinfectant label first. Never mix bleach with other household cleaners.
How do I dry the inside of a crevice tool?
Shake out excess water and leave both ends open to airflow. Positioning the attachment at an angle can help trapped droplets drain. Do not reconnect it until the internal channel and connector are completely dry.
Why does my crevice tool have weak suction?
Inspect the narrow nozzle for lint, hair, paper, or compacted debris first. If it is clear, check other parts of the vacuum’s airflow path, including the hose, bin or bag, filter, and connection points.
Can I clean a crevice tool with a bottle brush?
Yes, a suitably sized soft bottle brush can help clean a simple hollow crevice tool. Choose one that moves freely inside the channel rather than forcing an oversized brush through the plastic.
Should I clean a crevice tool after vacuuming mold?
Visible mold can require more care than routine household dust. Do not treat ordinary vacuuming as a mold-remediation method, especially for larger or moisture-damaged areas.
Expert Alert: For extensive mold growth, recurring moisture, contaminated porous materials, or uncertainty about safe cleanup, use appropriate professional guidance rather than relying on a household crevice tool.
Final Takeaway: Keep the Crevice Tool Clear and Dry
Cleaning a crevice tool is simple when you follow one rule: start dry and confirm washability before adding water.
Disconnect the attachment, remove loose debris, clear the narrow channel, wipe it clean, and wash only manufacturer-approved parts. Then let everything dry completely.
I also check the nozzle whenever suction changes. A two-minute inspection can catch a small lint plug before it becomes a frustrating blockage.
Keep the tool clean, clear, and ready to reach the places your main vacuum head cannot.
