
How Do You Keep Vacuum Attachments Organized?

Quick Answer
The easiest way to keep vacuum attachments organized is to give every tool a fixed storage spot near the vacuum. Group attachments by use, keep small tools in a labeled bin or caddy, hang larger tools on hooks, and store hoses without sharp bends. Knowing what each tool does also makes organization easier, so this vacuum attachment guide is a useful reference.
Quick organization steps
- Gather everything: Put every nozzle, brush, wand, hose, and specialty attachment in one place.
- Remove extras: Separate broken, duplicate, or incompatible accessories.
- Group by job: Keep crevice, dusting, upholstery, floor, and pet tools in logical groups.
- Choose one zone: Store the attachments close to the vacuum whenever possible.
- Use containers: Small bins, caddies, hooks, and wall organizers stop loose tools from disappearing.
- Label the system: Simple labels make it easier for everyone in the household to return each tool.
Vacuum attachments have a strange habit of disappearing exactly when I need them. I have spent more time than I would like searching closets for a crevice tool that should have been beside the vacuum.
A simple organization system fixes that problem. In this guide, I’ll show you practical ways to store vacuum cleaner accessories in closets, cabinets, apartments, garages, and small utility spaces.
In This Guide
What Is the Best Way to Organize Vacuum Attachments?
The best system keeps attachments visible, grouped, protected, and close to the vacuum. You should be able to find the tool you need without emptying a closet.
A vacuum attachment organization system is simply a dedicated storage arrangement for the extra tools used with your vacuum. That can include bins, hooks, shelves, caddies, racks, or built-in accessory holders.
Start by collecting every attachment
Bring all your vacuum accessories into one area before buying organizers. Check closets, cabinets, laundry rooms, utility shelves, and wherever you normally leave cleaning supplies.
Common accessories include:
- Crevice tools
- Dusting brushes
- Upholstery tools
- Pet-hair tools
- Extension wands
- Flexible hoses
- Hard-floor heads
- Motorized mini brushes
- Adapter pieces
Consumer Reports notes that common vacuum accessories are designed for different surfaces and difficult-to-reach areas. That is one reason I prefer organizing them by cleaning job instead of throwing everything into one large box.
Remove what you do not use
Check every attachment against your current vacuum. An old nozzle from a previous machine creates clutter if it no longer fits anything.
Set aside cracked tools, damaged hoses, mystery adapters, and unnecessary duplicates. Keep specialty attachments only when they solve a job you still perform.
Create one home base
I find that organization starts working once the vacuum and its accessories have a permanent home. A nearby closet, cabinet, pantry section, or utility shelf usually works better than storing accessories around the house.
Keep frequently used tools closest to the front. Rarely used specialty accessories can sit higher or farther back.
Section Takeaway: Keep every compatible attachment in one defined storage zone, then arrange the most-used tools where you can reach them first.
Which Vacuum Attachment Storage Method Works Best?
The best storage method depends on your available wall, shelf, cabinet, and floor space. There is no single organizer that fits every vacuum setup.
Here is how the most practical choices compare.
| Storage Method | Uses Wall Space | Portable | Keeps Tools Visible | Best For |
|---|---|---|---|---|
| Labeled bin | No | Yes | Moderate | Closets and shelves |
| Cleaning caddy | No | Yes | High | Multi-room cleaning |
| Wall hooks | Yes | No | High | Wands and larger tools |
| Pegboard | Yes | No | Very high | Large accessory collections |
| Cabinet drawer | No | No | Moderate | Hidden, tidy storage |
| Door organizer | Uses door | No | High | Small closets |
Bins work for most households
A small open bin is my default choice for standard crevice tools, dust brushes, and upholstery nozzles. It needs no installation and moves easily when you reorganize a closet.
Choose a container that lets attachments stand upright when possible. Deep containers can turn small adapters into buried clutter.
Caddies are useful when you move between rooms
A handled cleaning caddy lets you carry several attachments with you. This works well when one cleaning session includes furniture, stairs, blinds, baseboards, and tight corners.
It also prevents the familiar problem of leaving one tool upstairs while the vacuum ends up downstairs.
Hooks and pegboards use vertical space
Hooks work well for extension wands, floor heads, and accessories with hanging loops. Pegboards offer more flexibility because you can rearrange hooks as your collection changes.
Do not hang a tool by a fragile connection point. Support it where the plastic or metal body can safely carry its own weight.
Cabinets keep everything visually tidy
A cabinet is useful when you want cleaning tools hidden. Add a shallow basket or drawer organizer so small accessories do not collect in a loose pile.
Leave enough clearance around rigid tools. Forcing a large floor head into a packed cabinet can damage hinges, clips, or bristles.
Section Takeaway: Use bins for simplicity, caddies for portability, and hooks or pegboards when floor and shelf space are limited.
How Do You Store Vacuum Attachments in a Small Space?
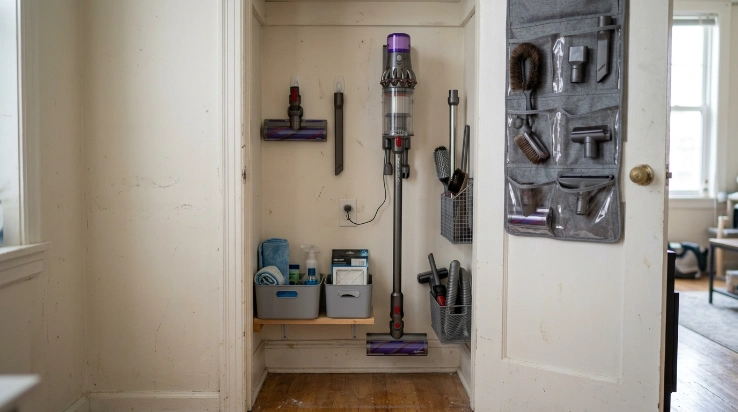
Small homes need vertical and hidden storage. The goal is to use doors, walls, cabinet sides, and narrow gaps before giving attachments valuable floor space.
I have found that even a crowded utility closet usually has unused space above or behind the vacuum.
Use the inside of a closet door
An over-door organizer can hold several lightweight accessories without consuming shelf space. Clear pockets also make small adapters easier to spot.
Make sure the door still closes freely. Thick floor heads may work better on a wall hook than inside a pocket.
Store attachments beside the vacuum
A narrow vertical basket can sit beside an upright or canister vacuum. This keeps long crevice tools and extension pieces contained without spreading across a shelf.
For a cordless stick vacuum, place the accessory holder near the charging location. That creates one compact cleaning station.
Use removable hooks in rentals
Renters may prefer non-permanent storage methods where the manufacturer permits their use. Removable hooks can hold lightweight accessories without drilling into a wall.
Always follow the hook maker’s weight and surface instructions. A falling vacuum head can damage both the attachment and the flooring.
Avoid overfilling one container
A tiny bin is not useful if you must remove six tools to reach the seventh. Divide accessories into two groups when your collection becomes crowded.
- Everyday tools: crevice tool, dust brush, upholstery nozzle.
- Specialty tools: pet tool, flexible extension, extra floor head, uncommon adapters.
This two-group system takes little extra space. It makes the attachments you use each week much easier to reach.
How Should You Sort and Label Vacuum Accessories?
Sort attachments by function, not simply by size. A good label tells you where a tool belongs and why you would reach for it.
For example, I prefer “Furniture Tools” over “Small Attachments.” The first label gives me useful information.
Use simple cleaning categories
- Tight spaces: crevice tools and flexible narrow nozzles.
- Dusting: soft brushes and delicate-surface tools.
- Furniture: upholstery heads and fabric brushes.
- Floors: hard-floor heads and specialty floor tools.
- Pet cleanup: hair tools and powered mini brushes.
- Reach: extension tubes and wands.
Consumer Reports describes several of these same attachment types, including crevice, dusting, upholstery, floor, and extension tools. Matching storage categories to the jobs they perform makes the system easier to remember.
Label tools from different vacuums
Households with two vacuums can easily mix accessories. Some connections look nearly identical while using different diameters, locks, or powered connectors.
Add a small label for the vacuum model or room. “Upstairs vacuum” and “canister vacuum” may be enough.
Photograph the finished arrangement
This trick sounds unnecessary until several people use the cleaning closet. Take one photo after everything is arranged correctly.
The image becomes a quick reference for where each accessory belongs. It is especially useful with pegboards and wall-mounted systems.
Should You Clean Attachments Before Storing Them?
Yes. Remove visible dirt, hair, lint, and debris before returning attachments to storage.
Clean storage keeps dusty tools from spreading debris through a cabinet or caddy. It also gives you a chance to catch blocked openings and tangled brushes early.
Do a quick check after use
- Disconnect the vacuum from power before handling powered parts.
- Remove hair or threads caught around brushes.
- Check narrow openings for trapped debris.
- Wipe visibly dirty exterior surfaces as appropriate.
- Inspect hoses for objects or obvious damage.
The CDC’s household cleaning guidance distinguishes routine cleaning from sanitizing and disinfecting. Your vacuum accessories normally need sensible cleaning based on their materials and use, not aggressive chemical treatment after every session.
Never store wet attachments
If your vacuum manufacturer says an attachment is washable, let it dry completely before storage. Moisture trapped in a closed bin or cabinet is something I try to avoid.
The EPA’s indoor air quality guidance emphasizes controlling indoor moisture as part of maintaining a healthier indoor environment.
Be careful with powered accessories
Never assume a motorized brush or electrically connected accessory can be submerged. Check the vacuum manual before introducing water.
Expert Alert: If a powered attachment has damaged wiring, a cracked electrical connector, overheating, or exposed conductors, stop using it and contact the manufacturer or a qualified appliance repair professional.
The EPA also recommends regular household cleaning to reduce accumulated dust and other indoor pollutants. A well-organized attachment system helps because your cleaning tools stay accessible instead of forgotten in a closet.
Section Takeaway: Put attachments away clean and completely dry, and follow the manufacturer’s care instructions for powered or washable parts.
Frequently Asked Questions
Where should vacuum attachments be stored?
Store vacuum attachments near the vacuum in a dry indoor location. A closet shelf, cabinet, utility room, wall organizer, or labeled bin works well. Keeping everything together saves time and makes it easier to notice when an attachment is missing.
Can I store vacuum attachments in a plastic bin?
Yes. A plastic bin is one of the simplest storage options. Choose a size that keeps tools visible instead of piling them deeply. Make sure every attachment is dry before closing the container, especially after washing a manufacturer-approved washable part.
How do I keep small vacuum attachments from getting lost?
Put small adapters, brush heads, and narrow nozzles in one labeled container. Avoid storing them loose on large shelves. A shallow bin, drawer divider, zippered accessory pouch, or caddy compartment makes small pieces easier to see and return.
Can vacuum hoses be hung on a wall?
A hose can be supported on a wide hook or holder if the vacuum manufacturer allows it. Keep the hose in a relaxed curve rather than folding or sharply bending it. Avoid hanging heavy accessories from the hose connection.
Should every vacuum attachment stay with the vacuum?
Usually, yes. Keeping compatible accessories together prevents mix-ups and saves time. The exception is a specialty tool used permanently in another location, such as an attachment kept beside a workshop or vehicle-cleaning vacuum.
How often should I reorganize vacuum accessories?
Check the storage area whenever it becomes hard to find tools or return them easily. I also like a quick review when changing vacuums because it prevents obsolete adapters and duplicate accessories from occupying space.
What should I do with old vacuum attachments?
First confirm that they are not compatible with your current machine. Usable accessories may be donated or passed to someone with the correct model. Follow local recycling or waste guidance for broken plastic, metal, or electrical accessories rather than assuming every part is recyclable.
Final Takeaway: Give Every Vacuum Attachment a Home
You do not need an elaborate storage system to keep vacuum attachments organized. You need a permanent location and a simple rule for where each accessory goes.
Start with one bin, caddy, drawer, door organizer, or set of hooks. Group tools by cleaning job and place the accessories you use most often within easy reach.
Then keep the system easy to maintain. Return tools clean, dry, and to the same place after every use.
That small habit turns a pile of mystery nozzles into a useful cleaning kit. More importantly, you can spend your cleaning time using the vacuum instead of searching for its attachments.
