
How Do You Dry a Wet Dry Vacuum After Use? Complete Guide

Quick Answer
To dry a wet dry vacuum after use, unplug it, empty the tank, separate the wet components, wipe away standing water, and let the tank, hose, filter, and washable accessories dry completely with good airflow. Never seal a damp vacuum for storage, because moisture can encourage musty odors and microbial growth; the EPA’s moisture-control guidance also stresses drying wet materials promptly.
Quick drying steps
- Unplug first: Disconnect the vacuum from power before opening or cleaning it.
- Empty the tank: Drain all collected water and remove wet debris.
- Separate components: Remove the filter and detachable hose or accessories as your manual allows.
- Wipe the drum: Use a clean, absorbent cloth to remove visible water.
- Air-dry fully: Leave parts open in a dry, ventilated location until no moisture remains.
- Reassemble last: Put the vacuum back together only when every washable component is completely dry.
One important rule
- Never rinse or soak the motor head, switches, battery compartment, cord connection, or other electrical components.
A wet dry vacuum can handle liquid messes that would damage an ordinary household vacuum, but collecting water is only half the job. Drying the machine correctly afterward is what prepares it for safe storage and its next dry cleanup.
My rule is simple: I treat the drum, filter, hose, and tools as separate moisture traps. Leaving them assembled while damp makes it harder for trapped water to escape.
In This Guide
- How Do You Dry a Wet Dry Vacuum After Use?
- Which Parts of a Wet Dry Vacuum Need to Be Dried?
- What Is the Fastest Safe Way to Dry a Wet Dry Vacuum?
- How Do You Dry the Filter Without Damaging It?
- What Drying Mistakes Should You Avoid?
- How Should You Store a Wet Dry Vacuum After It Dries?
- Frequently Asked Questions
How Do You Dry a Wet Dry Vacuum After Use?
Start by switching the wet dry vacuum off and disconnecting it from power. Then remove the motor head according to your owner’s manual and empty the collection drum completely.
A wet/dry vacuum is a vacuum designed to collect dry debris and approved liquid messes into a collection drum. Its filter setup and liquid-pickup procedure can change depending on the model and the amount of liquid being collected.
Drain the tank through its drain port if your model has one. Otherwise, remove the power head and carefully pour the water into an appropriate drain or disposal container.
Next, remove dirt, sludge, hair, or other residue from the tank. Standing debris holds moisture much longer than a clean plastic or stainless-steel drum.
- Empty: Remove all collected liquid and debris.
- Rinse if appropriate: Wash the drum with warm water and mild detergent when the manufacturer’s instructions allow it.
- Wipe: Remove pooled water with a clean towel or microfiber cloth.
- Open: Keep the drum uncovered while it dries.
- Ventilate: Place it in a dry area with steady airflow.
- Inspect: Check seams, drain ports, wheels, and attachment recesses for hidden droplets.
Current RIDGID maintenance instructions, for example, direct users to wash the drum, wipe it with a dry cloth, and allow it to dry completely before sealing the motor back onto the drum.
A similar principle applies around the cleaning area. The CDC’s household mold guidance emphasizes controlling moisture and drying wet areas promptly.
Section Takeaway: Empty first, wipe away standing water, then keep the vacuum open until every approved wet component is dry.
Which Parts of a Wet Dry Vacuum Need to Be Dried?
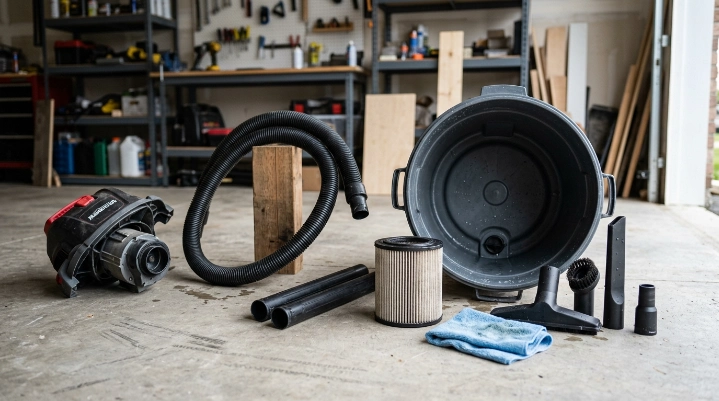
The collection drum gets the most attention, but it is not the only part that can stay wet. Water can remain inside filters, hoses, drain channels, extension tubes, floor tools, and small accessory recesses.
The collection drum
Dry the inside walls, bottom, drain area, and rim. Moisture near the upper rim can become trapped once the motor head is latched back into place.
- Tip the drum after draining to find remaining pooled water.
- Wipe the bottom and corners with an absorbent cloth.
- Leave the drum upright and uncovered while drying.
The hose and extension tubes
A hose may look dry outside while still holding water in a low point inside. Disconnect it, drain it, and position both ends so air can circulate.
If the hose is a plain non-powered hose and its manufacturer permits rinsing, you can rinse away dirty residue first. Do not rinse a hose containing electrical wiring or powered controls unless its instructions specifically allow it.
The filter
A wet filter deserves separate attention because filters vary widely. Some wet dry vacuums use a pleated cartridge for small liquid pickups, while others call for a dedicated wet filter during high-volume liquid collection.
Remove and clean the filter only as your manual directs. As of 2026, RIDGID’s wet-filter care guidance says its washable wet application filter should completely dry before storage or reuse.
Attachments and accessories
Crevice tools, floor nozzles, adapters, and extension wands can trap surprising amounts of water. Separate them instead of leaving everything connected to the hose.
- Shake out loose water.
- Wipe accessible surfaces.
- Stand hollow tools so water can drain.
- Keep openings unobstructed until dry.
Section Takeaway: Treat the vacuum as several separate wet components, not one machine that can be closed immediately after draining.
What Is the Fastest Safe Way to Dry a Wet Dry Vacuum?
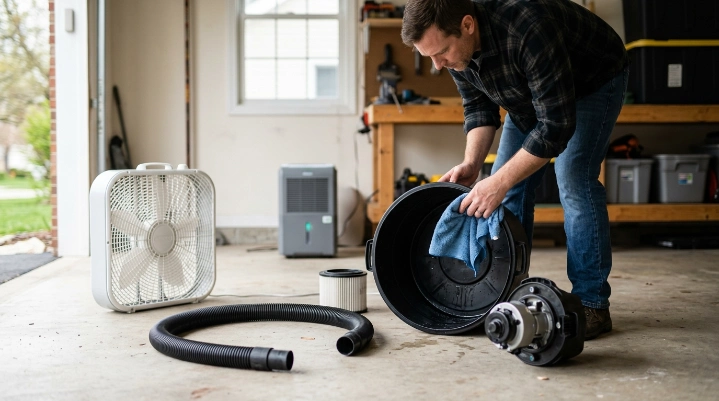
The fastest low-risk method combines manual water removal with room-temperature airflow. Wiping first matters because evaporation is much slower when a puddle remains inside the tank or hose.
Use a towel before relying on air
After draining, wipe the drum with an absorbent towel. This removes most surface water immediately and leaves only a thin film for airflow to handle.
For hoses and narrow tubes, drain by gravity before drying. Reposition the hose several times because water can collect in bends.
Increase normal airflow
A household fan can improve air movement around separated parts. Aim for broad ventilation rather than strong concentrated air that might blow dirty residue around the room.
A dehumidifier can also help when the room itself is humid. It dries the surrounding air rather than heating the vacuum.
| Drying Method | Best Use | Parts Separated? | Direct Heat? | My Recommendation |
|---|---|---|---|---|
| Towel + open-air drying | Routine liquid pickup | Yes | No | Best default method |
| Towel + room fan | Humid rooms or slow drying | Yes | No | Useful for faster airflow |
| Dehumidifier + airflow | Persistently humid space | Yes | No | Good when humidity is the problem |
| Hair dryer or heat gun | Not recommended routinely | N/A | Yes | Avoid unless specifically approved |
Do not rely on a universal number of hours. Filter material, humidity, temperature, tank size, and airflow all change drying time.
For surrounding water-damaged household materials, the EPA commonly recommends drying within 24 to 48 hours to reduce mold risk. That guidance is a moisture-control target for the home, not a fixed drying specification for your vacuum filter.
How Do You Dry the Filter Without Damaging It?
First, confirm what type of filter you have and whether it is washable. Never assume a pleated filter can be rinsed simply because another wet dry vacuum uses a similar-looking design.
If the filter is washable
Remove it according to the manual and rinse only as directed. Use gentle water pressure because aggressive spraying can damage filter media or seals.
- Shake off loose water gently.
- Set the filter where air can reach all sides.
- Keep it out of sealed bags or containers.
- Avoid crushing or deforming pleats.
- Reinstall only after complete drying.
RIDGID also advises inspecting cleaned filters for tears or small holes. A damaged filter should be replaced rather than returned to service.
If the filter is not washable
Do not rinse it. Follow its specific cleaning and replacement instructions instead.
A wet filter used for dry dust can clog quickly on models where the manufacturer requires a dry filter for dry pickup. That is another reason to wait until drying is complete.
Can you run the vacuum to dry the filter?
Some older or model-specific instructions may describe airflow-based drying procedures. Do not treat that as universal advice.
Use the vacuum itself for filter drying only when the manual for your exact model explicitly tells you to do so. Otherwise, remove the filter and let it air-dry separately.
Section Takeaway: Filter care is model-specific. Check washability, use gentle cleaning, inspect for damage, and wait for complete drying before storage or dry pickup.
What Drying Mistakes Should You Avoid?
The most common mistake is draining the drum and immediately replacing the power head. The inside can still be damp even when no liquid pours out.
- Don’t seal damp parts: Leave the drum and attachments open while moisture evaporates.
- Don’t soak the power head: Electrical and motor components should not be washed like the drum.
- Don’t guess filter rules: Check whether your filter can be washed or used for liquid pickup.
- Don’t use extreme heat: High temperatures can deform plastics, seals, hoses, or filter materials.
- Don’t store dirty water: Empty collected liquid as soon as practical after use.
- Don’t ignore odors: A persistent musty or sour smell can indicate trapped moisture or residue.
What if you vacuumed dirty floodwater?
Water from a clean spill and water from a contaminated flood are not equivalent. Floodwater may contain sewage, chemicals, microbes, or other hazards.
The CDC’s mold cleanup recommendations stress protective equipment and safe cleanup practices when significant water and mold damage are involved.
Expert Alert: If the vacuum collected sewage, heavily contaminated floodwater, hazardous chemicals, or extensive mold-contaminated material, follow the manufacturer’s sanitation instructions and seek qualified cleanup advice when needed.
What if the motor head got wet?
Do not simply place it in front of a fan and assume it is safe. Water inside electrical components can create a shock, short-circuit, or equipment-damage risk.
Expert Alert: If liquid entered the motor housing, switch, electrical connection, charger, or battery compartment, stop using the vacuum and have it inspected by a qualified service technician.
How Should You Store a Wet Dry Vacuum After It Dries?
Once the drum, filter, hose, and attachments are completely dry, reassemble the machine according to its manual. Store it indoors or in another manufacturer-approved location protected from moisture and severe environmental conditions.
I prefer to make one final inspection before closing the drum. The bottom seam, drain plug, hose cuffs, and filter folds are easy places to miss.
Use this final storage check
- Drum: No visible droplets, damp film, or residue.
- Filter: Completely dry and free from tears or holes.
- Hose: No water drains when you change its position.
- Accessories: Dry inside hollow tubes and nozzles.
- Motor head: Clean only by the method permitted in the manual.
- Storage area: Dry, protected, and away from leaks.
Avoid putting a still-damp vacuum into a tightly closed cabinet or wrapping it in non-breathable plastic. That can trap the moisture you just tried to remove.
If the surrounding room or garage remains damp, solve that problem too. Drying the vacuum properly will not help much if it is returned to a location with regular leaks or condensation.
Section Takeaway: Reassemble only after a final moisture check, then store the wet dry vacuum somewhere clean, dry, and protected.
Frequently Asked Questions
How long does a wet dry vacuum take to dry?
There is no universal drying time. A wiped plastic drum may dry quickly, while a wet filter or hose can take much longer depending on airflow, humidity, temperature, material, and the manufacturer’s design.
Can I leave my wet dry vacuum open overnight?
Yes, leaving the empty drum open in a clean, dry, protected location can help moisture escape. Keep children, pets, dirt, and rain away from exposed parts, and follow your model’s storage instructions.
Should I remove the filter after vacuuming water?
It depends on the vacuum and filter. Some manufacturers allow certain cartridge filters during small liquid pickups but recommend a dedicated wet filter or different setup for larger amounts, so check your exact owner’s manual.
Can I use a fan to dry a shop vac?
A normal room fan can improve airflow around the disconnected drum, filter, hose, and tools. Avoid forcing dirty air toward people, and never use airflow as a substitute for professional inspection if electrical components became wet.
Can I use a hair dryer on a wet dry vacuum filter?
I would avoid direct heated drying unless the filter manufacturer specifically permits it. Excess heat may damage filter media, adhesives, rubber seals, or plastic components, while room-temperature airflow is gentler.
Why does my wet dry vacuum smell after using it for water?
A stale or musty odor often comes from moisture, dirty residue, or a damp filter remaining inside the closed drum. Empty the tank, clean approved parts, inspect the filter, and let everything dry completely before storage.
Can I use the vacuum for dry dirt immediately after picking up water?
Only after preparing the machine according to its manual. If your model requires a dry cartridge filter for dry debris, wait until that filter is completely dry and correctly installed before vacuuming dust again.
Final takeaway: The safest way to dry a wet dry vacuum after use is uncomplicated: unplug it, empty it, separate approved wet parts, wipe away standing water, and give every component enough airflow to dry completely.
Make drying part of every liquid-cleanup routine. A few extra minutes of preparation can keep the drum, hose, filter, and accessories cleaner and ready for the next job.