
How to Maintain a Vacuum Cleaner: A Complete Care Guide

Quick Answer
To maintain a vacuum cleaner, empty its bin or change its bag before airflow becomes restricted, clean the brush roll, check the hose for clogs, and maintain filters according to the manufacturer’s instructions. A clean filtration system also helps control the dust leaving the machine; the EPA’s HEPA filter guidance explains why high-efficiency filtration matters for fine particles.
Basic vacuum maintenance steps
- Empty the dirt: Empty a bagless bin regularly or replace a disposable bag when needed.
- Check the filter: Clean or replace it only as your model’s manual allows.
- Clear the brush roll: Remove wrapped hair, thread, and fibers that restrict rotation.
- Inspect the airflow path: Check the hose, wand, intake, and attachments for blockages.
- Look for damage: Inspect belts, wheels, seals, cords, batteries, and connectors regularly.
- Dry washed parts: Never reinstall a washable filter or bin while it is still wet.
A vacuum usually gives you warning signs before its performance gets bad. Suction weakens, the brush sounds different, the machine gets hotter, or you notice more dust around the exhaust.
I’ve found that a few minutes of routine maintenance is much easier than troubleshooting a badly clogged machine later. This guide covers the full process for upright, canister, stick, cordless, and robot vacuums.
In This Guide
- Why Does Vacuum Cleaner Maintenance Matter?
- How Often Should You Maintain a Vacuum Cleaner?
- How Do You Maintain a Vacuum Cleaner Step by Step?
- How Should You Clean Vacuum Filters?
- Does Maintenance Change by Vacuum Type?
- What Are the Signs Your Vacuum Needs Maintenance?
- Vacuum Cleaner Maintenance FAQ
Why Does Vacuum Cleaner Maintenance Matter?
Vacuum cleaner maintenance keeps the air path clear, moving parts free, and filtration system working as designed. Neglect often shows up as reduced suction, clogs, tangled brush rolls, odors, or extra strain on the machine.
A vacuum cleaner is an appliance that creates airflow to lift dirt from a surface and carry it into a bag or dust container. Anything that restricts that airflow can reduce cleaning performance.
Dirty filters can restrict airflow
A filter gradually collects fine particles as air moves through the vacuum. Eventually, enough buildup can make it harder for air to move freely.
This is why filter maintenance matters even when the dustbin looks clean. Some machines use several filtration stages, including foam pre-filters and finer exhaust filters.
HEPA means high-efficiency particulate air. According to the EPA, a HEPA filter can theoretically remove at least 99.97% of airborne particles measuring 0.3 microns under the applicable test conditions.
Hair can stop a brush roll from working properly
Rotating brush rolls are especially good at collecting long hair, pet fur, thread, and carpet fibers. Unfortunately, those materials also wrap around the roller and its ends.
- Light buildup: The brush can still rotate, but cleaning efficiency may fall.
- Heavy buildup: The roller can become difficult to turn.
- Blocked end caps: Hair can work into the roller ends and interfere with movement.
- Belt strain: On belt-driven models, a jammed roller can put unnecessary load on the belt.
Clogs affect more than suction
A sock, paper scrap, dense clump of pet hair, or compacted dust can block the hose or intake. The result may feel like a motor problem even when the motor itself is fine.
Consumer Reports has also identified clogs, dirty filters, and brush-roll problems among issues reported by vacuum owners. Checking these simple areas first can therefore save unnecessary troubleshooting.
Section Takeaway: Most routine vacuum problems start with airflow, filtration, or moving parts. Keeping those areas clean is the foundation of good vacuum maintenance.
How Often Should You Maintain a Vacuum Cleaner?
There is no universal replacement schedule for every vacuum cleaner. Your owner’s manual should take priority because filter materials, dustbin designs, belts, batteries, and brush systems vary widely.
However, you can use a simple inspection schedule to catch problems early.
| Maintenance Task | Practical Check Interval | What to Look For |
|---|---|---|
| Dustbin or bag | During or after each cleaning session | Full bin, packed debris, reduced airflow |
| Brush roll | Weekly if you have pets or long hair | Hair, string, restricted rotation |
| Hose and air path | Monthly or whenever suction drops | Clogs, packed dust, cracks, loose connections |
| Washable filters | Follow your model’s manual | Visible dust, reduced airflow, maintenance alert |
| Belt and roller | Every few months or after a roller problem | Cracks, stretching, wear, poor rotation |
| Cord or battery | Before regular use | Cuts, exposed wiring, damaged plug, swelling, abnormal heat |
Think of these intervals as inspection reminders rather than fixed manufacturer schedules. Heavy pet hair, renovation dust, or frequent cleaning may require more attention.
As of 2026, manufacturer recommendations still vary considerably. For example, Dyson recommends monthly filter cleaning for many of its cordless machines, while other models and brands use different intervals.
Don’t wait for complete loss of suction
The best time to maintain a vacuum is before it becomes noticeably weak. A partially restricted filter or brush roll can cause a gradual decline that is easy to miss.
I prefer a quick visual check when emptying the machine. It makes hair buildup, clogged openings, and damaged parts much easier to catch.
Section Takeaway: Use your manual for exact service intervals, but inspect high-debris areas frequently. Usage conditions matter more than an arbitrary calendar date.
How Do You Maintain a Vacuum Cleaner Step by Step?
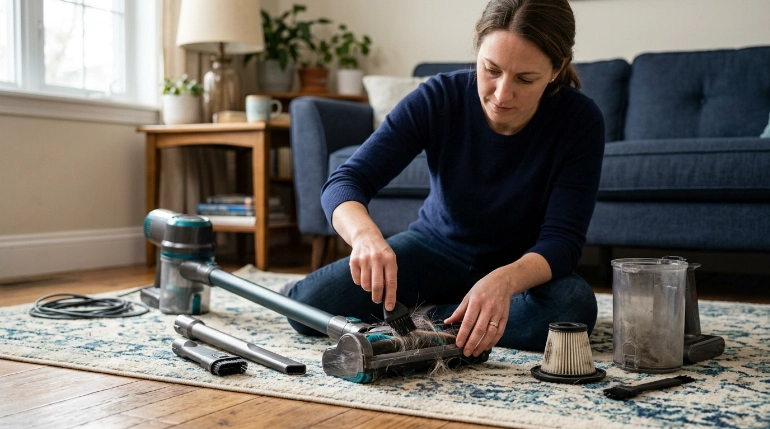
Start by switching the vacuum off and disconnecting it from its power source. Unplug a corded vacuum, or follow the manufacturer’s shutdown instructions for a cordless model.
Never open powered components while the machine can start unexpectedly.
1. Empty the dustbin or inspect the bag
Remove collected dirt before it becomes tightly packed. With a bagless vacuum, empty the container carefully so you don’t create a large dust cloud.
If the dustbin is washable, clean it only according to the manufacturer’s instructions. Let every washed component dry completely before reassembly.
For a bagged vacuum, check how full the bag is and replace it when the manufacturer recommends it. Don’t try to stretch disposable bags beyond their intended use.
2. Remove hair from the brush roll
Turn the cleaning head over and inspect the roller. Long strands usually collect around the center and near the roller ends.
- Disconnect the vacuum from power.
- Remove the brush roll if your model allows it.
- Cut or pull away wrapped hair carefully.
- Clear debris from the roller ends.
- Check the bristles for unusual wear.
- Reinstall the roller exactly as instructed.
Avoid cutting into the roller, belt, or soft brush material. Some modern heads use specialized rollers that need different cleaning methods.
3. Check the hose, wand, and intake
When suction suddenly falls, I check the air path before assuming anything expensive has failed. A compact blockage can make a powerful vacuum feel almost useless.
Disconnect removable sections and look through them where possible.
- Floor intake: Look for paper, hair clumps, and larger objects.
- Wand: Check both ends for compacted debris.
- Flexible hose: Look for both blockages and cracks.
- Elbows and joints: These curved sections often trap objects.
- Attachments: Clear lint from narrow openings.
Do not push knives, screwdrivers, or other sharp objects through a vacuum hose. They can puncture the hose and create an air leak.
4. Inspect the belt and moving parts
Some upright vacuums use a belt to turn the brush roll. Check it when the roller stops spinning, smells like hot rubber, or sounds unusual.
Replace a damaged belt only with the correct type for your machine. A belt with the wrong size or tension can create new problems.
5. Clean attachments and wheels
Crevice tools, upholstery brushes, and pet tools collect their own layer of lint and hair. Remove the buildup so openings and moving parts remain clear.
Check wheels for hair wrapped around their axles. A jammed wheel can drag debris across hard flooring instead of rolling smoothly.
6. Inspect the cord, plug, or battery
A corded vacuum should not be used with a visibly damaged power cord or plug. Electrical repair is different from routine cleaning.
Expert Alert: If a cord has exposed conductors, the machine produces sparks, or you suspect an internal electrical fault, stop using it and have the vacuum inspected by a qualified repair professional.
With cordless machines, follow the manufacturer’s battery and charging instructions. Stop using a battery that is swollen, leaking, physically damaged, or behaving abnormally.
Section Takeaway: Work through the vacuum from dirt storage to filtration, airflow, moving parts, and power. This order catches many common maintenance problems without unnecessary disassembly.
How Should You Clean Vacuum Filters?
Clean a vacuum filter only when the manufacturer says that particular filter is washable. Some filters can be rinsed, while others must stay dry or be replaced.
This distinction matters. Washing a non-washable filter can damage its structure and reduce performance.
Check what type of filter you have
Most household vacuums use one or more filters placed before or after the motor.
- Foam filters: Often washable, but not universally.
- Felt filters: Cleaning instructions vary by model.
- Cartridge filters: Some are washable and others are disposable.
- HEPA filters: May be washable or non-washable depending on the vacuum design.
- Pre-motor filters: Protect the motor from fine debris.
- Post-motor filters: Filter air before it leaves the machine.
Never decide whether a HEPA filter is washable based only on its appearance. Check the owner’s manual or official support documentation.
How to wash a washable vacuum filter
Manufacturer instructions come first. A typical process may look like this:
- Turn off and disconnect the vacuum.
- Remove the filter as directed.
- Tap off loose dust gently if instructed.
- Rinse using the temperature and method specified by the manufacturer.
- Avoid detergent unless the manufacturer specifically allows it.
- Remove excess water without damaging the filter.
- Air-dry it completely.
- Reinstall it only when fully dry.
Drying time is important. Dyson tells users to allow at least 24 hours for many washable filters, while Shark guidance for some cordless models specifies 24 to 48 hours.
Those numbers are examples, not universal rules. Your specific vacuum’s instructions should override them.
Why filtration matters for household dust
The EPA’s guidance on indoor particulate matter notes that HEPA filtration can help keep some vacuumed dust from escaping back into indoor air. This can be especially relevant in homes concerned about dust and allergens.
The Asthma and Allergy Foundation of America also recommends regular vacuuming and warns that poor-quality vacuums may put collected dust back into the air.
A HEPA filter doesn’t make every vacuum identical. Seals, airflow design, filter fit, maintenance condition, and the rest of the machine also influence how air moves through the vacuum.
Section Takeaway: Never assume a filter is washable. Identify the filter type, follow your model’s instructions, and let washed filters dry completely before reinstalling them.
Does Maintenance Change by Vacuum Type?
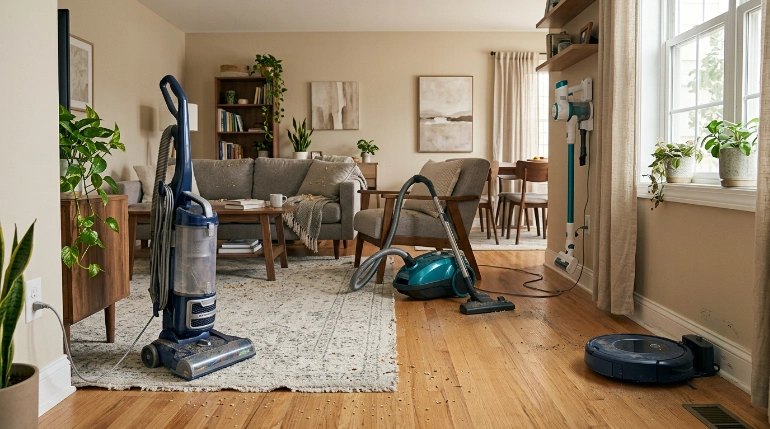
Yes. The basic principles stay the same, but different vacuum designs have different components that need attention.
Upright vacuums
Upright machines usually need close attention around the floor head. Hair, thread, belts, and intake clogs can affect the rotating brush.
- Inspect the brush roll frequently.
- Check belt condition if the model uses one.
- Keep the intake opening clear.
- Inspect the hose and extension wand.
- Maintain all pre-motor and exhaust filters.
Canister vacuums
A canister vacuum has a longer airflow path between the floor head and main body. Hose and wand inspections are therefore especially useful when suction falls.
Check powered floor heads separately because they may contain their own roller, electrical contacts, or belt system.
Cordless stick vacuums
Stick vacuums often have smaller dustbins and compact filters. That means visible debris can accumulate quickly during regular cleaning.
- Empty the bin frequently.
- Keep cyclone and shroud areas clear as instructed.
- Check narrow air passages for compacted debris.
- Remove hair from the floor head.
- Keep charging contacts clean and dry.
Don’t wash the motor, battery pack, charger, or electrical connections.
Robot vacuums
A robot vacuum adds sensors, small wheels, side brushes, charging contacts, and navigation components to the maintenance list.
- Remove hair from the main roller.
- Clean side brushes.
- Check caster and drive wheels.
- Empty the onboard bin.
- Maintain the filter.
- Wipe sensors using the approved method.
- Clean charging contacts when needed.
Models with self-emptying docks also have another airflow path, bag, or bin to inspect. Follow the dock’s separate maintenance instructions.
Bagged vs. bagless maintenance
| Feature | Bagged Vacuum | Bagless Vacuum |
|---|---|---|
| Dirt storage | Replaceable bag | Reusable dustbin |
| Routine task | Check and replace bag | Empty and clean bin as allowed |
| Dust exposure during emptying | Usually more contained when the bag seals well | Loose dust may become airborne during emptying |
| Filter maintenance | Still required if the model has serviceable filters | Often needs regular filter and cyclone-area checks |
Neither design is maintenance-free. The better choice is the one you can maintain correctly and consistently.
Section Takeaway: Match your routine to your vacuum’s design. Robot sensors, cordless batteries, upright belts, and canister hoses each add different maintenance points.
What Are the Signs Your Vacuum Needs Maintenance?
Reduced suction is the most obvious warning, but it isn’t the only one. Changes in sound, smell, heat, and debris pickup can reveal trouble earlier.
Check these symptoms first
- Weak suction: Inspect the bin or bag, filters, hose, wand, and intake.
- Debris left behind: Check the floor setting, brush roll, intake, and airflow.
- Brush roll not spinning: Remove wrapped material and inspect the belt or drive system.
- Whistling sound: Look for a partial blockage, loose connection, or air leak.
- Unusual odor: Check for trapped debris, dirty filters, overheated hair, or a mechanical problem.
- Machine running hot: Stop and inspect the airflow path before continuing.
- Dust near the exhaust: Check filter installation, condition, seals, and dust container fit.
- Short cordless runtime: Check the charging process and battery condition.
When maintenance becomes repair
Routine care shouldn’t require opening a motor housing or working on live electrical components. Stop DIY maintenance when the problem moves beyond accessible filters, hoses, brushes, and user-serviceable parts.
Expert Alert: Stop using the vacuum and seek qualified repair help if you notice electrical burning smells, smoke, sparks, exposed wiring, liquid inside electrical areas, or repeated overheating after accessible clogs and filters have been checked.
Don’t vacuum material your machine isn’t designed for
A standard household dry vacuum is not automatically suitable for every mess. Liquids, hot ash, large construction debris, and hazardous dust can require specialized equipment or procedures.
The same applies to significant mold contamination. A household vacuum is not a substitute for correcting the moisture source and following proper remediation procedures.
Expert Alert: Extensive mold, contaminated flood material, or other potentially hazardous debris may require professional assessment and remediation rather than routine household vacuuming.
Section Takeaway: Changes in suction, sound, heat, odor, and dust control are useful early warnings. Stop using the machine when symptoms suggest electrical or internal mechanical damage.
Vacuum Cleaner Maintenance FAQ
How often should I clean my vacuum cleaner?
Inspect the dustbin or bag during regular use and check the brush roll frequently, especially in homes with pets or long hair. Filter intervals vary by model, so follow the manufacturer’s manual rather than using one schedule for every vacuum.
How often should vacuum filters be washed?
Wash a filter only if its manufacturer identifies it as washable. Some manufacturers recommend monthly cleaning for certain models, while others use different schedules. Always follow the instructions for your exact vacuum and allow the filter to dry completely.
Can I wash a HEPA vacuum filter?
Only if the manufacturer says that particular HEPA filter is washable. HEPA describes a filtration performance category, not whether a filter can tolerate water. Washing a non-washable filter can damage it.
Why does my vacuum lose suction?
Common things to check include a full bag or bin, dirty filters, a blocked hose, a clogged intake, or poorly fitted components. Inspect the entire airflow path before assuming the motor has failed.
Why does my vacuum smell bad?
Odors can come from collected dirt, pet hair, dirty filters, trapped debris, or material wrapped around the brush roll. A hot or electrical burning smell is different; switch the vacuum off and investigate before using it again.
Should I empty my bagless vacuum after every use?
It is often useful to check the bin after every cleaning session, but you don’t necessarily need to empty a nearly empty container. Avoid letting debris exceed the manufacturer’s fill line or become densely packed.
Can regular maintenance make a vacuum cleaner last longer?
Routine maintenance helps prevent avoidable problems such as clogged air paths, obstructed rollers, overloaded bags, and neglected filters. However, actual service life also depends on design, usage, build quality, replacement-part availability, and how the machine is treated.
Keep Your Vacuum Clean Before Problems Build Up
The best vacuum maintenance routine is simple: control the dirt, protect the airflow, keep the roller moving freely, and follow the manufacturer’s instructions for filters and replacement parts.
You don’t need to dismantle the whole machine every month. Regular inspection of a few high-debris areas catches most maintenance issues much earlier.
- Empty the bin or monitor the bag.
- Remove hair from the brush roll.
- Check hoses and air passages.
- Maintain filters exactly as instructed.
- Inspect belts, wheels, cords, batteries, and seals.
- Stop using the vacuum when you notice unsafe electrical symptoms.
If suction suddenly drops, start with the simplest explanation first. A clogged hose or overloaded filter is much easier to fix than replacing parts you never needed.
A well-maintained vacuum is also a better tool for keeping household dust under control. The Consumer Reports vacuum maintenance guidance offers additional practical advice for dealing with common clogs and care issues.
