How to Clean Vacuum Attachments: Safe Step-by-Step Guide

Quick Answer
To clean vacuum attachments, unplug the vacuum first, remove loose debris, separate washable from non-washable parts, and clean each tool according to its material. Wash only attachments your manual says can get wet, then let them dry completely before reconnecting them. If you are unsure what each accessory is designed to do, this vacuum attachment guide explains several common tool types.
Quick Cleaning Steps
- Disconnect power: Unplug a corded vacuum or switch off a cordless model before removing tools.
- Remove loose dirt: Shake, brush, or wipe away hair, dust, crumbs, and lint.
- Check washability: Confirm whether the attachment can safely contact water.
- Wash safe parts: Use mild soap and water on compatible non-powered tools.
- Clear blockages: Check narrow openings, hoses, brush channels, and connection points.
- Dry completely: Reinstall every washed part only after no moisture remains.
Vacuum cleaner attachments pick up much more than visible crumbs. My crevice tools and brushes collect fine dust, hair, lint, and debris in places I rarely notice.
I have found that cleaning these vacuum accessories regularly makes them easier to use and helps prevent simple blockages. This guide covers hard tools, brushes, hoses, upholstery tools, and powered attachments without assuming every model is washable.
In This Guide
- What Do You Need Before Cleaning Vacuum Attachments?
- How Do You Clean Vacuum Attachments Step by Step?
- How Should You Clean Different Vacuum Attachments?
- How Do You Remove Hair, Odors, and Clogs Safely?
- How Often Should You Clean Vacuum Attachments?
- Frequently Asked Questions
- Final Takeaway: Keep Your Attachments Ready to Use
What Do You Need Before Cleaning Vacuum Attachments?

You usually need only a few basic cleaning supplies. The most important item is your vacuum’s manual because washability varies between models.
A vacuum attachment is a removable tool connected to a vacuum hose, wand, or main body. Common examples include crevice tools, dusting brushes, upholstery tools, extension hoses, and motorized brush heads.
- Microfiber cloth: Useful for wiping plastic surfaces and powered attachments.
- Small cleaning brush: Helps loosen packed dust around bristles and joints.
- Mild dish soap: Suitable for many washable plastic tools when the manufacturer permits water cleaning.
- Warm or cool water: Use only on components confirmed as washable.
- Blunt plastic tool: Helpful for gently pushing debris from some openings without scratching them.
- Scissors or seam ripper: Useful for cutting wrapped hair from removable brush rolls when the manual allows it.
- Clean towel: Gives washed tools a clean place to air-dry.
I separate my tools into two groups before cleaning. One group contains simple plastic or washable parts, while the other contains anything with wiring, electrical contacts, lights, sensors, or a motor.
That separation prevents the mistake that causes the most concern: getting water inside a powered component.
Household dust can contain several types of particles and biological material. The EPA also notes that vacuuming can stir particulate matter into indoor air, so I prefer cleaning dusty tools carefully instead of aggressively shaking them indoors.
Anyone sensitive to dust may find it more comfortable to handle heavily soiled attachments outside or in a well-ventilated utility area.
How Do You Clean Vacuum Attachments Step by Step?
The safest general method is to start dry and add water only after confirming the part is washable. I use this approach for both full-size vacuums and cordless stick vacuums.
- Turn the vacuum off. Unplug a corded machine and make sure a cordless vacuum cannot start accidentally.
- Remove the attachment. Separate the tool from the hose, wand, or vacuum body.
- Empty loose debris. Tap out crumbs and pull away visible hair over a trash container.
- Brush away dry dust. Work around seams, bristles, hinges, air openings, and connector points.
- Inspect for clogs. Look through open-ended tools and check bends where debris may collect.
- Check the manual. Confirm whether the attachment, brush bar, or hose may be washed.
- Wash compatible parts. Clean them with mild soap and water, then rinse away residue.
- Dry everything fully. Leave washed parts disconnected until every surface and internal channel is dry.
- Reassemble and test. Reconnect the dry attachment and check that airflow feels normal.
Don’t assume that two similar-looking attachments have the same cleaning instructions. A simple crevice tool may tolerate washing, while a tool beside it may hide electrical contacts or a small motor.
As of 2026, CDC household guidance still emphasizes cleaning away dirt before using disinfectants when disinfection is needed. For vacuum attachments, I would not spray disinfectant into openings or powered parts unless the manufacturer specifically allows it.
Routine dirt removal is usually the main job here. Heavy chemical treatment is rarely my starting point for a normal dusty vacuum tool.
How Should You Clean Different Vacuum Attachments?
Different attachment designs need different levels of care. The biggest difference is whether the tool is a simple passive part or contains a motor, wiring, electrical contacts, or delicate moving pieces.
| Attachment Type | Main Debris | Safe Starting Method | Water? |
|---|---|---|---|
| Crevice tool | Dust, crumbs, lint | Tap out and wipe | Only if manual permits |
| Dusting brush | Fine dust, hair | Comb or brush bristles clean | Check manufacturer |
| Upholstery tool | Hair, lint, fibers | Remove hair and wipe | Depends on design |
| Extension hose | Dust, paper, clogs | Disconnect and inspect | Only when specifically washable |
| Motorized tool | Wrapped hair, dust | Dry cleaning first | Keep powered housing dry |
How to Clean a Crevice Tool
Crevice tools are among the easiest attachments to maintain. I first hold the tool toward a light source and look through the opening for packed debris.
- Tap loose dirt into a trash container.
- Use a narrow brush to loosen dust near the tip.
- Wipe the outside with a damp microfiber cloth.
- Wash the entire tool only if its care instructions permit it.
- Leave it open to air-dry before reconnecting it.
How to Clean Dusting and Upholstery Brushes
Bristled tools often look clean from above while holding dust near the base of the bristles. Hair and fibers can also become woven through them.
I loosen that material before adding moisture. It is much easier to remove dry hair than wet hair trapped between dense bristles.
- Pull out loose strands by hand.
- Use a small comb or cleaning brush between bristle rows.
- Wipe the plastic body clean.
- Wash removable washable pieces only when approved for rinsing.
- Reshape bent bristles gently while they dry if needed.
Upholstery tools deserve extra attention after cleaning sofas, pet beds, mattresses, or car seats. Those jobs can leave a surprising amount of lint and hair packed around the intake.
How to Clean a Vacuum Hose
A dirty hose is different from a dirty surface attachment because debris can hide well inside it. Start by disconnecting the hose and looking through it if the design allows.
Never force a sharp object through a flexible hose. A puncture or split can create an air leak and turn a simple clog into a repair problem.
- Disconnect the hose from both ends when possible.
- Check the cuffs and bends for visible debris.
- Remove accessible clogs gently.
- Do not soak a hose containing wiring or electrical connections.
- If the hose is washable, follow the manual’s drying instructions before reinstalling it.
How to Clean Motorized Vacuum Attachments
Motorized attachments need the most caution. These tools may contain a powered brush bar, electrical terminals, sensors, lights, or internal wiring.
I treat the housing as a dry-clean-only component unless its manual says otherwise.
- Disconnect the tool completely.
- Remove hair from the brush roll and intake.
- Wipe the outer housing with a lightly damp cloth.
- Keep water away from electrical contacts.
- Remove a washable brush bar only according to the manufacturer’s directions.
Some manufacturers allow specific removable brush bars to be washed while keeping the powered housing dry. That is why model-specific instructions should override any general cleaning routine.
Section Takeaway: Match the cleaning method to the attachment, not just the dirt. Simple plastic tools and powered heads may look similar from outside but can have completely different water-safety rules.
How Do You Remove Hair, Odors, and Clogs Safely?
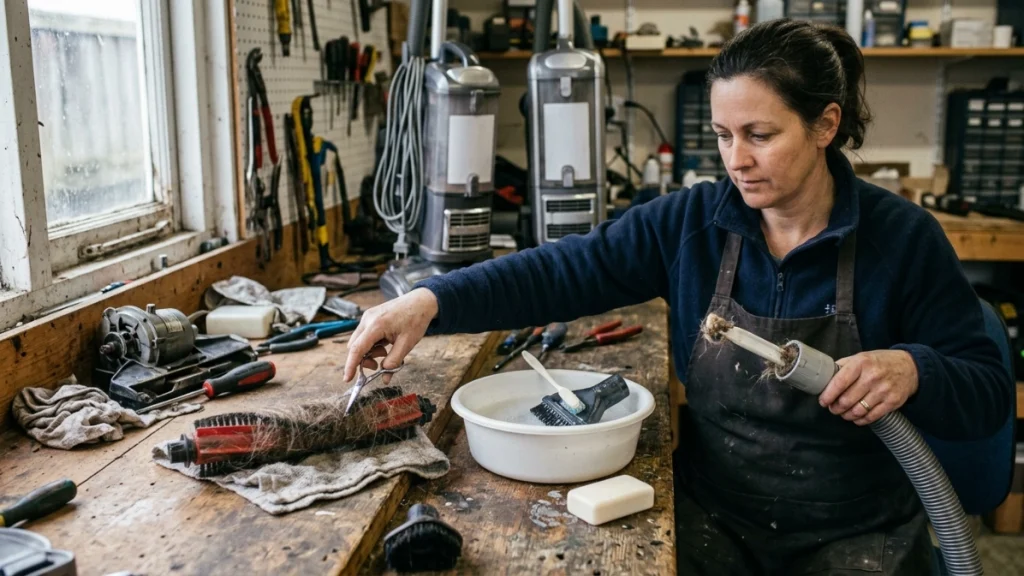
Hair, stale smells, and restricted airflow usually need different solutions. Trying to fix all three by soaking the attachment can make the job harder.
Removing Tangled Hair
Long hair and pet hair often wrap around brush rolls instead of entering the vacuum. I remove these tangles before they tighten into dense bands.
- Disconnect the attachment.
- Rotate the brush by hand if the design permits.
- Find the thickest hair bands.
- Cut them carefully without cutting bristles or belts.
- Pull away the loosened strands.
- Check both ends of the brush roll for trapped fibers.
Don’t work on a powered brush while it is attached to an active vacuum. Even a quick maintenance job should start with the machine safely switched off.
Dealing With Odors
A smelly attachment often has debris trapped on its surface or inside a brush. Remove the source before trying to cover the smell.
I avoid adding perfume, essential oil, or scented liquid inside the attachment. Residue can collect more dirt, and some materials may react poorly to added products.
- Remove visible organic debris.
- Clean washable surfaces with mild soap.
- Rinse compatible parts well.
- Allow complete drying before storage.
- Check the hose, bin, and filter if the smell continues.
Clearing a Clogged Attachment
A clog often forms at a narrow bend or connector. Hoover’s current support guidance also recommends checking nozzles and hoses when airflow drops.
Use gentle pressure instead of stabbing through the obstruction with a sharp object.
- Disconnect the blocked piece.
- Look through both ends.
- Pull accessible material toward the nearest opening.
- Use a blunt object only where it cannot damage the wall of the tool.
- Inspect the attachment again before reconnecting it.
Expert Alert: Stop using an attachment if you find damaged wiring, melted plastic, exposed electrical contacts, or a cracked powered housing. Have the affected part inspected or replaced rather than attempting electrical repairs yourself.
How Often Should You Clean Vacuum Attachments?
There is no single schedule that fits every household. A pet owner using an upholstery brush every day will need more maintenance than someone using a crevice tool once a month.
This is the practical schedule I use as a starting point, then I adjust it based on visible dirt and airflow.
- After a messy job: Remove obvious hair, damp debris, food particles, or heavy dust immediately.
- Weekly: Check frequently used pet, upholstery, and brush tools for tangled hair.
- Monthly: Inspect common attachments for packed dust, lint, and blocked openings.
- Every few months: Give washable tools a deeper clean if they are visibly dirty.
- Before storage: Make sure every attachment is clean and completely dry.
AAFA recommends regular vacuuming as part of controlling indoor allergens and notes the value of good filtration. Clean attachments do not replace a HEPA filter, but keeping debris out of the tool path is a sensible part of vacuum maintenance.
You can read more about controlling indoor allergens from the Asthma and Allergy Foundation of America.
The EPA also advises people with asthma or allergies to consider exposure to dust stirred up during vacuuming. Its guidance on indoor particulate matter provides broader context for managing household dust.
For routine household hygiene, CDC guidance explains that cleaning removes dirt and should come before disinfection when disinfection is necessary. Its home cleaning and disinfecting guidance is useful when deciding whether a surface needs more than ordinary cleaning.
Frequently Asked Questions
Can I wash vacuum cleaner attachments with water?
Some vacuum attachments can be washed, but not all of them. Check the manual first, especially for motorized heads, electrical connectors, wired hoses, or tools containing sensors. If the manufacturer does not clearly say a component is washable, use dry cleaning and a lightly damp cloth instead.
Can I soak vacuum attachments in soapy water?
Only soak a simple non-powered attachment if its manufacturer allows that cleaning method. Never assume a powered tool can be submerged. Mild soap is usually enough for compatible washable parts, and all soap residue should be rinsed away before complete air-drying.
How do I clean hair from a vacuum brush attachment?
Disconnect the tool first. Pull loose strands away, then carefully cut dense hair bands without damaging the bristles, belt, or brush-roll surface. Check the ends of the roller because hair often collects around those points even when the middle looks clean.
How do I clean a vacuum crevice tool?
Tap loose debris out, inspect the narrow opening, and loosen packed dust with a small brush. Wipe the outside with a microfiber cloth. If the crevice tool is confirmed washable, rinse or wash it and allow it to dry fully before reconnecting it.
Can dirty vacuum attachments reduce suction?
A blocked attachment can restrict airflow at its opening. Before assuming the vacuum itself has failed, check the attachment, hose, wand, bin, and filters for obstructions. Remove any clog carefully and reconnect each part securely before testing the machine again.
Should I disinfect my vacuum attachments?
Routine cleaning is usually enough for ordinary household dust and debris. If disinfection is needed after contamination, clean the surface first and use only a product and method compatible with that attachment. Never spray liquid into motors, electrical contacts, or other powered components.
How long should vacuum attachments dry before use?
They should remain disconnected until completely dry. Drying time varies by material, shape, airflow, and manufacturer instructions. Deep tubes and dense brush parts can hold hidden moisture, so do not judge readiness only by whether the outside feels dry.
Final Takeaway: Keep Your Attachments Ready to Use
Learning how to clean vacuum attachments is mostly about using the right method for each tool. Remove dry debris first, wash only confirmed washable parts, clear hair and clogs gently, and keep powered components away from water.
I also check attachments whenever a vacuum starts behaving differently. A tiny wad of lint inside a crevice tool or a band of hair around a brush can be much easier to fix than it first appears.
Make attachment cleaning part of your normal vacuum maintenance routine. A few minutes of inspection after dirty jobs can keep your tools cleaner, easier to use, and ready for the next room.