How to Empty a Wet Dry Vacuum Safely: Step-by-Step Guide

Quick Answer
To empty a wet dry vacuum, unplug it first, remove the motor head, and dispose of the tank contents according to what you collected. Dump dry debris into a trash bag, while liquid can usually be poured out or released through a drain port if your model has one. Emptying dusty material carefully also helps limit particles becoming airborne, which matters for household dust control.
Quick steps
- Switch it off: Turn off the vacuum and unplug the power cord.
- Move outdoors: Empty dusty debris outside when practical to reduce indoor mess.
- Remove the head: Release the side latches and lift the motor assembly straight up.
- Dispose correctly: Bag dry debris or drain collected liquid into an appropriate disposal point.
- Clean the tank: Rinse or wipe it when needed, especially after wet pickup.
- Dry completely: Let washable parts dry before storage or reassembly.
One important rule
- Check your owner’s manual before removing, washing, or reinstalling a filter because wet-pickup requirements vary by vacuum.
A wet dry vacuum is one of my favorite cleaning appliances for messy household jobs. It can handle ordinary dust, workshop debris, spilled water, and many jobs that would be unsuitable for a standard household vacuum.
Emptying one is simple, but the right method depends on what’s inside the tank. In this guide, I’ll show you how I handle both dry and wet loads while keeping cleanup controlled.
In This Guide
- What should you do before emptying a wet dry vacuum?
- How do you empty a wet dry vacuum after dry pickup?
- How do you empty a wet dry vacuum after collecting water?
- How should you clean the filter and tank afterward?
- What mistakes should you avoid when emptying a shop vacuum?
- Frequently Asked Questions
- What’s the safest routine to remember?
What Should You Do Before Emptying a Wet Dry Vacuum?
Turn the vacuum off and unplug it before opening the tank. You don’t want the motor energized while you’re removing the power head or handling the filter.
A wet dry vacuum is a canister-style vacuum designed to collect compatible dry debris and liquids. It’s also commonly called a wet/dry vac or shop vacuum.
Before opening mine, I look at what I collected. Fine drywall dust needs different handling from clean water, muddy water, or damp household debris.
Prepare the emptying area
For dry debris, I prefer working outdoors or beside an outdoor trash container. That keeps escaped dust from settling back onto furniture and floors.
The Asthma and Allergy Foundation of America recommends controlling household dust and notes that poorly contained vacuum dust can return to the air. This is especially relevant when someone in the home is sensitive to allergens.
- Dry load: Have a sturdy trash bag or lined bin ready.
- Wet load: Choose an appropriate drain or disposal location first.
- Dirty water: Wear gloves when the contents are unpleasant or potentially contaminated.
- Heavy tank: Use a drain port if available instead of lifting a full container.
Check the filter setup
Wet dry vacuums don’t all use the same filter arrangement. Some manufacturers require a cartridge filter, foam sleeve, collection bag, or another setup for specific jobs.
Never assume a filter should be removed for wet pickup just because another vacuum works that way. Follow the instructions for your exact model.
Section Takeaway: Unplug first, identify what’s in the tank, prepare the disposal area, and check your model’s filter instructions before opening anything.
How Do You Empty a Wet Dry Vacuum After Dry Pickup?
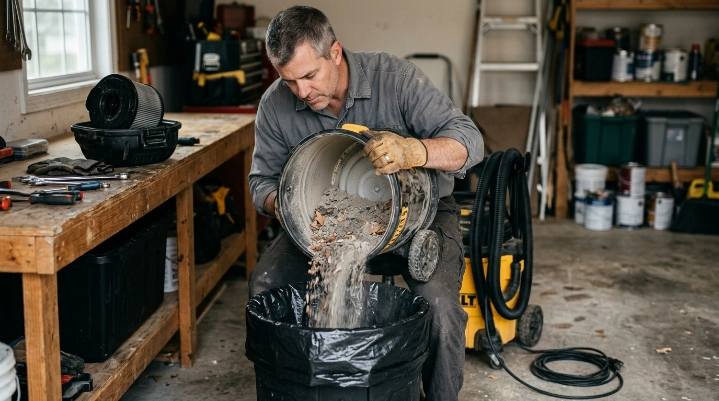
For dry debris, the goal is to transfer the contents into a trash bag without creating a dust cloud. I find that moving slowly makes a noticeable difference.
Step 1: Unplug and secure the hose
Switch the vacuum off and unplug it from the wall. Remove or secure the hose so it doesn’t swing around while you carry the tank.
Step 2: Release the tank latches
Most wet dry vacuums use side latches that hold the motor head onto the collection tank. Release them and lift the motor assembly carefully.
Set the motor head somewhere clean and dry. Avoid placing the filter directly into loose dust or standing water.
Step 3: Check for a disposable collection bag
If your vacuum uses a disposable dust bag, remove it according to the manufacturer’s directions. Close or seal the opening before moving the bag through the house.
If there’s no bag, you’ll empty the canister itself. This is where dust control matters most.
Step 4: Empty the tank into a trash bag
- Place a large trash bag inside or directly beside a trash container.
- Lower the vacuum tank close to the bag opening.
- Tilt the tank slowly instead of dumping it from a height.
- Allow heavier debris to slide out first.
- Tap the tank gently only if material is stuck.
- Close the trash bag promptly after emptying.
Household dust can contain many particles and biological contaminants. EPA guidance recommends practices that reduce dust buildup and help keep vacuumed particles from escaping back into indoor air.
Step 5: Inspect the inside
Look for packed dust around the tank rim, inlet, float area, or filter cage. Remove loose buildup without damaging internal components.
Fine construction dust can clog filters faster than ordinary household debris. If you’ve vacuumed a large amount, inspect the filter before the next use.
Expert Alert: If you’ve collected suspected asbestos-containing material, lead-contaminated renovation dust, or another hazardous substance, don’t treat it like normal household trash. Stop handling it and contact an appropriate qualified professional or local disposal authority.
Section Takeaway: Keep the tank close to the trash bag, pour slowly, and seal dusty waste quickly. Avoid shaking the tank or filter indoors.
How Do You Empty a Wet Dry Vacuum After Collecting Water?
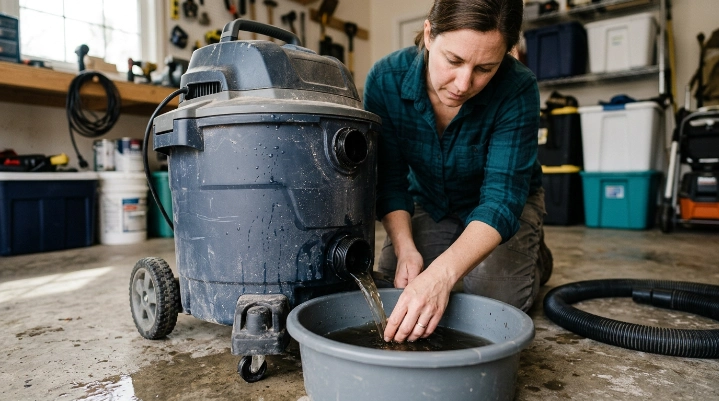
After wet pickup, empty the tank as soon as practical. Leaving dirty water sitting inside encourages odors and makes the next cleanup less pleasant.
Step 1: Turn off and unplug the vacuum
Disconnect the power before opening or draining the tank. Keep the plug and electrical components away from the collected liquid.
Step 2: Use the drain port if your vacuum has one
Larger wet dry vacuums often have a drain opening near the bottom of the tank. If yours does, move the vacuum to the correct disposal location before opening it.
- Position the drain over an appropriate disposal point.
- Remove the drain cap slowly.
- Allow the liquid to flow out under control.
- Reinstall the cap securely when the tank is empty.
A drain port is useful because several gallons of liquid become heavy to lift. It also reduces the chance of spilling the entire tank while pouring.
Step 3: Pour the tank if there is no drain
Remove the motor head and set it in a dry location. Grip the tank securely with both hands and pour the liquid slowly.
Don’t lift more weight than you can comfortably control. Empty part of the tank another way or get assistance if necessary.
Know what you’re disposing of
Clean water from a household spill is different from sewage, oily liquid, chemicals, solvents, pesticides, or contaminated floodwater. The vacuum’s ability to pick up a liquid doesn’t automatically make normal drain disposal appropriate.
Expert Alert: If the tank contains sewage, fuel, solvents, pesticides, unknown chemicals, or heavily contaminated floodwater, don’t pour it into a household drain or onto the ground. Contact your local waste authority or a qualified cleanup professional for disposal guidance.
If the water came from a moldy or flood-damaged area, take extra precautions during cleanup. The CDC’s mold cleanup guidance emphasizes limiting exposure, using suitable protective equipment, and addressing the moisture source.
Step 4: Don’t forget the tank afterward
Once the liquid is gone, rinse or wipe the collection tank when appropriate. Then leave it open until the interior is completely dry.
Section Takeaway: Drain liquids promptly, keep electrical parts dry, and treat contaminated liquids differently from ordinary household water.
How Should You Clean the Filter and Tank Afterward?
A quick cleanup after emptying prevents yesterday’s mess from becoming tomorrow’s odor. The tank, filter, hose, and accessories may all need attention depending on what you collected.
Clean the tank
For ordinary dirt, I usually start by removing loose debris and wiping the tank. After wet pickup, a rinse with clean water may be appropriate if the manufacturer’s instructions allow it.
- Remove remaining sludge or debris.
- Rinse or wipe the tank as appropriate.
- Inspect the inlet and drain opening.
- Leave the tank open to air-dry.
- Reinstall the drain cap after cleaning.
Moisture control matters when you’re trying to prevent mold growth. EPA’s mold guidance identifies controlling moisture as the key step in controlling indoor mold.
Check the filter
Don’t automatically wash a vacuum filter. Some filters are washable, while others can be damaged by water or require replacement.
Follow the filter label or owner’s manual. If washing is allowed, let the filter dry completely before reinstalling it unless the manufacturer specifically directs otherwise.
Check the hose after wet pickup
Dirty water can remain trapped inside the hose. Disconnect it and drain any remaining liquid before storage.
When permitted by the manufacturer, rinsing a dirty hose can help remove residue. Hang or position it so both ends can drain and dry.
Leave parts open until dry
I avoid sealing a damp hose, filter, and tank together immediately after wet cleaning. Trapped moisture can lead to musty odors and unwanted microbial growth.
CDC guidance also emphasizes drying wet materials and fixing moisture problems when dealing with mold-prone environments. The principle is simple: don’t store your vacuum with unnecessary moisture trapped inside.
Section Takeaway: Clean only what needs cleaning, follow the manual for filter care, and make sure wet components are dry before long-term storage.
What Mistakes Should You Avoid When Emptying a Shop Vacuum?
Most emptying problems come from rushing. A few small habits can prevent dust clouds, spills, filter damage, odors, and unnecessary strain.
| Task | Dry Debris | Liquid Pickup |
|---|---|---|
| Best disposal approach | Lower tank close to a lined trash container and pour slowly | Use the drain port when available or pour carefully |
| Main concern | Airborne dust and scattered debris | Weight, spills, contamination, and trapped moisture |
| Tank cleaning | Usually wipe or remove remaining loose dust | Rinse or wipe when appropriate, then dry thoroughly |
| Filter handling | Inspect for clogging and clean only as instructed | Follow the exact wet-pickup configuration in the manual |
| Before storage | Make sure loose debris is removed | Make sure the tank, hose, and washable parts are dry |
Don’t dump dust from shoulder height
The farther dry debris falls, the easier it is to create a cloud. Keep the tank opening close to the bag or trash container.
Don’t pull the motor head while it’s plugged in
Unplug before opening the vacuum. This should become automatic every time you empty or inspect the machine.
Don’t assume every filter is washable
Water can damage filters that weren’t designed to be washed. Check the filter’s instructions before rinsing it.
Don’t store dirty water in the tank
Empty wet debris promptly and dry the tank afterward. This helps prevent lingering odors and moisture problems.
Don’t lift an overloaded tank unnecessarily
A full wet dry vacuum can become surprisingly heavy. Use wheels and the tank drain whenever your model provides them.
Don’t vacuum hazardous materials casually
A general-purpose wet dry vacuum isn’t automatically suitable for asbestos, combustible dust, flammable liquids, hot ash, toxic chemicals, or other hazardous materials. Follow the manufacturer’s prohibited-use warnings.
Section Takeaway: Slow, controlled emptying is cleaner and safer than rushing. Treat dry dust, ordinary water, and hazardous material as three different disposal situations.
Frequently Asked Questions About Emptying a Wet Dry Vacuum
How often should I empty a wet dry vacuum?
Empty it before the tank becomes overloaded and after wet jobs whenever practical. For dirty water, I prefer emptying and drying the tank soon after finishing rather than leaving liquid sealed inside until the next cleaning session.
Can I empty a wet dry vacuum into a regular trash can?
Ordinary dry household debris can generally go into a lined trash container. Keep the tank close to the bag while pouring, and seal dusty waste promptly. Hazardous, chemically contaminated, or regulated material requires a different disposal method.
Can I pour wet dry vacuum water down the drain?
That depends on what’s in the water and local disposal rules. Clean household spill water is different from sewage, paint, oil, solvents, pesticides, or contaminated floodwater, so identify the contents before choosing a drain.
Should I remove the filter before emptying the vacuum?
You normally remove the motor head to access the tank, which may expose the filter assembly. However, don’t remove, wash, or change the filter configuration unless your vacuum’s manual directs you to do so.
Why does my wet dry vacuum smell after collecting water?
Moist debris, dirty water, residue in the hose, or storing the vacuum before it dries can create musty odors. Empty the tank, clean compatible parts, drain the hose, and let wet components dry completely before storage.
Can I wash the inside of a wet dry vacuum?
The collection tank can often be rinsed, but the motor head and electrical components should not be soaked. Check your owner’s manual because materials, filter systems, and cleaning instructions differ between models.
What should I do if the vacuum picked up moldy debris?
A small amount of damp debris still requires careful emptying and drying. For extensive mold contamination, the situation goes beyond routine vacuum maintenance, and CDC cleanup guidance recommends limiting exposure and using appropriate protective measures.
What’s the Safest Wet Dry Vacuum Emptying Routine to Remember?
The routine I use is straightforward: unplug, identify the contents, empty slowly, inspect the filter, clean the tank when needed, and let wet parts dry. That sequence works for most ordinary household wet dry vacuum cleanup jobs.
The biggest difference is what you’re disposing of. Dry debris needs dust control, while liquids require attention to weight, spills, contamination, and moisture left inside the machine.
- Before opening: Unplug the vacuum.
- For dry debris: Pour slowly into a lined trash container.
- For liquids: Use the drain port when available.
- For filters: Follow your model-specific instructions.
- After wet pickup: Clean and dry the tank, hose, and compatible parts.
- For hazardous contents: Stop and get appropriate professional or disposal guidance.
As of 2026, wet dry vacuums remain one of the most useful tools I keep around for messy household cleanup. A few minutes of proper emptying and drying can also make the machine much nicer to use the next time you need it.