
How Do You Clean a Wet Dry Vacuum? Step-by-Step Guide

Quick Answer
To clean a wet dry vacuum, unplug it or remove the battery, empty the tank, clean the tank and washable attachments, clear the hose, and service the filter according to its manufacturer instructions. Let every washable component dry completely before reassembling or storing the vacuum, especially after liquid pickup. The EPA’s wet-vacuum guidance also stresses cleaning and drying tanks, hoses, and attachments after wet cleanup.
Quick cleaning steps
- Disconnect power: Unplug the vacuum or remove its battery before opening or cleaning it.
- Empty the tank: Dispose of collected liquid or dry debris in an appropriate location.
- Clean the tank: Wash it with warm water and mild detergent when the manufacturer allows it.
- Clear the hose: Remove trapped sludge, hair, dust, or other debris from the airflow path.
- Check the filter: Wash it only when the specific filter is labeled or documented as washable.
- Dry everything: Air-dry washable components fully before storage or dry vacuuming.
A wet dry vacuum handles some of the messiest jobs in home hygiene, from ordinary dust to spilled water. Cleaning the vacuum itself afterward matters just as much as cleaning the floor.
I’ve found that a five-minute cleanup after each wet job prevents far more work later. This guide covers the tank, filter, hose, attachments, float system, odors, and safe storage.
In This Guide
- What should you do before cleaning a wet dry vacuum?
- How do you clean the tank, hose, and attachments?
- How do you clean a wet dry vacuum filter?
- How do you clean the float and motor head safely?
- How do you remove odors, mold residue, and dirty-water buildup?
- How often should you clean a wet dry vacuum?
- Frequently Asked Questions
What Should You Do Before Cleaning a Wet Dry Vacuum?
Disconnect the vacuum from power before removing the motor head, tank, filter, or other components. Cordless models should have the battery removed when their instructions allow it.
Definition: A wet dry vacuum is a vacuum designed to collect dry debris and, when configured correctly, liquids such as water.
Identify what the vacuum collected
The cleanup method depends partly on what’s inside the tank. Ordinary household water and sawdust create different cleaning needs.
Before opening the machine, identify whether you collected:
- Clean or lightly dirty water.
- Mud or wet soil.
- Dry dust and household debris.
- Fine construction dust.
- Pet hair or organic debris.
- Water from a leak or minor flooding.
- Potentially contaminated liquid.
Don’t treat sewage, fuels, solvents, pesticides, or unknown chemicals like normal household water. Disposal and decontamination requirements may be different.
Expert Alert: If the vacuum contains sewage, hazardous chemicals, fuel, or material from a major contaminated flood, stop DIY cleaning and get appropriate professional guidance.
Check your owner’s manual
Wet dry vacuum designs aren’t identical. Filter requirements, washable components, drain systems, and approved cleaning products vary between models.
Pay particular attention to instructions covering:
- Filter removal and washing.
- Wet-pickup configuration.
- Collection bags.
- Float or automatic shutoff assemblies.
- Tank cleaning and disinfection.
- Parts that must never be immersed.
As of 2026, you still shouldn’t assume that a filter is washable simply because another vacuum’s filter looks similar.
How Do You Clean the Tank, Hose, and Attachments?
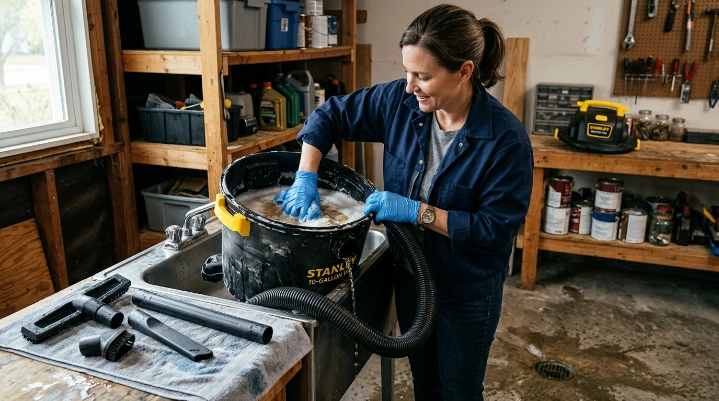
Start by emptying the collection tank, then clean the parts that directly touched debris or liquid. This is where most odor-causing residue tends to remain.
1. Empty the collection tank
For liquid pickup, use the tank drain when your model has one. Otherwise, empty the container using the method in its manual.
Dry debris should be dumped carefully to limit the amount of dust sent back into the room. I prefer doing dusty emptying outdoors when practical.
2. Wash the tank
Remove loose residue first. Then wash the tank with warm water and mild detergent if your manufacturer permits normal washing.
- Remove the motor head and filter components.
- Dump or drain the tank completely.
- Rinse away loose mud or debris.
- Add a small amount of mild detergent and warm water.
- Scrub stubborn residue with a soft brush or cloth.
- Rinse away remaining detergent.
- Wipe the tank or leave it open to air-dry.
A closed damp tank is a common source of stale smells. I leave the tank open until I can’t see or feel moisture around the bottom seam.
3. Flush the hose
The hose can hide much more debris than it appears to hold. Wet dust can form a paste along ridges, bends, and couplings.
If your hose is approved for washing, detach it before cleaning. Run water through it until the discharge looks clear.
- Check both hose ends for packed debris.
- Inspect elbows and couplings for sludge.
- Use a long non-sharp cleaning brush when needed.
- Avoid puncturing the hose with wire or pointed tools.
- Hang or position the hose so trapped water can drain.
One place I always check is the first bend behind the inlet. Heavy grit often settles there after dirty-water pickup.
4. Wash appropriate attachments
Floor nozzles, crevice tools, extension wands, and wet-pickup accessories may collect residue. Wash only accessories made for contact with water.
Inspect narrow passages before drying them. A small clog can noticeably reduce airflow during the next cleaning job.
Section Takeaway: Clean the entire path that contacted the mess, not just the tank. A clean tank with a dirty hose can still leave you with odors, clogs, and poor airflow.
How Do You Clean a Wet Dry Vacuum Filter?
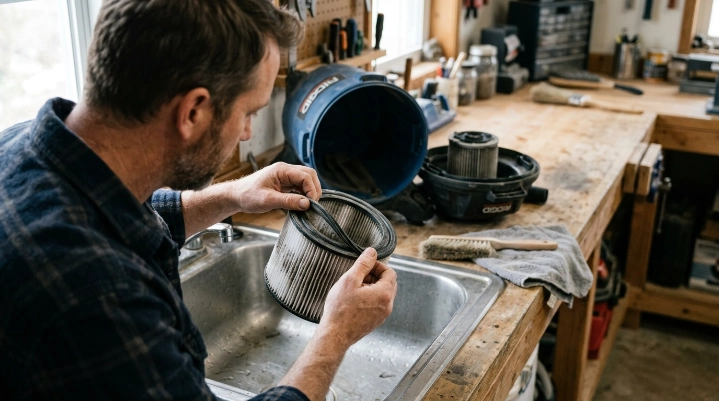
Clean the filter according to its exact type and manufacturer instructions. Some filters can be rinsed, while others should only be tapped, brushed, replaced, or handled differently.
This is the part of wet dry vacuum maintenance where guessing causes the most problems.
| Filter or Collection Type | Typical Cleaning Approach | Can You Rinse It? | Before Reuse |
|---|---|---|---|
| Pleated cartridge filter | Tap off loose dust or use a soft brush | Only when the manufacturer says it is washable | Inspect for tears and dry completely if washed |
| Foam wet-use filter | Remove debris and clean as directed | Commonly washable, but verify the model | Air-dry before storage |
| HEPA-type cartridge | Follow the exact filter instructions | Varies by filter; never assume | Replace if damaged or required by the manual |
| Disposable collection bag | Remove and dispose of it | No | Install a compatible replacement |
How should you clean a washable filter?
RIDGID’s published wet-filter cleaning instructions, for example, recommend removing the filter, rinsing it without excessive water pressure, and letting it dry completely.
That procedure applies to the compatible filters described by the manufacturer. It shouldn’t be treated as a universal instruction for every brand or filter material.
If your filter is washable, a safe general sequence is:
- Disconnect the vacuum from power.
- Remove the filter according to the manual.
- Knock off loose material gently.
- Rinse only when washing is approved.
- Avoid water pressure that could tear filter media.
- Inspect for holes, splits, or damaged seals.
- Air-dry completely before required reuse.
Never reinstall a damp filter for dry dust collection unless your manufacturer specifically allows that condition.
How Do You Clean the Float and Motor Head Safely?
Clean the float system gently and keep water away from electrical components unless the manual explicitly identifies a part as washable. Never immerse the complete motor head.
Check the float mechanism
Many wet dry vacuums use a float or similar shutoff system to respond when the liquid level rises. Mud, hair, or dried residue can interfere with free movement.
With power disconnected, inspect the accessible float area. Remove loose debris without forcing, bending, or modifying the mechanism.
Wipe the motor-head exterior
Use a slightly damp cloth on exterior surfaces when the manufacturer permits it. Keep water away from switches, vents, electrical terminals, battery contacts, plugs, and motor openings.
Don’t spray a hose directly into the powerhead. Internal electrical service is different from routine household cleaning.
Expert Alert: If liquid has entered the motor housing, switch, wiring, battery compartment, or electrical connections, don’t power the vacuum on to “test it.” Have it inspected by a qualified service professional.
How Do You Remove Odors, Mold Residue, and Dirty-Water Buildup?
Persistent wet-vac odors usually mean moisture or residue remains somewhere inside the tank, hose, filter area, or attachments. Cleaning and complete drying should come before fragrance or deodorizer.
Start with detergent and thorough drying
Wash approved hard surfaces with mild detergent and water. Rinse as needed, then leave the parts open until they are completely dry.
The EPA specifically advises that tanks, hoses, and attachments used for wet-vacuum cleanup should be thoroughly cleaned and dried because mold and spores can remain on those surfaces.
For broader household mold situations, see the EPA’s home mold-cleanup guidance and the CDC’s mold information for households.
Don’t automatically reach for bleach
Some individual vacuum manuals provide specific disinfection procedures. That doesn’t mean one bleach concentration or disinfectant is safe for every wet dry vacuum.
Check your manufacturer’s instructions before using disinfectants. Never mix bleach with ammonia or other household cleaners.
What if mold is already visible?
A small amount of residue on a washable hard vacuum surface isn’t the same as a large household mold problem. Clean approved parts and remove the moisture source promptly.
The EPA says larger mold problems or substantial water damage may require professional help. Its household guidance uses roughly 10 square feet as an important threshold for deciding when broader remediation guidance may be needed.
Expert Alert: If your vacuum was used during extensive mold remediation, major flooding, sewage cleanup, or another high-contamination job, consult a qualified remediation professional instead of relying on routine appliance cleaning.
Section Takeaway: Odor control starts with removing residue and moisture. Don’t mask a dirty wet vacuum with fragrance while damp material remains inside it.
How Often Should You Clean a Wet Dry Vacuum?
Clean a wet dry vacuum after every liquid pickup and whenever dry debris creates heavy buildup. A quick cleanup after use is easier than removing dried sludge weeks later.
A practical household schedule looks like this:
- After water pickup: Empty the tank and clean wet or dirty components promptly.
- After muddy pickup: Rinse approved tank, hose, and attachments before residue hardens.
- After fine dust: Inspect and clean the filter using its approved method.
- Before storage: Confirm the tank, hose, accessories, and washable filter are dry.
- Periodically: Inspect seals, hose connections, wheels, latches, cord, and accessible airflow passages.
Storage conditions matter too. A clean vacuum placed in a damp basement with its lid sealed can still develop musty odors.
I prefer storing mine dry with no liquid sitting in hose folds or tank grooves. That simple habit makes the next use much less unpleasant.
Frequently Asked Questions
Can you wash the inside of a wet dry vacuum?
Yes, the collection tank of many wet dry vacuums can be washed with water and mild detergent. Remove the powerhead first and follow your model’s instructions because electrical assemblies, switches, battery contacts, and other powered components must stay dry.
Can you hose out a wet dry vacuum?
You can rinse certain tanks, hoses, attachments, and washable filters when the manufacturer permits it. Don’t hose down the assembled vacuum or spray water into the motor head, electrical vents, switch, plug, battery area, or other powered components.
Should you clean a wet dry vacuum after picking up water?
Yes. Drain the collected water, remove residue, clean the tank and wet accessories as needed, and let everything dry before storage. EPA wet-vacuum guidance also recommends thoroughly cleaning and drying tanks, hoses, and attachments after wet cleanup.
Can you wash a wet dry vacuum filter with water?
Only wash the filter when its manufacturer says it is washable. Some cartridge and wet-use filters can be rinsed, while other filter media may require dry cleaning or replacement. If washed, let the filter dry completely as directed before reuse.
Why does my wet dry vacuum smell bad?
A bad smell often develops when dirty water, wet dust, organic debris, or moisture remains inside the tank, hose, filter, or attachments. Empty the machine, clean approved components, check hidden hose areas, and let everything dry fully before storage.
Can I use bleach to clean my wet dry vacuum?
Don’t use bleach automatically. Some manufacturers publish specific disinfection procedures for certain models, while others may restrict cleaning chemicals. Follow your owner’s manual, ventilate the area when using cleaners, and never mix bleach with ammonia or other cleaning products.
Do you have to let a wet dry vacuum dry before using it again?
Washable parts should be allowed to dry as required by the manufacturer, especially before dry-debris pickup or storage. Trapped moisture can contribute to stale odors and residue, while a damp filter may be unsuitable for dry pickup.
The easiest routine to remember is simple: empty it, clean what touched the mess, inspect the filter and airflow path, then let the washable parts dry completely.
A wet dry vacuum is built for dirty jobs, but it shouldn’t stay dirty between them. A few minutes of care after each use can keep the machine cleaner, easier to store, and ready for the next household mess.