
How Do I Replace a Vacuum Belt?

Quick Answer
To replace a vacuum belt, unplug the vacuum, remove the floor-head cover, lift out the brush roll, remove the worn belt, and install the correct replacement around the motor shaft and brush roll. Reinstall the roller, rotate it by hand to check alignment, then secure the cover before testing the vacuum. This basic sequence matches the vacuum belt replacement process explained by Consumer Reports, although your model’s manual should always take priority.
Quick replacement steps
- Disconnect power: Unplug a corded vacuum or remove the battery when the design allows it.
- Open the floor head: Remove the bottom plate or brush-roll cover.
- Remove the roller: Lift the brush roll out carefully and clear wrapped hair or thread.
- Fit the belt: Loop the correct replacement belt around the motor pulley and brush roll.
- Check alignment: Reseat the roller and turn it several times by hand.
- Reassemble: Secure the cover, then test the vacuum for normal brush-roll operation.
A worn vacuum belt can make a perfectly good vacuum feel weak on carpet because the brush roll may slow down or stop turning. I always treat the belt as one of the first things to inspect when suction seems normal but carpet pickup suddenly gets worse.
This guide covers the full replacement process, common belt problems, model differences, and the mistakes that can ruin a new belt.
In This Guide
How Do I Know If My Vacuum Belt Needs Replacing?
A vacuum belt probably needs attention when the brush roll stops spinning, turns slowly, makes unusual noise, or produces a hot-rubber smell. Poor carpet pickup can also point toward a stretched belt even when the vacuum still has suction.
A vacuum belt is a flexible drive component that transfers power from the vacuum’s motor or drive pulley to the rotating brush roll. On many upright vacuums, that rotating brush helps loosen dirt, hair, and debris from carpet fibers.
Common signs of a worn or broken belt
- Brush roll has stopped: The motor runs, but the roller underneath does not rotate.
- Weak carpet pickup: Suction seems present, yet debris remains embedded in carpet.
- Rubber smell: A slipping or stalled belt can heat up and create a noticeable odor.
- Visible cracking: The belt shows splits, glazing, frayed areas, or obvious stretching.
- Squealing noise: A belt may slip against the pulley instead of driving the roller normally.
A stopped brush roll does not automatically mean the belt is bad. Hair, thread, carpet fibers, or another object can jam the roller and prevent it from turning.
For example, Bissell’s CleanView belt instructions tell owners to inspect the brush roll and verify that it spins freely while checking the belt for wear or cuts.
| Symptom | Possible cause | First check |
|---|---|---|
| Brush roll does not move | Broken belt or jammed roller | Inspect belt and turn roller by hand with power disconnected |
| Roller turns slowly | Stretched or slipping belt | Check belt tension and fit |
| Hot-rubber smell | Slipping belt or seized brush roll | Switch off immediately and inspect both parts |
| Weak pickup everywhere | Clog, full bin, dirty filter, or belt problem | Check airflow system as well as the brush roll |
Section Takeaway: A stopped brush roll is a strong belt clue, but inspect the roller for jams before buying parts.
What Do I Need Before Replacing a Vacuum Belt?
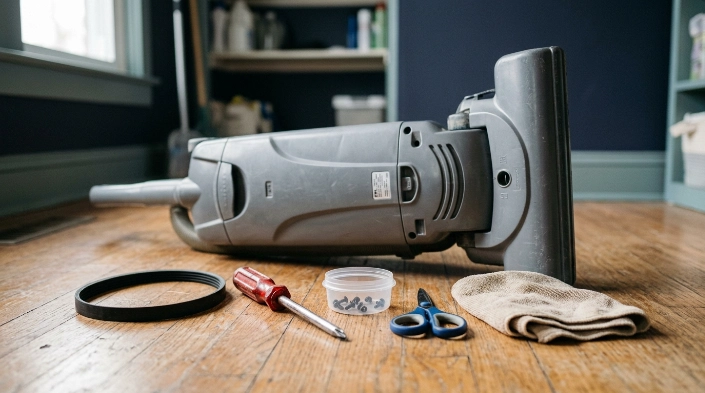
You usually need only the correct belt, a screwdriver, and a clean workspace. The most important item is the exact replacement belt specified for your vacuum model.
Do not buy a belt only because it looks similar. Vacuum belts vary in diameter, width, profile, elasticity, and tooth pattern.
Find your vacuum model number first
Look for the model label on the back, underside, base, dust-bin area, or another location identified in your manual. Match that number against the manufacturer’s replacement-parts information.
Some manufacturers use several different belts across visually similar vacuum cleaners. Guessing can leave you with a belt that slips, stretches too far, or will not fit.
Gather basic tools
- Correct replacement belt: Match the model or approved part number.
- Screwdriver: Many bottom plates use Phillips-head screws.
- Small container: Keep removed screws together.
- Scissors: Use carefully for cutting hair or thread away from the brush roll.
- Dry cloth: Wipe loose dust from the belt and pulley area.
The number of fasteners varies. Hoover’s general belt guidance, for example, notes that some designs use six screws while others use eight.
Other vacuums use latches, locking tabs, or removable access doors instead. Never force a cover that still feels attached.
Expert Alert: If you find melted wiring, a damaged power cord, a loose electrical connection, or visible motor damage, stop using the vacuum. Those repairs are better handled by a qualified appliance technician.
How Do I Replace a Vacuum Belt Step by Step?
For a typical belt-driven upright vacuum, replacement follows seven basic steps. Your owner’s manual should override these instructions if your machine uses a different system.
1. Disconnect the vacuum from power
Unplug a corded vacuum before opening the floor head. For a cordless machine with a removable battery, remove the battery when the manufacturer instructs you to do so.
Do not work around the brush roll while the vacuum can start unexpectedly.
2. Turn the vacuum over and remove the bottom plate
Place the vacuum on a stable floor or work surface. Remove the screws, clips, or locking plate that covers the brush roll.
Keep every screw in one place. Some machines use different screw lengths in different positions.
3. Lift out the brush roll
Note how both brush-roll end caps sit in the vacuum body before lifting the roller. A quick phone photo can make reassembly easier.
Remove hair, string, and fibers wrapped around the roller. Check that its ends move normally rather than feeling seized or gritty.
4. Remove the old belt
Slide the belt off the brush roll and motor pulley. If it has snapped, remove every loose piece from the floor head.
Look for black rubber dust around the pulley. Heavy deposits can suggest that the old belt was slipping or rubbing.
5. Install the replacement belt
Follow your model’s routing instructions. On many simple uprights, one end loops over the motor shaft while the other fits around the belt section of the brush roll.
The new belt may feel tighter than the old one. That is normal for many stretch-belt designs, but excessive force can indicate the wrong part.
6. Reinstall and align the brush roll
Pull the roller into its mounting slots while keeping the belt properly seated. Make sure both end caps sit fully in their original positions.
Turn the roller several complete rotations by hand. The belt should track smoothly instead of walking sideways or twisting.
7. Replace the cover and test
Reinstall the bottom plate and all fasteners. Turn the vacuum upright before reconnecting power.
Run it briefly and listen for smooth brush-roll operation. Stop immediately if you hear grinding, see smoke, or smell strong burning rubber.
Section Takeaway: Correct belt routing and brush-roll alignment matter as much as installing the new belt itself. Always rotate the roller manually before powering the vacuum.
Do All Vacuum Belts Get Replaced the Same Way?
No. The basic idea is similar, but vacuum designs differ enough that model-specific instructions matter.
A conventional upright often has a simple stretch belt. A powered canister nozzle, carpet cleaner, cordless floor head, or clutch-equipped upright may use a different drive system.
Common vacuum belt designs
| System | Typical characteristics | Replacement caution |
|---|---|---|
| Stretch belt | Smooth rubber belt stretched between pulley and brush roll | Use the exact size because tension is part of the drive system |
| Flat non-stretch belt | Maintains a more fixed length | Routing and compatibility are especially important |
| Cogged or toothed belt | Teeth engage matching gears or pulleys | Teeth must seat correctly instead of riding over the gear |
| Power-nozzle belt | Located inside a separate powered floor head | Access method varies widely by nozzle design |
| Multi-belt system | More than one belt may drive brushes, pumps, or related parts | Do not assume both belts follow the same routing |
Modern cordless and robot vacuums can be different again. Some use direct-drive brush motors rather than a user-serviceable belt.
If you cannot clearly identify a replaceable belt, check the manual before opening the nozzle further.
Why Does My New Vacuum Belt Slip, Smell, or Break?
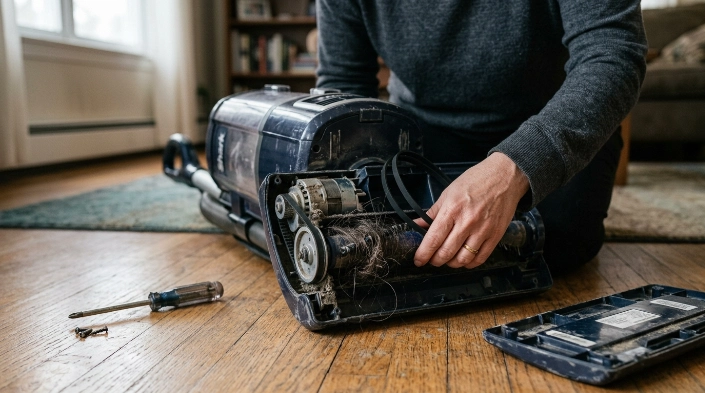
A new belt should not repeatedly slip or fail. If it does, the underlying problem may be the roller, pulley, installation, or belt selection rather than the replacement belt itself.
The replacement belt is wrong
A belt that is too large may slip. One that is too small can place excessive tension on the roller and drive system.
Confirm the vacuum model and belt part number instead of matching by appearance.
The brush roll is jammed
Hair can pack tightly around the ends of a brush roll. Thread and carpet fibers can create the same problem.
The motor may still try to move the belt against the stuck roller. That friction can create heat and a rubber smell.
- Remove wrapped debris: Clear both the bristle area and roller ends.
- Check movement: With power disconnected, verify that the roller turns as your model’s design allows.
- Inspect end caps: Make sure they are seated in the correct orientation.
The belt is twisted or off-center
A belt should sit squarely in its intended track. A twisted belt can rub the housing and wear quickly.
Rotate the brush roll by hand several times before installing the cover. Watch whether the belt stays centered.
The pulley or brush roll is damaged
A rough pulley, seized bearing, distorted roller, or damaged belt track can destroy replacement belts. Repeated failures deserve more investigation.
Expert Alert: Stop using the vacuum if the motor shaft is loose, the housing is melted, electrical components look damaged, or a burning smell remains after the belt area is cleared. Have a qualified repair technician inspect it.
Routine maintenance can prevent some repeat failures. Consumer Reports also recommends unplugging the vacuum before maintenance and checking components that affect long-term vacuum life in its vacuum maintenance guidance.
Should I replace a vacuum belt on a schedule?
There is no single replacement interval that applies to every vacuum. Belt type, model design, carpet load, hair buildup, and usage all affect wear.
As of 2026, my practical approach is to follow the manufacturer’s maintenance schedule and inspect the belt whenever the brush-roll area is already open. Replace it when the manual calls for replacement or when you see clear wear, stretching, damage, or performance problems.
Section Takeaway: If a replacement belt fails again quickly, do not keep installing belts. Find the cause, especially a jammed roller, incorrect part, bad alignment, or damaged drive component.
Frequently Asked Questions About Vacuum Belts
Can I replace a vacuum belt myself?
Yes, many basic upright vacuum belts are designed for straightforward owner replacement. Disconnect the vacuum from power first and follow the model-specific manual. If replacement requires opening electrical housings or working around damaged wiring, use a qualified repair technician instead.
Can I use any vacuum belt that fits?
No. A belt can appear to fit yet have the wrong width, length, elasticity, or tooth pattern. Use the belt part number or compatibility list specified for your exact vacuum model whenever possible.
Why is my new vacuum belt so tight?
Some stretch-style belts are intentionally tighter than the worn belt they replace. However, you should not assume extreme tension is normal. Recheck the part number and installation instructions if the brush roll is exceptionally difficult to reinstall.
Will a vacuum still have suction with a broken belt?
Often, yes. The suction motor and brush-roll drive can perform separate jobs. A vacuum may still pull air while a broken belt prevents the brush from agitating carpet, which can make pickup noticeably worse on rugs and carpeted floors.
Why does my vacuum smell like burning rubber?
A slipping belt or jammed brush roll is a common possibility. Turn the vacuum off, disconnect power, and inspect the floor head. Do not continue running the machine if the smell persists or if you find melting, smoke, wiring damage, or motor problems.
Should I clean the brush roll when replacing the belt?
Yes. Removing hair, thread, and fibers helps the roller move normally and reduces unnecessary load on the new belt. Check around both ends of the roller as well as the bristle section.
Does maintaining the vacuum matter for household dust?
Yes. A working vacuum is part of routine dust control, although vacuuming can also stir particles into the air temporarily. The U.S. Environmental Protection Agency’s indoor dust guidance recommends regular cleaning and notes that high-efficiency filtration can help limit some vacuumed dust from escaping back into the room.
The main rule is simple: disconnect power, use the exact belt for your model, clean and inspect the brush roll, and confirm smooth alignment before switching the vacuum back on.
If your vacuum still struggles after a correct belt replacement, check for airflow blockages, dirty filters, brush-roll damage, or a mechanical problem before replacing the belt again.
