
How Do I Clean a Blocked Vacuum Filter?

Quick Answer
To clean a blocked vacuum filter, switch the vacuum off and unplug it or remove its battery first. Take out the filter, remove loose dust, then wash it only if your model says the filter is washable. Let a washed filter air-dry completely before reinstalling it; manufacturers such as Dyson provide model-specific filter-care instructions.
Quick cleaning steps
- Power down: Unplug the vacuum or remove its battery.
- Remove the filter: Check your manual if the location or release method is unclear.
- Remove loose dust: Gently tap the filter over a trash bin, preferably outdoors.
- Check washability: Never assume a HEPA or pleated filter can be rinsed.
- Clean correctly: Rinse washable filters according to the manufacturer’s instructions.
- Dry completely: Do not reinstall a damp filter.
If airflow is still weak
- Check the whole airflow path: A clogged hose, full dust cup, blocked wand, tangled brush roll, or worn filter can cause the same low-suction symptoms.
A blocked vacuum filter can turn a normally strong cleaner into a noisy machine with disappointing suction. The good news is that filter maintenance is usually straightforward once you know whether your particular filter is washable.
My rule for vacuum troubleshooting is simple: start with airflow before assuming the motor has failed. This 2026 guide explains how to clean the filter safely, identify filters that shouldn’t get wet, and prevent the same blockage from coming back.
In This Guide
How Can I Tell If My Vacuum Filter Is Blocked?
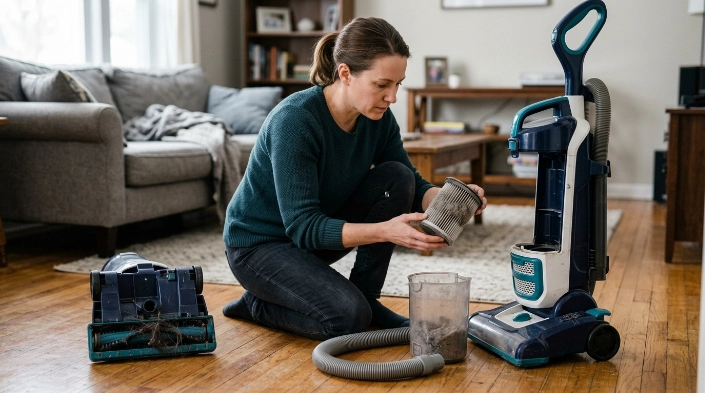
A blocked vacuum filter is a filter whose pores or surface have accumulated enough dust, hair, lint, or fine debris to restrict normal airflow. The restriction can reduce cleaning performance and make the vacuum work harder.
Don’t judge the filter by appearance alone. Look at the vacuum’s behavior as well.
Common signs of a clogged filter
- Reduced suction: The vacuum still runs, but dirt needs repeated passes.
- Weak airflow at the hose: Air movement feels noticeably lower than usual.
- Unusual operating sound: The motor may sound different when airflow is restricted.
- Filter warning: Some cordless vacuums display a filter or airflow alert.
- Dust-covered filter: The filter surface may look gray, packed, or coated with fine debris.
- Unexpected shutdown: Some machines can stop when overheating or airflow problems occur.
A dirty filter isn’t the only cause of poor suction. A full dust bin, blocked hose, clogged wand, tangled brush roll, or obstruction near the cleaner head can produce similar symptoms.
I therefore treat the filter as one part of the entire airflow system. If cleaning it doesn’t restore suction, check the rest of that path before assuming something electrical has failed.
The U.S. Environmental Protection Agency’s indoor air quality resources also explain why household particles and indoor pollutants matter. Keeping a vacuum’s filtration system properly maintained helps the machine handle collected dust as its manufacturer intended.
What Should I Do Before Cleaning the Filter?
First, disconnect the vacuum from power. Unplug a corded model and remove the removable battery from a cordless model when possible.
Next, identify the exact filter you are handling. One vacuum can contain several filters with completely different cleaning requirements.
Check these details first
- Filter location: It may sit above the dust cup, below it, behind the motor, or near an exhaust cover.
- Filter material: Common designs include foam, felt, mesh, pleated media, and HEPA-style filters.
- Washable marking: Look for wording such as “washable,” “rinse,” or manufacturer cleaning instructions.
- Replacement-only instructions: Some filters must never be rinsed.
- Drying requirement: Washable filters generally need to be completely dry before reuse.
This distinction matters. For example, BISSELL instructions for some models allow washing the pre-motor filter but specifically say the post-motor filter should not be washed.
You can see this model-dependent approach in BISSELL’s CleanView filter guidance. Your own vacuum’s manual should take priority over generic cleaning advice.
Expert Alert: If the vacuum smells burnt, sparks, has damaged wiring, repeatedly trips a breaker, or has liquid inside the motor housing, stop using it. Those problems need qualified electrical or appliance repair rather than routine filter cleaning.
How Do I Clean a Blocked Vacuum Filter Step by Step?
For most vacuums, the safest process is to remove dry debris first and introduce water only when the manufacturer allows it. That prevents an ordinary maintenance job from damaging a replacement-only filter.
1. Switch the vacuum off and isolate the power
Unplug the machine before opening filter compartments. For cordless models, remove the battery if the design allows easy battery removal.
2. Empty the dust cup or replace the bag
A packed dust container restricts airflow and can quickly load the filter again. Empty it before judging whether filter cleaning solved the problem.
If your bagged vacuum uses a disposable bag, check how full it is. Replace it when required by the manufacturer.
3. Remove the filter carefully
Open the filter compartment without forcing clips or covers. Note which direction the filter faces so you can reinstall it correctly.
If several filters are stacked together, separate only the parts the manual says can be separated.
4. Remove loose dry debris
- Take the filter outdoors when practical.
- Hold it over a trash bin.
- Tap it gently to release loose dust.
- Use your fingers to remove visible hair or lint.
- Avoid crushing, aggressively brushing, or deforming delicate pleats.
This dry-cleaning step may be all a non-washable filter needs. If dirt remains deeply embedded and airflow stays poor, replacement may be safer than aggressive cleaning.
5. Wash the filter only if it is approved for washing
Follow the manual’s water temperature and detergent instructions. Requirements vary between brands and even between filters inside the same vacuum.
For example, some manufacturers specify water only. Others permit mild detergent on certain foam filters.
- Use gentle water pressure: Don’t blast delicate filter media with a high-pressure nozzle.
- Rinse thoroughly: Continue according to your model’s instructions until loose dirt is removed.
- Don’t improvise chemicals: Avoid bleach, disinfectants, solvents, fragrance sprays, or degreasers unless expressly approved.
- Don’t scrub fragile pleats: Physical damage can make the filter unsuitable for continued use.
6. Air-dry the filter completely
This is where rushing causes problems. A filter can feel dry on the outer surface while moisture remains deeper inside its material.
Several major vacuum manufacturers specify around 24 hours or longer for certain washable filters. Hoover, for example, lists roughly 24–36 hours for some filter-cleaning guidance, while Dyson specifies at least 24 hours for its washable cordless filters.
- Place the filter in a well-ventilated area.
- Keep it away from open flames.
- Don’t put it in a microwave.
- Don’t reinstall it while damp.
- Follow your model’s stated minimum drying time.
7. Reinstall and test the vacuum
Put every filter back in its correct position. Make sure covers, dust cups, seals, and latches sit properly.
Run the vacuum briefly on a normal surface. If suction remains weak, inspect the hose, wand, inlet passages, brush roll, and cleaner head for another obstruction.
Section Takeaway: Clean loose debris first, wash only filters specifically designed for washing, and never reinstall a damp filter. If suction stays weak afterward, continue checking the complete airflow path.
Can Every Vacuum Filter Be Washed?
No. A filter’s appearance doesn’t reliably tell you whether water is safe, so the model manual is the deciding source.
This is especially important with HEPA filtration. “HEPA” describes filtration performance rather than a universal cleaning method.
| Filter type | Typical cleaning approach | Can it be washed? | Main caution |
|---|---|---|---|
| Foam pre-filter | Tap out debris; rinse when permitted | Often, but model-dependent | Must dry completely |
| Felt filter | Tap or rinse only as instructed | Model-dependent | Can lose shape if handled roughly |
| Pleated filter | Gentle tapping or manufacturer-approved cleaning | Some are washable; others are not | Water can damage non-washable media |
| HEPA/post-motor filter | Follow exact model instructions | Varies widely | Never assume “HEPA” means washable |
| Mesh screen | Brush or wipe debris away as directed | Depends on assembly | May be attached to non-washable components |
When should I replace instead of clean?
Cleaning isn’t meant to make a worn filter last forever. Replace the filter when its manufacturer says it has reached its service limit or when cleaning no longer restores it.
- Torn media: Holes or splits mean the filter should not stay in service.
- Damaged pleats: Crushed or separated material may not function as intended.
- Permanent heavy loading: Embedded debris remains after approved cleaning.
- Distorted foam: The filter no longer fits its housing correctly.
- Persistent odor: A clean, dry filter still smells unpleasant.
- Manufacturer replacement interval: Follow it when your model specifies one.
Indoor allergens can include dust mites, pollen, mold, and pet-related material. The Asthma and Allergy Foundation of America recommends regular household cleaning as part of controlling indoor allergens.
A filter that is damaged or incorrectly fitted shouldn’t be treated as “good enough.” Install the correct replacement specified for your machine.
Section Takeaway: Washability depends on the exact filter and vacuum model. Check the manual first, because one machine can contain both washable and replacement-only filters.
How Do I Stop My Vacuum Filter From Blocking Again?
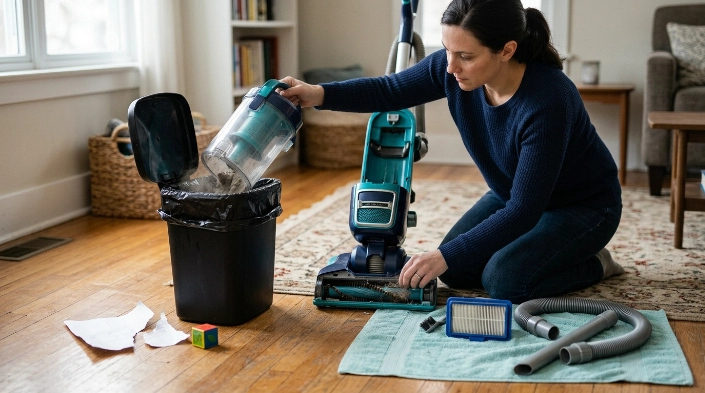
A filter will always collect some fine material because that’s part of its job. The goal is to prevent excessive loading that chokes airflow earlier than necessary.
Empty the bin before it is packed solid
Don’t keep vacuuming with debris compressed to the top of the dust cup. Empty the container at its fill line or according to the manufacturer’s instructions.
Check the filter on a routine schedule
Your manual should set the main maintenance schedule. Heavy pet hair, fine dust, renovation debris, or frequent vacuuming may justify more frequent visual checks.
Shark’s current upright vacuum maintenance guidance, for example, combines filter care with checking the dust cup, brush roll, sensors, and other blockages. That whole-machine approach makes sense for any vacuum.
Remove large debris before vacuuming
Pick up objects that can clog narrow airways before you start. Large paper scraps, small toys, clumps of material, and similar items belong in the trash rather than the vacuum.
Watch fine construction dust
Ordinary household vacuums may not be designed for large amounts of drywall, plaster, fireplace ash, or construction debris. Fine material can load filters rapidly.
Use equipment and filtration designed for the material you’re collecting. Never vacuum hot ash or hazardous dust with an ordinary household vacuum.
Keep the rest of the cleaning system maintained
- Cut wrapped hair from the brush roll.
- Inspect removable hoses for compacted debris.
- Check the wand for blockages.
- Clean seals and dust-cup mating surfaces as instructed.
- Make sure filters are seated correctly.
- Replace worn filters with the correct type.
Regular cleaning also limits the amount of settled household material available to be picked up repeatedly. For broader home-cleaning guidance, the CDC’s household hygiene resources explain practical cleaning principles for household environments.
Don’t clean the filter more aggressively than necessary
More cleaning isn’t always better. Hard brushing, compressed air at close range, harsh chemicals, or high heat can damage filter media that was designed for gentler maintenance.
Use the least aggressive approved method that removes the blockage. Replace a filter when cleaning requires more force than its material can safely tolerate.
Section Takeaway: Prevent repeat blockages by maintaining the entire airflow path, emptying the dust container promptly, and following the filter schedule for your exact model.
Frequently Asked Questions
Can I wash a vacuum HEPA filter?
Only if the vacuum manufacturer specifically says that HEPA filter is washable. Some HEPA or post-motor filters can be rinsed, while others must remain dry and eventually be replaced.
How long should a vacuum filter dry after washing?
Follow the stated time for your model. Several manufacturers specify at least 24 hours for certain washable filters, and some instructions call for longer; the important requirement is that the filter is completely dry before installation.
Can I put a vacuum filter in a dryer?
Don’t use a tumble dryer, microwave, oven, open flame, or another high-heat shortcut unless the manufacturer specifically permits it. Air-drying is the standard approach for many washable vacuum filters.
Can I use soap to clean a vacuum filter?
It depends on the filter. Some manufacturers specify water only, while instructions for certain foam filters permit mild detergent, so follow the care directions for your exact vacuum instead of using one rule for every filter.
Why is my vacuum still losing suction after I cleaned the filter?
Check the dust cup or bag, hose, wand, cleaner head, brush roll, seals, and internal airflow passages. The problem may be another blockage, an incorrectly seated filter, or a filter that now needs replacement.
How often should I clean my vacuum filter?
There is no single interval for every vacuum. Some manufacturers recommend monthly checks or cleaning for particular filters, but usage level, filter type, and model design all affect the correct schedule.
What happens if I reinstall a wet vacuum filter?
A damp filter can interfere with proper airflow and may allow moisture into areas that should remain dry. Leave a washable filter out until it meets the manufacturer’s drying requirement and feels completely dry.
Final Takeaway
Cleaning a blocked vacuum filter is usually simple: disconnect the power, remove loose debris, confirm whether the filter is washable, clean it using the approved method, and let it dry fully. Never rinse a filter just because another vacuum uses a washable one.
If cleaning doesn’t restore airflow, inspect the rest of the vacuum for blockages and consider whether the filter needs replacement. A few minutes of correct maintenance can often solve a suction problem without unnecessary disassembly.
