Can You Make Your Own Air Purifier? Genius & Essential!
Yes, you absolutely can make your own air purifier! This guide explores effective DIY methods using readily available materials, offering a cost-effective and empowering way to improve your indoor air quality.
Breathing clean air is fundamental to our well-being, yet indoor air can often be significantly more polluted than outdoor air. Dust, allergens, pet dander, and even volatile organic compounds (VOCs) can accumulate, impacting our health and comfort. Many people wonder if they can create their own solutions, and the answer is a resounding yes! This article will guide you through the process of making your own air purifier, a genius and essential step towards a healthier home.
The Ingenuity of DIY Air Purification
Can you make your own air purifier? The answer is a definitive yes, and it’s a surprisingly accessible project for most people. Building your own air purifier allows for customization, cost savings, and a deeper understanding of air filtration principles. It’s a smart way to take control of your home’s air quality.
This approach leverages readily available components to create a functional device that can significantly reduce airborne pollutants. You’ll gain satisfaction from a hands-on project that directly benefits your health.
Why Consider a DIY Air Purifier?
Commercial air purifiers can be expensive, and their filter replacement costs add up. A DIY version offers a budget-friendly alternative, allowing you to achieve similar results without the recurring financial burden. It’s a practical solution for those seeking to improve their indoor environment affordably.
This empowers you to manage your home’s air quality proactively. You can tailor the design to your specific needs and the size of your space.
Understanding the Core Components of an Air Purifier
At its heart, any air purifier, whether store-bought or DIY, relies on a few key components to function. These elements work in synergy to capture and remove contaminants from the air you breathe. Understanding these parts is crucial for building your own effective unit.
Knowing these basics will demystify the process. It’s less complicated than you might think to assemble a working air cleaner.
The Fan: The Air Mover
The fan is the engine of your air purifier, responsible for drawing air into the unit and pushing it through the filtration system. The size and power of the fan will determine how much air your DIY purifier can process. A computer fan or a box fan are common choices for DIY projects.
Selecting the right fan is essential for efficient air circulation. Ensure it’s powerful enough for the space you intend to purify.
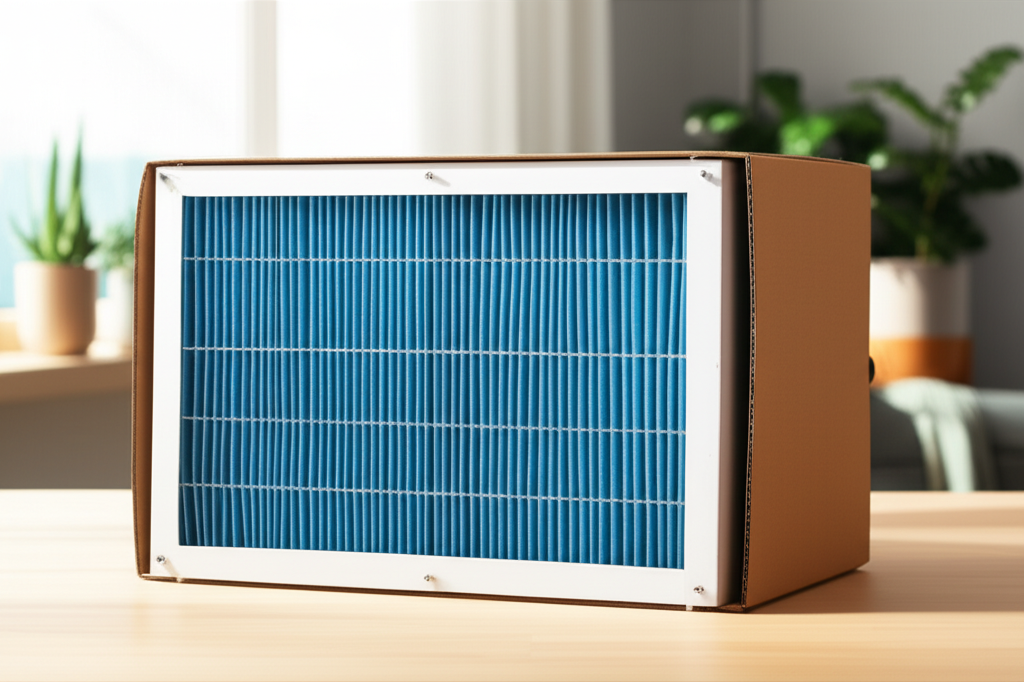
The Filter: The Contaminant Catcher
The filter is where the magic happens – it’s the part that traps airborne particles. For DIY purifiers, High-Efficiency Particulate Air (HEPA) filters are the gold standard. They are designed to capture at least 99.97% of particles 0.3 microns in size, including dust, pollen, mold spores, and bacteria.
Choosing the appropriate filter is paramount for effective purification. HEPA filters offer the best performance for capturing microscopic irritants.
The Housing: The Structure
The housing, or enclosure, is what holds the fan and filter together, directing the airflow effectively. This can be as simple as a cardboard box or a more robust plastic bin. The goal is to create a sealed system where air is forced through the filter and not around it.
A well-designed housing ensures that air is efficiently channeled through the filter. This maximizes the purifier’s effectiveness.
The Box Fan & HEPA Filter Method: A Popular DIY Choice
This is arguably the most straightforward and popular method for creating a DIY air purifier. It requires minimal tools and readily available materials, making it an excellent starting point for beginners. You can assemble this effective unit in under an hour.
This method is a fantastic way to get started with DIY air purification. It’s efficient, cost-effective, and easy to build.
Materials You’ll Need
Gathering the right materials is the first step towards building your box fan air purifier. Having everything on hand makes the assembly process smooth and enjoyable. This project is designed to be accessible and budget-friendly.
Here’s a list of what you’ll need for this popular DIY air purifier:
- One 20-inch box fan
- One 20×20 inch HEPA filter (MERV 13 or higher is also a good option if HEPA is unavailable or too expensive)
- Duct tape or strong packing tape
- Optional: Cardboard for a shroud or additional seals
These simple items are widely available at hardware stores and online retailers. They form the foundation of your effective air cleaning device.
Step-by-Step Assembly
Follow these simple steps to construct your DIY air purifier. The process is designed to be intuitive and requires no specialized skills. You’ll be amazed at how quickly you can have a working air cleaner.
Let’s get building your effective DIY air purifier:
- Prepare the Fan: Ensure your box fan is clean and in good working order.
- Attach the Filter: Place the HEPA filter against the back of the box fan. Ensure the airflow arrow on the filter points in the direction of the fan’s airflow (usually towards the front of the fan).
- Seal the Edges: Use duct tape to create a tight seal around the edges where the filter meets the fan. This is crucial to prevent air from bypassing the filter.
- Reinforce (Optional): For a better seal and improved airflow direction, you can create a cardboard shroud around the filter and fan. This helps direct air more efficiently through the filter.
- Test: Plug in the fan and turn it on a low setting. You should feel air being drawn through the filter and expelled from the front.
Congratulations, you’ve just made your own air purifier! It’s a simple yet powerful addition to your home’s air quality management.
The Corsi-Rosenthal Box: A Super-Efficient DIY Solution
For those looking for even greater filtration power, the Corsi-Rosenthal box is a highly effective DIY air purifier. This design uses multiple HEPA filters to dramatically increase the surface area for air filtration, making it exceptionally efficient. It’s a testament to ingenious engineering with simple materials.
This advanced DIY design offers superior air cleaning capabilities. It’s a fantastic option for larger rooms or areas with significant air quality concerns.
How the Corsi-Rosenthal Box Works
The Corsi-Rosenthal box typically uses four HEPA filters arranged in a cube formation, with a single box fan placed on top to draw air through all the filters simultaneously. This multi-filter approach significantly boosts the amount of air that can be filtered, leading to faster and more thorough purification.
This innovative design maximizes air intake and filtration. The increased filter surface area means less strain on the fan and longer filter life.
Building Your Corsi-Rosenthal Box
Constructing a Corsi-Rosenthal box involves a bit more assembly than the single-filter box fan method, but the results are well worth the effort. It’s a robust and highly effective air purifier that can rival many commercial units.
Here are the steps to build this powerful DIY air purifier:
- Materials: Four 20x20x1 inch HEPA filters (or MERV 13), one 20-inch box fan, a piece of cardboard (approx. 20×20 inches), duct tape, and a box cutter or scissors.
- Assemble the Filter Cube: Stand the four HEPA filters on their edges to form a cube, with the airflow arrows pointing inward. Tape the filters together securely at the seams.
- Create the Base: Cut the cardboard to fit the bottom of the filter cube. Tape it securely to seal the bottom.
- Mount the Fan: Place the box fan on top of the filter cube, ensuring it’s centered and positioned to draw air upwards.
- Seal the Fan: Use duct tape to create a tight seal between the fan and the top edges of the filters. You can also create a cardboard shroud around the fan to direct airflow more efficiently.
- Test: Turn on the fan. You should feel air being pulled through the filters and pushed out by the fan.
The Corsi-Rosenthal box is a testament to the power of DIY innovation in improving indoor air quality. It’s a project that truly delivers on its promise.
Filter Choices and Their Effectiveness
When making your own air purifier, the type of filter you choose is paramount to its performance. Not all filters are created equal, and understanding their capabilities will help you select the best option for your needs and budget.
The right filter is the key to capturing the pollutants you want to remove. Let’s explore the common filter types and their strengths.
HEPA Filters
As mentioned, HEPA (High-Efficiency Particulate Air) filters are the most effective for capturing small particles. They are certified to remove 99.97% of airborne particles 0.3 microns in size. This makes them ideal for allergies, asthma, and general air quality improvement.
For maximum particle capture, HEPA filters are the undisputed champions. They are the go-to for serious air purification.
MERV Rated Filters
MERV (Minimum Efficiency Reporting Value) is a rating system used for furnace and HVAC filters. MERV 13 filters, for example, are quite effective at capturing smaller particles like bacteria and virus carriers, and are often more affordable and accessible than true HEPA filters.
MERV 13 filters offer a good balance of performance and cost for DIY air purifiers. They are a practical choice for many users.
Activated Carbon Filters
While HEPA and MERV filters excel at capturing particles, activated carbon filters are designed to adsorb gases and odors. These can be used in conjunction with particle filters to tackle VOCs, smoke, and other chemical pollutants.
If odors or chemical fumes are a concern, adding an activated carbon layer is highly recommended. It complements the particle-capturing abilities of other filters.
Optimizing Your DIY Air Purifier’s Performance
Simply assembling the components is a great start, but a few tweaks can significantly enhance your DIY air purifier’s effectiveness. These adjustments focus on maximizing airflow through the filters and ensuring a tight seal to prevent air leakage.
Small improvements can lead to a big difference in air cleaning efficiency. Let’s look at how to get the most out of your creation.
Creating a Seal
Air will always take the path of least resistance. If there are gaps between your filter and the fan housing, air will bypass the filter, reducing its effectiveness. Meticulous taping is essential to create a truly sealed system.
A perfect seal ensures all the air passes through the filter. Don’t underestimate the power of good quality tape and careful application.
Building a Shroud
A shroud is an optional but highly recommended addition. It’s typically made from cardboard and wraps around the filter and fan, creating a more directed airflow. This helps the fan pull air more efficiently through the entire surface area of the filter.
A shroud optimizes airflow, allowing your purifier to work harder. It’s a simple addition that boosts performance significantly.
Placement and Usage
Where you place your DIY air purifier matters. For best results, position it in the room where you spend the most time, away from walls or furniture that could obstruct airflow. Running it on a medium to high setting for several hours a day can be very effective.
Strategic placement ensures your DIY air purifier can effectively clean the air in your living space. Consistent use is key to maintaining clean air.
Maintenance and Filter Replacement
Like any air purification system, your DIY unit will require some maintenance to remain effective. The most important aspect is regular filter replacement, as clogged filters can reduce airflow and filtration efficiency.
Keeping your DIY air purifier in top condition ensures it continues to deliver clean air. Regular maintenance is simple and crucial.
When to Replace Filters
The lifespan of your filters will depend on the air quality in your home and how often you run the purifier. As a general guideline, particle filters (HEPA/MERV) should be replaced every 3-6 months. Activated carbon filters may need replacement more frequently, perhaps every 1-3 months, especially if dealing with strong odors.
Visual inspection is also a good indicator; if the filter looks visibly dirty or clogged, it’s time for a change. Don’t wait too long to replace them for optimal performance.
Cleaning Your DIY Unit
Periodically, you should dust or vacuum the exterior of your DIY air purifier and the fan blades. Ensure the unit is unplugged before cleaning. This will help maintain the unit’s longevity and prevent dust buildup on the fan itself.
Keeping the entire unit clean ensures efficient operation. A little cleaning goes a long way in preserving your DIY air purifier.
Cost-Effectiveness of DIY Air Purifiers
One of the most compelling reasons to make your own air purifier is the significant cost savings. Compared to purchasing commercial units, a DIY approach is remarkably budget-friendly, both in initial setup and ongoing maintenance.
The financial benefits of a DIY air purifier are substantial. It’s an investment in your health that pays for itself quickly.
Initial Investment vs. Commercial Units
A high-quality commercial HEPA air purifier can easily cost anywhere from $100 to $500 or more. In contrast, a DIY box fan purifier typically costs between $30-$60, and a Corsi-Rosenthal box might be around $80-$120, depending on the cost of filters. This makes DIY a far more accessible option for many households.
The upfront savings are undeniable, making clean air achievable for more people. You get comparable or even better performance for a fraction of the price.
Ongoing Costs
The primary ongoing cost for any air purifier is filter replacement. While commercial units often require proprietary and expensive filters, DIY versions can utilize standard, widely available HEPA or MERV filters, which are generally more affordable. This makes long-term ownership much more economical.
The reduced cost of replacement filters means your DIY solution remains budget-friendly over time. You’re not locked into expensive proprietary consumables.
Are DIY Air Purifiers Safe?
Safety is a valid concern when undertaking any DIY project, especially one involving electrical components. However, when built with care and using appropriate materials, DIY air purifiers are generally safe to operate.
With a little attention to detail, your DIY air purifier can be a safe and effective addition to your home. Prioritizing safety during construction is key.
Electrical Safety
Always use fans that are in good working condition and have no frayed cords. Ensure all connections are secure and that the fan is placed on a stable surface. Avoid modifying the fan’s electrical components unless you have the expertise to do so safely.
Treat the fan with respect and ensure it’s always used as intended. Never attempt to bypass safety features or rewire the fan.
Fire Hazards
The primary risk with any electrical appliance is overheating. Ensure the fan has adequate ventilation and is not covered. Never leave a DIY air purifier running unattended for extended periods, especially when you are not home, until you are confident in its safe operation.
Regularly check the fan for any signs of overheating or unusual noises. Proper assembly and supervision minimize fire risks.
When a Commercial Air Purifier Might Be Better
While DIY air purifiers are fantastic, there are situations where a commercial unit might be a more suitable choice. Understanding these differences will help you make the best decision for your specific needs and circumstances.
For all their benefits, DIY solutions aren’t always the perfect fit for every situation. Knowing when to go commercial is also important.
Advanced Features
Commercial air purifiers often come with advanced features like air quality sensors, automatic modes, remote control operation via apps, and specialized multi-stage filtration systems (including UV-C light or ionizers). If these features are important to you, a commercial unit is likely the better option.
These added functionalities can provide convenience and more sophisticated air monitoring. They offer a level of integration that DIY projects typically lack.
Aesthetics and Noise Levels
Many commercial air purifiers are designed with aesthetics in mind to blend seamlessly into home decor. They also often feature quieter operation, especially at lower fan speeds, which can be a significant factor for bedrooms or living areas. DIY units, while functional, may not always be as visually appealing or as quiet.
If a sleek design and whisper-quiet operation are high priorities, a manufactured unit might be more satisfying. The visual and auditory impact of a device in your home is worth considering.
Specific Health Needs
For individuals with severe respiratory conditions, such as advanced COPD or cystic fibrosis, a certified medical-grade air purifier might be necessary. These units are rigorously tested and validated for specific performance standards that DIY solutions may not meet. Consulting with a healthcare professional is advisable in such cases.
When dealing with critical health concerns, relying on certified, medical-grade equipment ensures the highest level of safety and efficacy. Always prioritize professional medical advice.
FAQ: Your DIY Air Purifier Questions Answered
Making your own air purifier can spark a lot of questions. Here are answers to some of the most common ones beginners ask, designed to give you confidence in your DIY journey.
Here’s a quick rundown of frequently asked questions about building your own air purifier.
Can I use a regular furnace filter instead of a HEPA filter?
Yes, you can use a furnace filter with a high MERV rating (like MERV 13 or higher). While not as effective as true HEPA for capturing the smallest particles, they can still significantly improve air quality and are often more affordable.
How long will a DIY air purifier last?
The lifespan of your DIY air purifier depends on the quality of the fan and how often it’s used. The fan itself could last for years, but the filters will need regular replacement, typically every 3-6 months for particle filters.
Is it noisy to make your own air purifier?
Box fans can be noisy, especially on higher settings. The noise level will depend on the specific fan you use. Some DIY enthusiasts experiment with quieter computer fans or add sound-dampening materials to their enclosures.
Can I add an activated carbon pre-filter to my box fan purifier?
Absolutely! You can often find thin activated carbon pre-filter sheets that can be attached to the intake side of your HEPA filter. This will help capture odors and VOCs in addition to particles.
Where is the best place to buy filters for a DIY air purifier?
Online retailers like Amazon, Home Depot, Lowe’s, and specialty HVAC supply stores are great places to find HEPA and high-MERV filters. Buying in bulk can sometimes offer additional savings.
Can I use a smaller fan or a different size filter?
Yes, you can adapt the design. For smaller fans, use smaller filters. The key is to ensure a good seal between the fan and the filter to maximize efficiency. A larger fan with a larger filter surface area will generally clean the air faster.
Conclusion: Breathe Easier with Your Own Creation
So, can you make your own air purifier? The answer is a resounding yes, and it’s an incredibly rewarding and practical endeavor. From the simple yet effective box fan method to the powerhouse Corsi-Rosenthal box, these DIY solutions offer a tangible way to improve your indoor air quality without breaking the bank.
Embracing DIY air purification is a smart, cost-effective, and empowering choice for anyone looking to create a healthier living environment. It’s a testament to how simple materials and a little ingenuity can make a significant difference. You can absolutely make your own air purifier and enjoy cleaner, fresher air in your home starting today!

