
Why Are My Robot Vacuum Sensors Dirty?

Quick Answer
Robot vacuum sensors get dirty because they work only inches above dusty floors, where fine dust, pet hair, fibers, fingerprints, and oily household residue can settle on their exposed windows. Dirty sensors are normal maintenance rather than automatic evidence of a broken robot, and manufacturers such as iRobot recommend regular dry-cloth cleaning of cliff sensors.
The most common reasons sensors get dirty
- Fine floor dust: Lightweight particles become deposited on downward-facing and front sensors.
- Pet hair: Hair and dander can collect around bumper openings and underside sensors.
- Kitchen residue: Fine grease can create a slightly sticky film that traps more dust.
- Carpet fibers: Lint can gather around wheels, bumpers, optical sensors, and brush areas.
- Frequent cleaning: A robot that runs often naturally encounters more dirt between maintenance sessions.
What to do first
- Turn the robot off and gently wipe accessible sensor windows with a clean, dry microfiber or lint-free cloth, following your model’s manual.
I’ve cleaned enough robot vacuums to notice the same pattern: the machine can look fairly clean on top while the small sensors underneath are coated with gray dust. That’s because those sensors operate right where household debris is constantly moving.
Dirty sensors are usually easy to deal with. The bigger question is whether the dirt explains your robot’s behavior or whether something else needs attention.
In This Guide
Why Do Robot Vacuum Sensors Get Dirty?
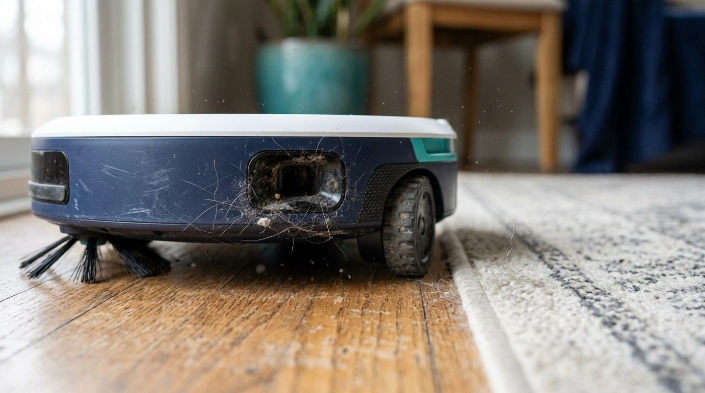
Robot vacuum sensors become dirty mainly because of their location. Many sit underneath or around the front edge of a machine that continuously travels through dust, hair, crumbs, lint, and other floor debris.
The rotating brushes and wheels also disturb fine particles. Some of that material can settle onto nearby sensor windows instead of entering the dustbin.
Fine dust creates the most common coating
Fine dust can be difficult to notice on the floor, but it becomes obvious on a glossy black sensor window. After several runs, I often see a pale gray haze rather than a thick layer of visible dirt.
That thin coating matters because many robot sensors depend on optical or infrared signals. Anything covering the exposed window can interfere with a clear path for those signals.
- Hard floors: Fine dust moves easily across tile, laminate, vinyl, and wood.
- Carpet: Fibers, lint, hair, and embedded dust can be disturbed as the robot moves.
- Entryways: Outdoor grit and fine debris enter on shoes and pet paws.
- Under furniture: Dust often collects where normal manual cleaning happens less often.
Pet homes can create faster buildup
Pet hair is obvious, but dander and fine debris are easier to miss. A robot that runs daily around shedding pets may therefore need more frequent inspection.
Long hair can also collect near the bumper and wheels. That debris may not cover a sensor directly, yet it can interfere with surrounding moving parts.
Kitchen floors can leave a sticky film
Kitchen dust sometimes behaves differently from bedroom dust. Tiny amounts of airborne cooking residue can settle on surfaces and make later dust cling more firmly.
I notice this when a sensor doesn’t wipe completely clean on the first gentle pass. The robot itself may also feel slightly tackier around its front edge.
A dusty sensor does not mean your home is unusually dirty
Robot vacuums operate closer to the floor than almost any other household appliance. Seeing dirt on the sensors is therefore expected maintenance, especially when the machine runs several times each week.
The goal isn’t to keep every sensor spotless every day. It is to stop buildup becoming heavy enough to contribute to navigation or detection problems.
Section Takeaway: Dirty robot vacuum sensors are usually the result of normal exposure to floor-level dust, hair, fibers, and residue. Their location makes gradual buildup hard to avoid.
What Do Robot Vacuum Sensors Do?
A robot vacuum sensor is an electronic component that helps the machine detect its surroundings, position, floor conditions, obstacles, dock, or operating state. A single robot can use several different sensor technologies at the same time.
Sensor layouts vary significantly between models. Your owner’s manual should always take priority when identifying a component.
| Sensor Type | Common Location | Main Job | Possible Dirty-Sensor Clue |
|---|---|---|---|
| Cliff sensor | Underside near edges | Detects stairs or sudden drops | Unexpected stopping or cliff warnings |
| Obstacle sensor | Front or bumper area | Helps detect objects and walls | Unusual bumping or avoidance |
| LiDAR navigation sensor | Raised turret or front module | Measures surroundings for mapping | Poor positioning or mapping |
| Camera or optical sensor | Front, top, or underside | Supports navigation or floor tracking | Navigation becomes less consistent |
| Docking sensor | Robot front and/or dock | Helps locate and align with the base | Repeated missed docking attempts |
Some models also have carpet sensors, dirt-detection sensors, wheel-position sensors, full-bin sensors, or additional optical tracking hardware. That’s why generic diagrams should not replace your model’s documentation.
As of 2026, navigation systems also vary widely between entry-level and advanced robots. Two machines that look similar from above may rely on completely different sensor arrangements.
How Can You Tell if the Sensors Are Dirty or Faulty?
You usually cannot diagnose a failed sensor from strange movement alone. Dust is one possibility, but blocked wheels, a stuck bumper, dark flooring, poor dock placement, map errors, or damaged components can produce similar symptoms.
Cleaning is useful because it is a simple first check. If behavior improves afterward, dirt may have contributed to the problem.
Signs worth checking before assuming a failure
- The robot suddenly reports a cliff or drop-off error.
- It turns repeatedly in an open area.
- It avoids a section of floor it previously cleaned.
- It begins bumping into objects more often.
- It struggles to find or align with its charging dock.
- Mapping becomes inconsistent without an obvious room change.
iRobot’s own troubleshooting information lists dirty cliff sensors as one possible cause of certain drop-detection errors. However, dark surfaces and uneven flooring can also trigger similar behavior.
| Symptom | Could Dirt Contribute? | Also Check |
|---|---|---|
| False cliff warning | Yes | Dark flooring, actual drop, sensor damage |
| Repeated circling | Possibly | Wheel obstruction, bumper, navigation error |
| Poor docking | Possibly | Dock position, charging contacts, obstacles |
| Bad mapping | Possibly | Map data, moved dock, lighting, blocked LiDAR |
One habit has saved me from unnecessary troubleshooting: I clean the visible sensors before resetting maps or changing settings. It takes only a few minutes and removes one obvious variable.
If the robot remains unreliable around stairs, don’t test it beside an open drop. Use a flat area until you know its cliff-detection system is behaving normally.
Section Takeaway: Strange navigation can point to dirty sensors, but it does not prove a sensor problem. Clean first, then check wheels, bumpers, flooring, docking conditions, maps, and model-specific error guidance.
How Should You Clean Dirty Robot Vacuum Sensors?
The safest general starting point is a clean, dry microfiber or lint-free cloth. Roborock’s maintenance guidance, for example, instructs owners of several models to wipe sensors using a dry, lint-free cloth.
Don’t assume every component can be cleaned the same way. Sensor windows, charging contacts, brushes, and filters may each have different care instructions.
Safe basic cleaning steps
- Stop the cleaning cycle. Turn the robot off according to its manual.
- Use a stable surface. Put the robot on a clean table, floor, or soft towel.
- Check the manual. Identify the sensor locations for your exact model.
- Remove loose debris. Clear visible hair or lint without pushing it into openings.
- Wipe exposed sensor windows. Use a clean, dry microfiber or lint-free cloth with light pressure.
- Inspect the bumper. Make sure trapped debris is not stopping normal movement.
- Return the robot upright. Place it on a clear, flat floor.
- Run a short test. Watch its movement before restarting an unattended schedule.
What should you avoid?
- Don’t spray household cleaner directly onto sensors.
- Don’t flood recessed openings with water.
- Don’t scrape sensor windows with metal tools.
- Don’t force a LiDAR turret or bumper mechanism.
- Don’t dismantle electronic sensor assemblies unless approved service instructions require it.
- Don’t assume alcohol or glass cleaner is safe for every optical surface.
Cleaning should feel gentle. If visible dirt will not come off with the method your manufacturer approves, check the manual before trying a stronger cleaner.
Expert Alert: If a sensor housing is cracked, loose, water-damaged, or still produces errors after approved cleaning and troubleshooting, contact the manufacturer or a qualified appliance technician instead of opening sensitive electronics.
Section Takeaway: Sensor maintenance is usually a wiping job, not a deep-cleaning job. Dry, gentle cleaning and model-specific instructions reduce the chance of creating a new problem while trying to fix the old one.
How Often Should You Clean Sensors and Prevent Buildup?

There is no single cleaning interval that applies to every robot vacuum. Manufacturer schedules differ, and homes with pets, heavy dust, frequent cooking, or daily robot use may need more frequent inspection.
For one useful reference point, iRobot lists monthly cliff-sensor care for certain Roomba i Series models. Treat that as model-specific guidance rather than a rule for every brand.
A practical inspection routine
- After unusually dusty cleaning: Look underneath for visible coating or fibers.
- When navigation changes: Inspect sensors before making major settings changes.
- During regular maintenance: Check sensors when cleaning brushes, wheels, and the dustbin.
- Before troubleshooting errors: Remove obvious dust so you are testing a clean system.
I prefer inspection over blindly following a calendar. A robot working daily in a pet-heavy home can collect debris faster than one running twice weekly in a low-dust apartment.
Reduce the amount of dirt reaching the robot
You cannot prevent sensor dust completely, but you can reduce unnecessary buildup. Basic floor and robot maintenance helps.
- Keep long hair and cords off the floor before a cleaning run.
- Empty the dustbin before it becomes tightly packed.
- Remove hair wrapped around wheels and brush ends.
- Keep the charging dock area reasonably dust-free.
- Clean heavy crumbs or sticky spills before sending the robot through them.
- Maintain filters according to the manufacturer’s instructions.
Why do my sensors get dirty again so quickly?
Fast buildup usually reflects the robot’s environment or cleaning frequency. Fine dust near entrances, shedding pets, carpets, construction dust, or greasy kitchen residue can all increase what reaches the sensor surfaces.
If your robot also starts moving strangely, eufy’s troubleshooting guidance is a good example of the broader approach: clean the sensors, check the bumper and wheels for debris, and restart the machine.
Sensor maintenance is only one part of robot vacuum care. Consumer Reports’ vacuum-cleaner section also provides broader information on robotic and conventional vacuum ownership.
Section Takeaway: Check sensors as part of routine robot maintenance and whenever behavior changes. Homes with more dust, hair, fibers, or frequent robot use may need more frequent cleaning.
Frequently Asked Questions
Can dirty sensors stop a robot vacuum from working?
They can contribute to certain errors or navigation problems because some sensors need an unobstructed optical path. However, stopping, circling, poor docking, or false cliff warnings can also come from wheels, bumpers, flooring, software, maps, or damaged components.
Why are my robot vacuum cliff sensors always dusty?
Cliff sensors are usually mounted underneath the robot, close to the floor. Fine dust disturbed by brushes and wheels can gradually settle on their exposed windows, so some recurring buildup is normal.
Can I clean robot vacuum sensors with a wet cloth?
Use moisture only when your exact manufacturer’s instructions approve it for that component. A clean, dry microfiber or lint-free cloth is the safer general starting point for many exposed sensor windows.
Can I use alcohol on robot vacuum sensors?
Don’t use alcohol automatically. Optical plastics, coatings, adhesives, and sensor designs vary, so follow the cleaning products and methods specifically approved for your model.
Why does my robot still show a sensor error after cleaning?
The sensor may not have been the true cause. Check the manufacturer’s error instructions, floor conditions, wheels, bumper movement, navigation hardware, dock placement, maps, and any visible physical damage before assuming the sensor itself has failed.
Do pet owners need to clean robot sensors more often?
Possibly. Pet hair, dander, tracked-in debris, and more frequent vacuum schedules can increase how quickly material accumulates around the robot’s underside, wheels, bumper, and exposed sensors.
Should I replace a robot vacuum sensor if it looks dirty?
No. Visible dirt alone is not a reason to replace a sensor. Clean it using the approved procedure first, then follow model-specific troubleshooting if an error or navigation problem continues.
What Is the Final Takeaway?
If you’re asking, “Why are my robot vacuum sensors dirty?” the simplest answer is that they spend their working life extremely close to the dirtiest surface in your home. Fine dust, hair, lint, and residue naturally reach them over time.
Start with gentle cleaning instead of assuming something has failed. A clean, dry microfiber cloth and your model’s maintenance instructions will handle many routine sensor-cleaning jobs.
Then watch how the robot behaves. If navigation, docking, or cliff detection remains unreliable after proper cleaning, move on to wheels, bumpers, maps, flooring conditions, and manufacturer troubleshooting before considering repair or replacement.
